2017 Nissan Sentra Tail Light
Replacing a tail light on your 2017 Nissan Sentra can seem daunting, but it's often a task you can accomplish yourself with the right tools and a little patience. This guide will provide you with a clear understanding of 2017 Nissan Sentra tail lights, covering everything from bulb types and replacement procedures to troubleshooting common issues and finding the right replacement parts.
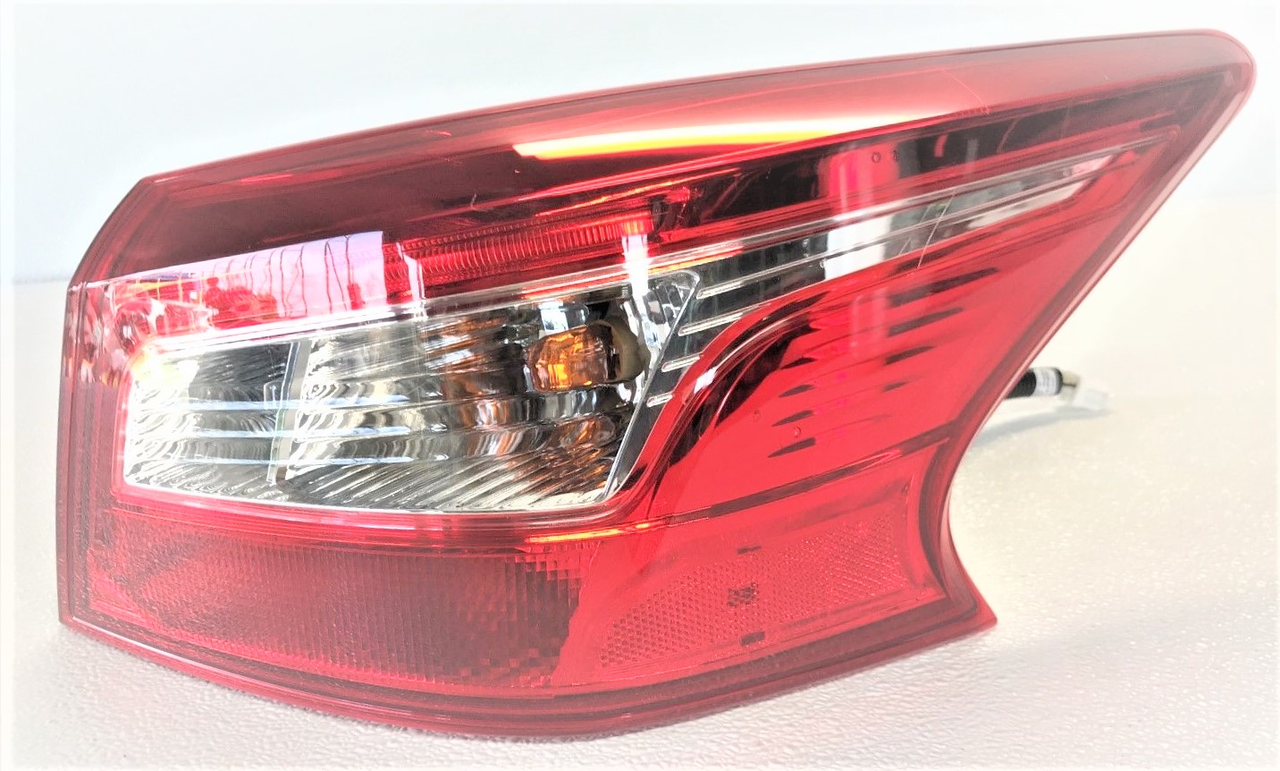
Understanding Your 2017 Nissan Sentra Tail Light Assembly
Before diving into repairs, it's crucial to understand the components of your 2017 Nissan Sentra's tail light assembly. Typically, the assembly includes the following:
- Brake Light: Illuminates when you press the brake pedal.
- Tail Light (Running Light): Stays on whenever your headlights are on, increasing visibility at night and during inclement weather.
- Turn Signal: Flashes to indicate your intention to turn or change lanes.
- Reverse Light: Illuminates when the vehicle is in reverse.
- Side Marker Light: A small light on the side of the assembly, enhancing visibility from the side.
Each of these functions is typically powered by a separate bulb, although some newer assemblies may incorporate LED technology which integrates multiple functions into a single unit. Identifying which bulb is out is the first step in any tail light repair.
Common Bulb Types for the 2017 Nissan Sentra Tail Light
The 2017 Nissan Sentra typically uses specific bulb types for its tail light functions. While it's always best to consult your owner's manual or a reliable auto parts website to confirm the exact bulb specifications for your vehicle, here are some common types you might encounter:
- Brake Light/Tail Light: Usually a dual-filament bulb, such as a 7443 or similar, which allows for both a brighter brake light and a dimmer tail light function.
- Turn Signal: Often an amber 7440 bulb or a similar wedge-base bulb.
- Reverse Light: Typically a 921 bulb or a similar wedge-base bulb, providing bright white illumination.
Always verify the correct bulb type before purchasing a replacement. Using the wrong bulb can result in improper function, damage to the electrical system, or even reduced visibility.
Replacing a 2017 Nissan Sentra Tail Light Bulb: A Step-by-Step Guide
Replacing a tail light bulb on your 2017 Sentra is usually a straightforward process. Here's a general guide:
- Gather Your Tools and Supplies: You'll need the correct replacement bulb(s), a screwdriver (usually a Phillips head), and possibly a socket wrench or pliers, depending on the assembly design. Gloves are also recommended to protect your hands.
- Access the Tail Light Assembly: Open the trunk or liftgate of your Sentra. Look for an access panel or cover on the inside of the trunk, behind the tail light assembly. Remove the panel to expose the back of the tail light.
- Disconnect the Bulb Socket: Locate the socket for the bulb you need to replace. Twist the socket counterclockwise to release it from the tail light assembly. Gently pull the socket straight out.
- Remove the Old Bulb: Depending on the bulb type, it may either twist and lock into the socket or simply pull straight out. Identify the bulb type and remove it accordingly.
- Install the New Bulb: Insert the new bulb into the socket. Ensure it's fully seated and securely locked in place if it's a twist-lock type.
- Reinstall the Socket: Align the socket with the opening in the tail light assembly and twist it clockwise to lock it in place.
- Test the Light: Turn on your headlights, activate the turn signal, and depress the brake pedal to ensure the new bulb is functioning correctly.
- Reinstall the Access Panel: Replace the access panel or cover inside the trunk.
- Repeat for Other Bulbs (If Necessary): If you need to replace other bulbs, repeat steps 3-8 for each bulb.
"Safety is paramount. Always ensure your vehicle is parked in a safe location, the engine is off, and the parking brake is engaged before working on any electrical components."
Replacing the Entire 2017 Nissan Sentra Tail Light Assembly
In some cases, the entire tail light assembly may need to be replaced due to damage, cracks, or internal failures. Replacing the entire assembly is also a manageable DIY project, though it requires a bit more effort than simply changing a bulb.
- Gather Your Tools: You'll need a socket wrench set, a screwdriver (Phillips head), and potentially a trim removal tool to prevent damaging the vehicle's body panels.
- Disconnect the Electrical Connector: Before removing the assembly, disconnect the electrical connector that provides power to the tail light. This will prevent any accidental electrical shorts. The connector usually has a release clip that you'll need to press to detach it.
- Remove the Mounting Hardware: Locate the bolts or nuts that secure the tail light assembly to the vehicle's body. Use a socket wrench to carefully remove them. Be mindful of any retaining clips or washers.
- Remove the Old Assembly: Gently wiggle the tail light assembly to loosen it from the vehicle. Be careful not to scratch the paint. You may need to use a trim removal tool to gently pry the assembly away from the body.
- Install the New Assembly: Align the new tail light assembly with the mounting holes. Ensure the electrical connector is accessible.
- Secure the New Assembly: Reinstall the mounting bolts or nuts and tighten them securely. Do not overtighten, as this could damage the assembly or the vehicle's body.
- Connect the Electrical Connector: Reconnect the electrical connector to the new tail light assembly. Ensure it clicks into place securely.
- Test the Lights: Turn on your headlights, activate the turn signal, and depress the brake pedal to ensure all functions are working correctly.
Troubleshooting Common 2017 Nissan Sentra Tail Light Problems
Even after replacing a bulb or assembly, you might encounter some common issues. Here's a troubleshooting guide:
- Bulb Doesn't Light Up:
- Check the Bulb: Ensure the bulb is the correct type and is properly seated in the socket.
- Check the Fuse: Locate the fuse for the tail lights in your vehicle's fuse box (refer to your owner's manual for the location). If the fuse is blown, replace it with a new one of the same amperage.
- Check the Socket: Inspect the bulb socket for corrosion or damage. Clean the contacts with a wire brush or contact cleaner. If the socket is severely damaged, it may need to be replaced.
- Check the Wiring: Inspect the wiring harness leading to the tail light assembly for any signs of damage, such as cuts, breaks, or frayed wires. Repair any damaged wiring.
- Dim or Flickering Light:
- Check the Ground Connection: A poor ground connection can cause dim or flickering lights. Locate the ground wire for the tail light assembly and ensure it's securely attached to a clean, unpainted metal surface.
- Check the Voltage: Use a multimeter to check the voltage at the bulb socket. If the voltage is low, there may be a problem with the wiring or the vehicle's electrical system.
- Turn Signal Blinks Too Fast:
- Check for Other Burned-Out Bulbs: A rapid flashing turn signal often indicates that another turn signal bulb is burned out on the same side of the vehicle. Check all turn signal bulbs, including the front and side marker lights.
- Check the Flasher Relay: The flasher relay controls the blinking of the turn signals. If the relay is faulty, it may cause the turn signals to blink too fast. The flasher relay is typically located in the fuse box.
Finding the Right 2017 Nissan Sentra Tail Light Replacement Parts
When sourcing replacement tail light bulbs or assemblies for your 2017 Nissan Sentra, you have several options:
- Local Auto Parts Stores: These stores offer a wide selection of bulbs and assemblies, and their staff can often provide helpful advice.
- Online Retailers: Online retailers often have competitive prices and a vast inventory. Be sure to check customer reviews and verify the part's compatibility with your specific vehicle before purchasing.
- Nissan Dealership: Dealerships offer genuine Nissan parts, ensuring the highest quality and perfect fit. However, they typically come at a higher price.
- Salvage Yards: Salvage yards can be a cost-effective option for finding used tail light assemblies. However, inspect the assembly carefully for any damage before purchasing.
When purchasing replacement parts, be sure to provide the year, make, and model of your vehicle to ensure you receive the correct part.
Replacing a 2017 Nissan Sentra tail light doesn't have to be a stressful experience. By understanding the components, following the correct procedures, and troubleshooting common issues, you can often handle this repair yourself, saving time and money. Remember to prioritize safety and always consult your owner's manual for specific instructions related to your vehicle.