2017 Nissan Versa Rear Brakes
Alright, let's talk about the rear brakes on your 2017 Nissan Versa. This article is aimed at those of you who are comfortable wrenching on your cars and want to tackle a brake job yourself. We'll cover everything from identifying the components to troubleshooting common problems. While the Versa is a relatively simple car, proper brake maintenance is crucial for safety, so pay close attention and always double-check your work.
Understanding the 2017 Versa Rear Brake System
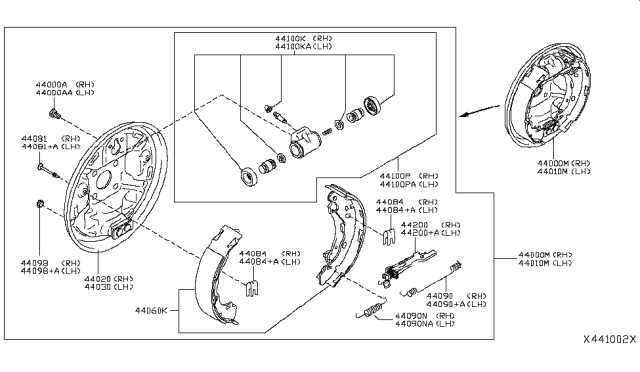
Unlike some modern vehicles with rear disc brakes, the 2017 Nissan Versa uses a drum brake system on the rear axle. Drum brakes are generally less expensive to manufacture and maintain, which makes them a common choice for entry-level vehicles like the Versa. Understanding how they work is essential before you dive into any repairs.
Key Components:
- Brake Drum: This is the rotating, cylindrical component that the brake shoes press against to create friction and slow down the wheel. It's essentially a metal shell that covers the entire brake assembly.
- Brake Shoes: These are curved metal platforms with friction material (brake lining) bonded to them. When you press the brake pedal, these shoes are forced outwards against the inside surface of the brake drum.
- Wheel Cylinder: This hydraulic cylinder, located inside the drum brake assembly, is responsible for pushing the brake shoes outwards. When hydraulic pressure from the master cylinder reaches the wheel cylinder, pistons inside it extend, forcing the brake shoes against the drum.
- Return Springs: These springs pull the brake shoes back away from the drum when the brake pedal is released. This ensures the brakes aren't dragging and allows the wheel to rotate freely. There are usually two return springs per wheel, an upper and lower.
- Adjuster Mechanism: Drum brakes have an adjuster mechanism to compensate for wear of the brake lining. This mechanism maintains the proper clearance between the brake shoes and the drum. The Versa uses a self-adjusting mechanism, which in theory, automatically adjusts the brakes. However, these can sometimes fail to function correctly and require manual adjustment.
- Parking Brake Cable: A cable connects the parking brake lever in the cabin to a lever arm on one of the brake shoes (usually the rear shoe). When the parking brake is engaged, the cable pulls this lever arm, forcing the brake shoes against the drum mechanically.
- Hold-Down Springs: These small springs hold the brake shoes securely against the backing plate. They usually use a pin that goes through the backing plate and a small cap that locks the spring in place.
- Backing Plate: This is the stationary metal plate that the entire brake assembly is mounted to. It provides a solid foundation for all the other components.
How Drum Brakes Work:
When you press the brake pedal, the master cylinder (located under the hood) sends pressurized brake fluid through the brake lines to the wheel cylinders at each wheel. In the rear drum brakes, this pressure forces the pistons in the wheel cylinder outwards, pushing the brake shoes against the inside surface of the brake drum. The friction between the brake shoes and the drum slows the rotation of the drum, and consequently, the wheel.
When you release the brake pedal, the pressure in the brake lines is released. The return springs then pull the brake shoes back away from the drum, allowing the wheel to rotate freely again.
Performing a Rear Brake Job on a 2017 Nissan Versa
Now let's get into the practical stuff. Here's a step-by-step guide to replacing the rear brake shoes on your Versa. Remember to always work safely and use proper safety equipment, including jack stands!
Tools and Materials You'll Need:
- Jack and Jack Stands
- Wheel Chocks
- Lug Wrench
- Brake Cleaner
- Brake Spring Tool (essential for removing and installing the springs safely)
- Pliers
- Screwdrivers (various sizes)
- Socket Set
- Wrench Set
- New Brake Shoes
- New Wheel Cylinders (recommended, especially if they show any signs of leaking)
- New Brake Hardware Kit (includes springs, hold-down pins, and adjuster parts)
- Brake Grease (specifically for brake components)
- Gloves
- Safety Glasses
- Torque Wrench
Step-by-Step Instructions:
- Safety First: Chock the front wheels securely. Loosen the lug nuts on the rear wheels *before* jacking up the car.
- Jack Up the Car: Jack up the rear of the car and securely support it with jack stands placed on the designated jacking points. Never work under a car supported only by a jack!
- Remove the Wheels: Remove the rear wheels.
- Remove the Brake Drum: This can sometimes be tricky. If the drum is stuck, try tapping it gently with a rubber mallet around the edges. You can also try backing off the adjuster mechanism (more on that below). If it's really stuck, you might need to use a drum puller.
- Inspect the Brake Components: Once the drum is off, carefully inspect all the brake components. Look for:
- Worn or cracked brake shoes
- Leaking wheel cylinders (look for brake fluid around the cylinder)
- Broken or corroded springs
- Damage to the backing plate
- Disconnect the Brake Components: Using the brake spring tool, carefully disconnect the return springs, hold-down springs, and adjuster spring. Disconnect the parking brake cable from the lever arm on the brake shoe. Take pictures as you disassemble the brakes! This will be a lifesaver when it comes time to reassemble everything.
- Remove the Brake Shoes: Once all the springs and cables are disconnected, you can remove the brake shoes.
- Inspect and Replace the Wheel Cylinder (if needed): Disconnect the brake line from the wheel cylinder. Be prepared for some brake fluid to leak out. Unbolt the wheel cylinder from the backing plate. Install the new wheel cylinder, tightening the brake line securely. Bleed the brakes after installation.
- Clean the Backing Plate: Use brake cleaner to thoroughly clean the backing plate. Remove any rust or debris.
- Lubricate Contact Points: Apply a small amount of brake grease to the contact points on the backing plate where the brake shoes will slide. This will help prevent noise and ensure smooth operation.
- Install the New Brake Shoes: Install the new brake shoes onto the backing plate, making sure they are properly seated.
- Reconnect the Brake Components: Reconnect all the springs, hold-down springs, adjuster spring, and parking brake cable. This is where those pictures you took earlier will come in handy! Make sure all the springs are properly seated and secured.
- Adjust the Brakes: The Versa has a self-adjusting mechanism, but it's a good idea to manually adjust the brakes to ensure proper operation. You can access the adjuster through a small slot in the backing plate. Use a screwdriver to turn the adjuster wheel until the brake shoes are just barely touching the drum when you reinstall it.
- Reinstall the Brake Drum: Reinstall the brake drum. It should slide on easily. If it doesn't, double-check that the brake shoes are properly adjusted.
- Reinstall the Wheels: Reinstall the wheels and tighten the lug nuts to the proper torque specification (check your owner's manual).
- Lower the Car: Lower the car and remove the jack stands.
- Test the Brakes: Before driving the car, pump the brake pedal several times to seat the brake shoes. Then, take the car for a slow test drive to ensure the brakes are working properly. Listen for any unusual noises. Check the parking brake operation.
- Bleed the Brakes: If you replaced the wheel cylinder, you'll need to bleed the brakes to remove any air from the brake lines.
Troubleshooting Common Problems
Here are some common problems you might encounter with the rear drum brakes on your 2017 Nissan Versa and how to troubleshoot them:
- Noisy Brakes (Squealing or Grinding): This can be caused by worn brake shoes, glazed brake drums, or debris in the brake assembly. Inspect the brake shoes and drums for wear or damage. Clean the brake assembly thoroughly with brake cleaner. If the drums are glazed, you may need to have them resurfaced or replaced.
- Brakes Dragging: This can be caused by a sticking wheel cylinder, broken return springs, or an improperly adjusted brake adjuster. Inspect the wheel cylinder for leaks or sticking. Replace any broken or weak return springs. Adjust the brake adjuster to the proper clearance.
- Weak Brakes: This can be caused by worn brake shoes, air in the brake lines, or a faulty master cylinder. Inspect the brake shoes for wear. Bleed the brakes to remove any air from the brake lines. If the problem persists, the master cylinder may need to be inspected and possibly replaced.
- Parking Brake Not Holding: This can be caused by a stretched parking brake cable, worn brake shoes, or a faulty parking brake mechanism. Adjust the parking brake cable tension. Inspect the brake shoes for wear. If the problem persists, the parking brake mechanism may need to be inspected and repaired.
- Uneven Brake Wear: This can indicate a problem with one of the wheel cylinders or the self-adjuster mechanism. Inspect both wheel cylinders for proper operation. Make sure the self-adjuster mechanism is functioning correctly on both sides.
Important Considerations
- Brake Fluid: Use the correct type of brake fluid specified in your owner's manual. DOT 3 is the most common for the Versa.
- Brake Lines: Inspect the brake lines for any signs of leaks or damage. Replace any damaged brake lines immediately.
- Torque Specifications: Always tighten bolts and nuts to the proper torque specifications. This will ensure that the components are properly secured and will prevent damage.
- Brake Bedding: After replacing the brake shoes, it's important to bed them in properly. This involves performing a series of controlled stops to heat up the brake shoes and transfer a thin layer of friction material onto the brake drums. Consult your brake shoe manufacturer's instructions for specific bedding procedures.
Replacing the rear brakes on your 2017 Nissan Versa is a manageable task for the experienced DIYer. By following these steps and taking your time, you can save money and ensure your car's brakes are functioning properly. Remember to always prioritize safety and consult a professional mechanic if you're unsure about any aspect of the repair.