7 Pole Trailer Connector Wiring Diagram
So, you're tackling the 7-pole trailer connector wiring, huh? Don't worry, it's a common challenge, and with a little patience and the right information, you can get your trailer lights working properly. This article is designed to walk you through the common problems, the tools you'll need, and a clear path to a solution.
Understanding the 7-Pole Trailer Connector
The 7-pole trailer connector is the most common type for larger trailers, especially those with electric brakes. It provides power for running lights, brake lights, turn signals, a brake controller signal, auxiliary power (often used for interior lights or charging a trailer battery), and a ground connection. Before diving in, it's crucial to understand what each pin is supposed to do.
The Standard Wiring Configuration:
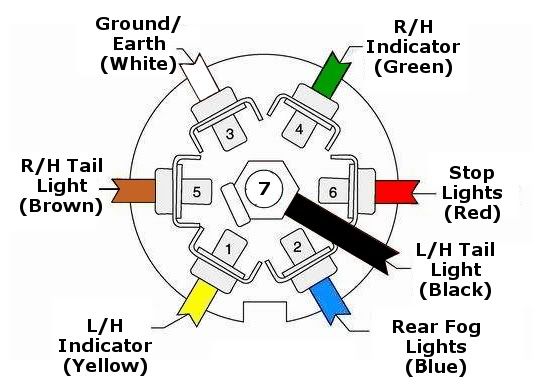
- White: Ground
- Blue: Electric Brakes
- Brown: Tail/Running Lights
- Yellow: Left Turn/Brake Light
- Green: Right Turn/Brake Light
- Black: 12V Auxiliary Power (Battery Charge)
- Red: Auxiliary (Reverse lights on some trailers, can be repurposed if needed)
Keep in mind that while this is the standard, there can be variations, especially if someone has rewired the connector previously. Always double-check with a test light or multimeter to confirm each wire's function.
Common Problems and Their Solutions
Let's dive into the most frequent issues you might encounter when troubleshooting a 7-pole trailer connector:
1. No Lights at All
Problem: This is often the most frustrating, as it suggests a fundamental problem. It could be a missing ground, a blown fuse on the tow vehicle, or a completely disconnected wire.
Solution:
- Check the Ground: A poor ground is the #1 culprit. Ensure the white wire is securely connected to a clean, rust-free metal surface on both the tow vehicle and the trailer. Sometimes, even if it *looks* connected, corrosion can prevent a good connection. Unbolt it, clean the contact points with sandpaper or a wire brush, and re-tighten securely.
- Inspect Fuses: Check the fuse box in your tow vehicle. Many vehicles have separate fuses specifically for trailer lights. Consult your owner's manual to locate these fuses and replace any that are blown. Don't just replace the fuse and forget about it! A blown fuse indicates a short circuit somewhere. If it blows again immediately, you need to investigate further.
- Verify Wiring Connections: Inspect all the wiring connections in the connector itself. Wires can become loose, corroded, or disconnected. Use a test light or multimeter to check for power at each pin on the tow vehicle's connector when the corresponding light function is activated (e.g., check for power on the yellow pin when the left turn signal is on).
2. One or More Lights Not Working (Turn Signals, Brake Lights)
Problem: This usually points to a problem with the specific wire for that function or a faulty bulb/socket on the trailer.
Solution:
- Test the Bulbs: Start with the easiest thing first. Remove the lens and inspect the bulb filament. Even if the filament *looks* intact, it might be broken. Replace the bulb with a known good one.
- Inspect the Socket: Corrosion inside the bulb socket is a common problem. Clean the socket with a wire brush or sandpaper and apply dielectric grease to prevent future corrosion.
- Trace the Wiring: Use a test light or multimeter to trace the wiring from the connector to the light in question. Look for breaks in the wire, loose connections, or corrosion. If you find a break, repair it with a crimp connector or by soldering the wires together (soldering is the preferred method for a more durable repair). Always use heat shrink tubing to protect the connection from moisture.
- Check the Ground (Again!): Even if the main ground is good, individual lights often have their own ground connections. Make sure these are clean and secure.
3. Brake Lights Not Working Properly (Especially with Electric Brakes)
Problem: Electric brakes add another layer of complexity. The blue wire carries the signal from the brake controller to the trailer's brakes. A problem here can result in weak braking, no braking, or even brakes locking up.
Solution:
- Check the Brake Controller: Make sure your brake controller is properly adjusted and functioning correctly. Consult your brake controller's manual for troubleshooting tips.
- Inspect the Blue Wire: Carefully inspect the blue wire from the connector to the trailer's brakes. Look for breaks, loose connections, or corrosion.
- Test the Trailer Brakes: Use a brake controller tester (a small device that plugs into the trailer connector and simulates brake activation) to test the trailer brakes independently of the tow vehicle. This will help you isolate whether the problem is with the tow vehicle's wiring or the trailer's brakes.
- Adjust Brake Magnets: The brake magnets are located inside the brake drums and are responsible for activating the brakes. Over time, they can wear down or become out of adjustment. This is more of a trailer maintenance task.
4. Auxiliary Power Not Working (12V Battery Charge)
Problem: The black wire provides 12V auxiliary power, often used to charge a trailer battery or power interior lights. If this isn't working, you won't be able to charge your trailer battery while driving.
Solution:
- Check the Fuse (Again!): Many vehicles have a separate fuse specifically for the auxiliary power wire. Check your owner's manual to locate this fuse.
- Verify Voltage: Use a multimeter to check for voltage on the black wire at the tow vehicle's connector when the engine is running. You should see approximately 12-14 volts. If you don't, there's a problem with the tow vehicle's wiring.
- Inspect the Wiring: Trace the black wire from the connector to the trailer battery or interior lights. Look for breaks, loose connections, or corrosion.
- Check the Trailer Battery: If you're trying to charge a trailer battery, make sure the battery is in good condition and capable of accepting a charge. A dead or damaged battery won't charge, no matter how good the wiring is.
Tools You'll Need
Having the right tools makes the job much easier. Here's a list of essential tools:
- Multimeter: For checking voltage, continuity, and resistance.
- Test Light: A simple tool for checking for power.
- Wire Strippers/Crimpers: For stripping and crimping wires.
- Pliers: For gripping and bending wires.
- Screwdrivers: Both flathead and Phillips head.
- Socket Set/Wrenches: For removing and tightening bolts and nuts.
- Electrical Tape: For insulating wires.
- Heat Shrink Tubing: For creating a waterproof seal around wire connections.
- Dielectric Grease: For preventing corrosion in electrical connections.
- Wire Brush/Sandpaper: For cleaning corroded contacts.
Approximate Repair Costs
The cost of repairing a 7-pole trailer connector can vary depending on the nature of the problem and whether you do it yourself or hire a professional.
- Simple Repairs (e.g., replacing a blown fuse, cleaning a corroded contact): $5-$20 (for parts like fuses and dielectric grease) + your time.
- Replacing a Damaged Connector: $20-$50 (for the connector) + your time. A mechanic would likely charge $50-$150 for this.
- Wiring Repairs (e.g., repairing a broken wire, rewiring a section of the trailer): $10-$50 (for wire, connectors, and heat shrink tubing) + your time. A mechanic could charge $100-$300 depending on the complexity of the repair.
- Electric Brake Issues: This can be the most expensive, as it may involve replacing brake magnets, controllers, or wiring. Costs can range from $50 to several hundred dollars, especially if you need a new brake controller.
Important Note: If you're not comfortable working with electrical systems, it's always best to consult a qualified mechanic. Improper wiring can not only damage your vehicle or trailer, but also create a safety hazard.
Prevention is Key
The best way to avoid problems with your 7-pole trailer connector is to perform regular maintenance. Here are a few tips:
- Clean the Connector Regularly: Use a wire brush or contact cleaner to remove dirt and corrosion from the connector pins.
- Apply Dielectric Grease: Apply a thin layer of dielectric grease to the connector pins to prevent corrosion.
- Inspect the Wiring Regularly: Look for breaks, loose connections, or signs of wear and tear.
- Use a Connector Cover: When the trailer is not in use, use a connector cover to protect the connector from the elements.
By understanding the basics of the 7-pole trailer connector and following these troubleshooting steps, you can get your trailer lights working properly and safely. Remember to be patient, methodical, and always double-check your work. Good luck!
Disclaimer: This article is for informational purposes only and should not be considered a substitute for professional advice. Always consult with a qualified mechanic if you have any concerns about your vehicle or trailer.