7 Wiring Diagram For Trailer
Trailer wiring gremlins! We've all been there. You hook up your trailer, check the lights, and… nothing. Or maybe just a flicker, or a strange combination of lights doing things they shouldn’t. Don't despair! Trailer wiring issues are common, but with a little troubleshooting, you can often diagnose and fix the problem yourself, saving time and money.
Understanding the 7-Way Trailer Connector
Before diving into specific problems, let's review the 7-way trailer connector. This is the most common type for larger trailers and campers, and understanding its pin-out is crucial for troubleshooting. Think of it as a universal language for your trailer's electrical system.
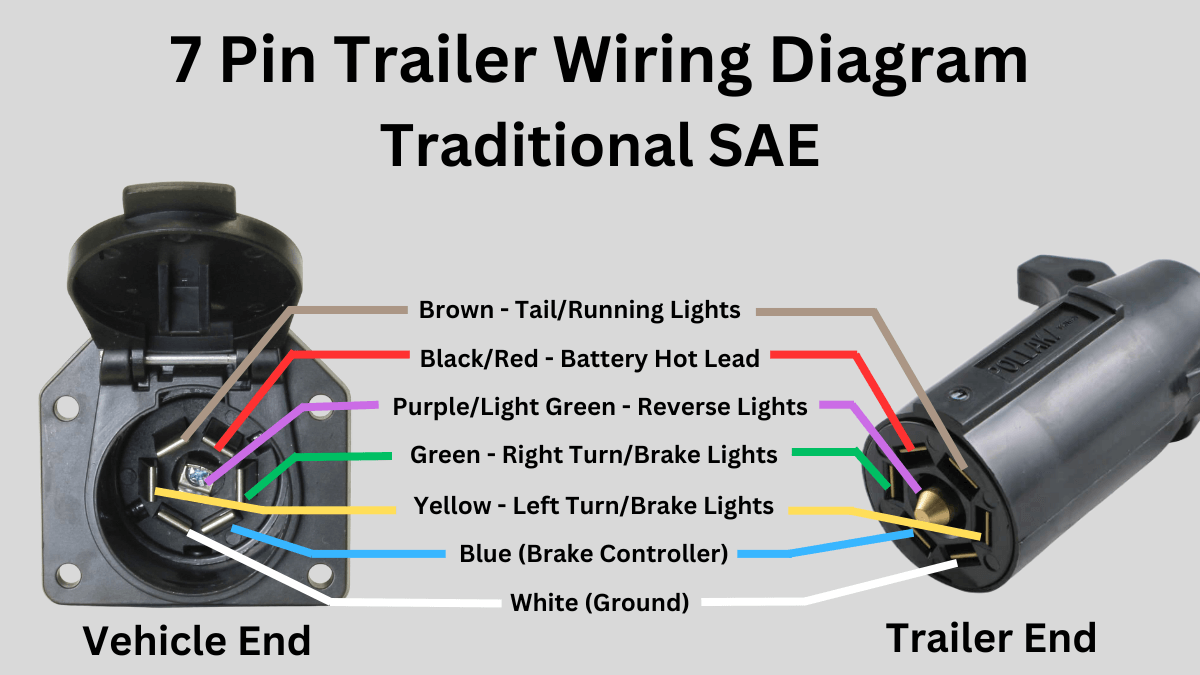
Here's a breakdown of each pin (looking at the connector on your vehicle, with the notch at the top):
- Center Pin: 12V+ Auxiliary Power (often for charging a trailer battery or powering interior lights)
- 1 O'Clock: Right Turn/Brake Lights
- 3 O'Clock: Tail Lights/Running Lights
- 5 O'Clock: Left Turn/Brake Lights
- 7 O'Clock: Ground
- 9 O'Clock: Electric Brakes
- 11 O'Clock: Reverse Lights/Auxiliary (Function varies depending on the trailer)
Remember: Always disconnect your vehicle's battery (negative terminal) before working on any electrical wiring to prevent shorts and potential damage.
Common Trailer Wiring Problems and Solutions
Here are some of the most frequent issues we see and how to tackle them:
1. No Lights at All
This is the worst-case scenario, but often the easiest to diagnose.
- Possible Cause: A bad ground connection is the most likely culprit.
- Solution:
- Inspect the Ground Wire: Check where the ground wire from the trailer wiring harness attaches to the trailer frame. Is it rusty, loose, or corroded? Clean the connection thoroughly with a wire brush and apply dielectric grease. Retighten securely.
- Check the Vehicle Ground: Ensure the ground connection on your tow vehicle is also clean and secure.
- Use a Jumper Wire: As a test, use a jumper wire to directly connect the trailer frame to the vehicle's frame. If the lights suddenly work, you've confirmed a ground issue.
- Possible Cause: Blown Fuse in the Tow Vehicle.
- Solution:
- Locate the Trailer Wiring Fuse: Check your vehicle's owner's manual to find the fuse specifically for trailer wiring (often located in the engine compartment or under the dashboard).
- Check the Fuse: Inspect the fuse for a broken filament. If it's blown, replace it with a fuse of the *same amperage rating*.
- Repeatedly Blowing Fuses: If the fuse blows repeatedly, there's likely a short circuit somewhere in the trailer wiring. You'll need to trace the wires and look for damage.
- Possible Cause: Faulty Wiring Harness on the Vehicle.
- Solution:
- Use a Multimeter: Use a multimeter to test the voltage at each pin of the vehicle's 7-way connector when the corresponding function is activated (turn signal, brake pedal, etc.). You should see 12V+ on the appropriate pins.
- Wiring Harness Replacement: If there's no voltage on any pins, the wiring harness itself may be faulty. You might need to replace it. This can range from $50 to $200 depending on the vehicle and harness.
2. Some Lights Work, Others Don't
This usually indicates a problem with a specific wire or connection.
- Possible Cause: Broken or Corroded Wire.
- Solution:
- Visual Inspection: Carefully inspect the wiring harness along the trailer, looking for any cuts, breaks, or areas where the insulation is damaged.
- Test with a Multimeter: Use a multimeter to test continuity between the connector pin and the corresponding light. If there's no continuity, there's a break in the wire.
- Repair or Replace: Repair the wire with butt connectors and electrical tape, or replace the entire section of wiring. Ensure your connections are weatherproof.
- Possible Cause: Faulty Light Fixture.
- Solution:
- Test the Light Directly: Disconnect the light fixture and apply 12V directly to it (using a spare battery or jumper pack). If the light doesn't work, it's faulty and needs to be replaced.
- Check the Bulb: Sounds simple, but make sure the bulb isn't burnt out.
- Possible Cause: Corroded Connector Pin.
- Solution:
- Clean the Connectors: Use a wire brush or electrical contact cleaner to clean the pins on both the vehicle and trailer connectors. Apply dielectric grease to protect them from further corrosion.
3. Lights Flicker or Are Dim
Flickering or dim lights usually point to a voltage drop due to a poor connection or corrosion.
- Possible Cause: Poor Ground Connection (Again!).
- Solution: Revisit the ground connection checks described above. Even if the ground *seems* okay, clean and tighten it thoroughly.
- Possible Cause: Corroded Connectors or Wiring.
- Solution: Clean all connectors and inspect the wiring for corrosion. Replace any corroded wires or connectors.
- Possible Cause: Undersized Wiring.
- Solution: If you've added lights to your trailer, or if the original wiring is very thin, it may be undersized for the load. Consider upgrading to thicker gauge wiring. This is especially important for long trailers.
4. Brake Lights Don't Work
- Possible Cause: Blown Fuse in the Tow Vehicle (Dedicated Brake Light Fuse).
- Solution: Locate and check the brake light fuse in your vehicle's fuse box.
- Possible Cause: Faulty Brake Light Switch in the Tow Vehicle.
- Solution: While less likely to *only* affect the trailer, a faulty brake light switch can prevent the brake lights from working on both the vehicle and trailer. Have this checked by a mechanic.
- Possible Cause: Issue with the Electric Brake Controller (if equipped).
- Solution:
- Controller Display: Check the brake controller display for any error messages.
- Gain Setting: Ensure the gain setting on the brake controller is properly adjusted.
- Wiring to the Controller: Inspect the wiring to the brake controller for loose connections or damage.
5. Electric Brakes Don't Work
This is a serious safety concern and should be addressed immediately.
- Possible Cause: Faulty Electric Brake Controller (in the tow vehicle).
- Solution:
- Test the Output: Use a multimeter to test the output voltage of the brake controller when the brake pedal is pressed. You should see a voltage that increases as you apply more pressure to the pedal.
- Consult the Manual: Refer to the brake controller's manual for troubleshooting tips.
- Professional Diagnosis: If you suspect the controller is faulty, have it professionally diagnosed.
- Possible Cause: Wiring Issues to the Brakes.
- Solution:
- Continuity Test: Use a multimeter to test the continuity of the brake wire from the trailer connector to each brake assembly.
- Brake Magnet Inspection: Inspect the brake magnets for wear and tear. They should be replaced if they are excessively worn.
- Wiring Within the Brake Assembly: Check the wiring within the brake assembly itself for corrosion or damage.
- Possible Cause: Poor Ground Connection.
- Solution: Clean and secure the ground connection for the electric brakes.
6. Tail Lights Work, But Turn Signals Don't (or Vice Versa)
This usually indicates a problem with the specific wiring for the affected function.
- Possible Cause: Faulty Turn Signal Switch in the Tow Vehicle.
- Solution: While less likely, a faulty turn signal switch *can* sometimes cause issues with the trailer lights but not the vehicle lights. Have this checked if you suspect it.
- Possible Cause: Wiring Issues Specific to the Turn Signal Circuit.
- Solution: Trace the wiring for the affected turn signal circuit, looking for breaks, corrosion, or loose connections. Use a multimeter to test continuity.
7. Reverse Lights Don't Work
- Possible Cause: Vehicle Wiring Issue.
- Solution: Confirm that the vehicle is sending power to the correct pin on the 7-way connector when the vehicle is in reverse. Use a multimeter.
- Possible Cause: Trailer Wiring Issue.
- Solution: Check the wiring between the 7-way connector on the trailer and the reverse lights themselves. Look for breaks, corrosion or loose connections.
- Possible Cause: Faulty Reverse Lights.
- Solution: Disconnect the reverse lights from the wiring harness and test them directly with a 12V power source. If they don't light up, they are faulty and need to be replaced.
Tools You'll Need
Having the right tools makes troubleshooting much easier:
- Multimeter: Essential for testing voltage, continuity, and resistance.
- Wire Strippers/Crimpers: For making clean and secure wire connections.
- Wire Brush: For cleaning corroded connections.
- Electrical Tape: For insulating wire splices.
- Dielectric Grease: To protect connections from corrosion.
- Butt Connectors: For joining wires.
- Jumper Wire: For temporary testing of ground connections.
- Screwdrivers and Wrenches: For removing and tightening connections.
- Work Gloves: Protect your hands.
Estimated Repair Costs
Repair costs can vary widely depending on the problem and whether you do the work yourself. Here's a rough estimate:
- Cleaning and Tightening Connections: $0 - $20 (DIY)
- Replacing a Blown Fuse: $0 - $5 (DIY)
- Replacing a Light Fixture: $10 - $50 (DIY)
- Replacing a Section of Wiring: $10 - $30 (DIY)
- Replacing the Entire Wiring Harness: $50 - $200 (DIY, or $200 - $500 professionally)
- Replacing the Electric Brake Controller: $50 - $300 (DIY, or $200 - $600 professionally)
Important Note: If you're not comfortable working with electrical wiring, or if you're unsure about any aspect of the repair, it's always best to consult a qualified mechanic. Electrical problems can be dangerous, and improper repairs can lead to further damage.
By following these troubleshooting steps, you should be able to diagnose and fix most common trailer wiring problems. Happy trailering!