Are H9 And H11 Bulbs The Same
So, you're staring down a burned-out headlight and wondering if that H11 bulb in your glove compartment can fill in for the H9 that just went dark. It's a common question, and frankly, a tempting one. We all want to save a few bucks and a trip to the auto parts store. But swapping bulbs isn't always as simple as screwing in a lightbulb. Let's break down the differences between H9 and H11 bulbs, and whether or not you can safely and effectively use them interchangeably.
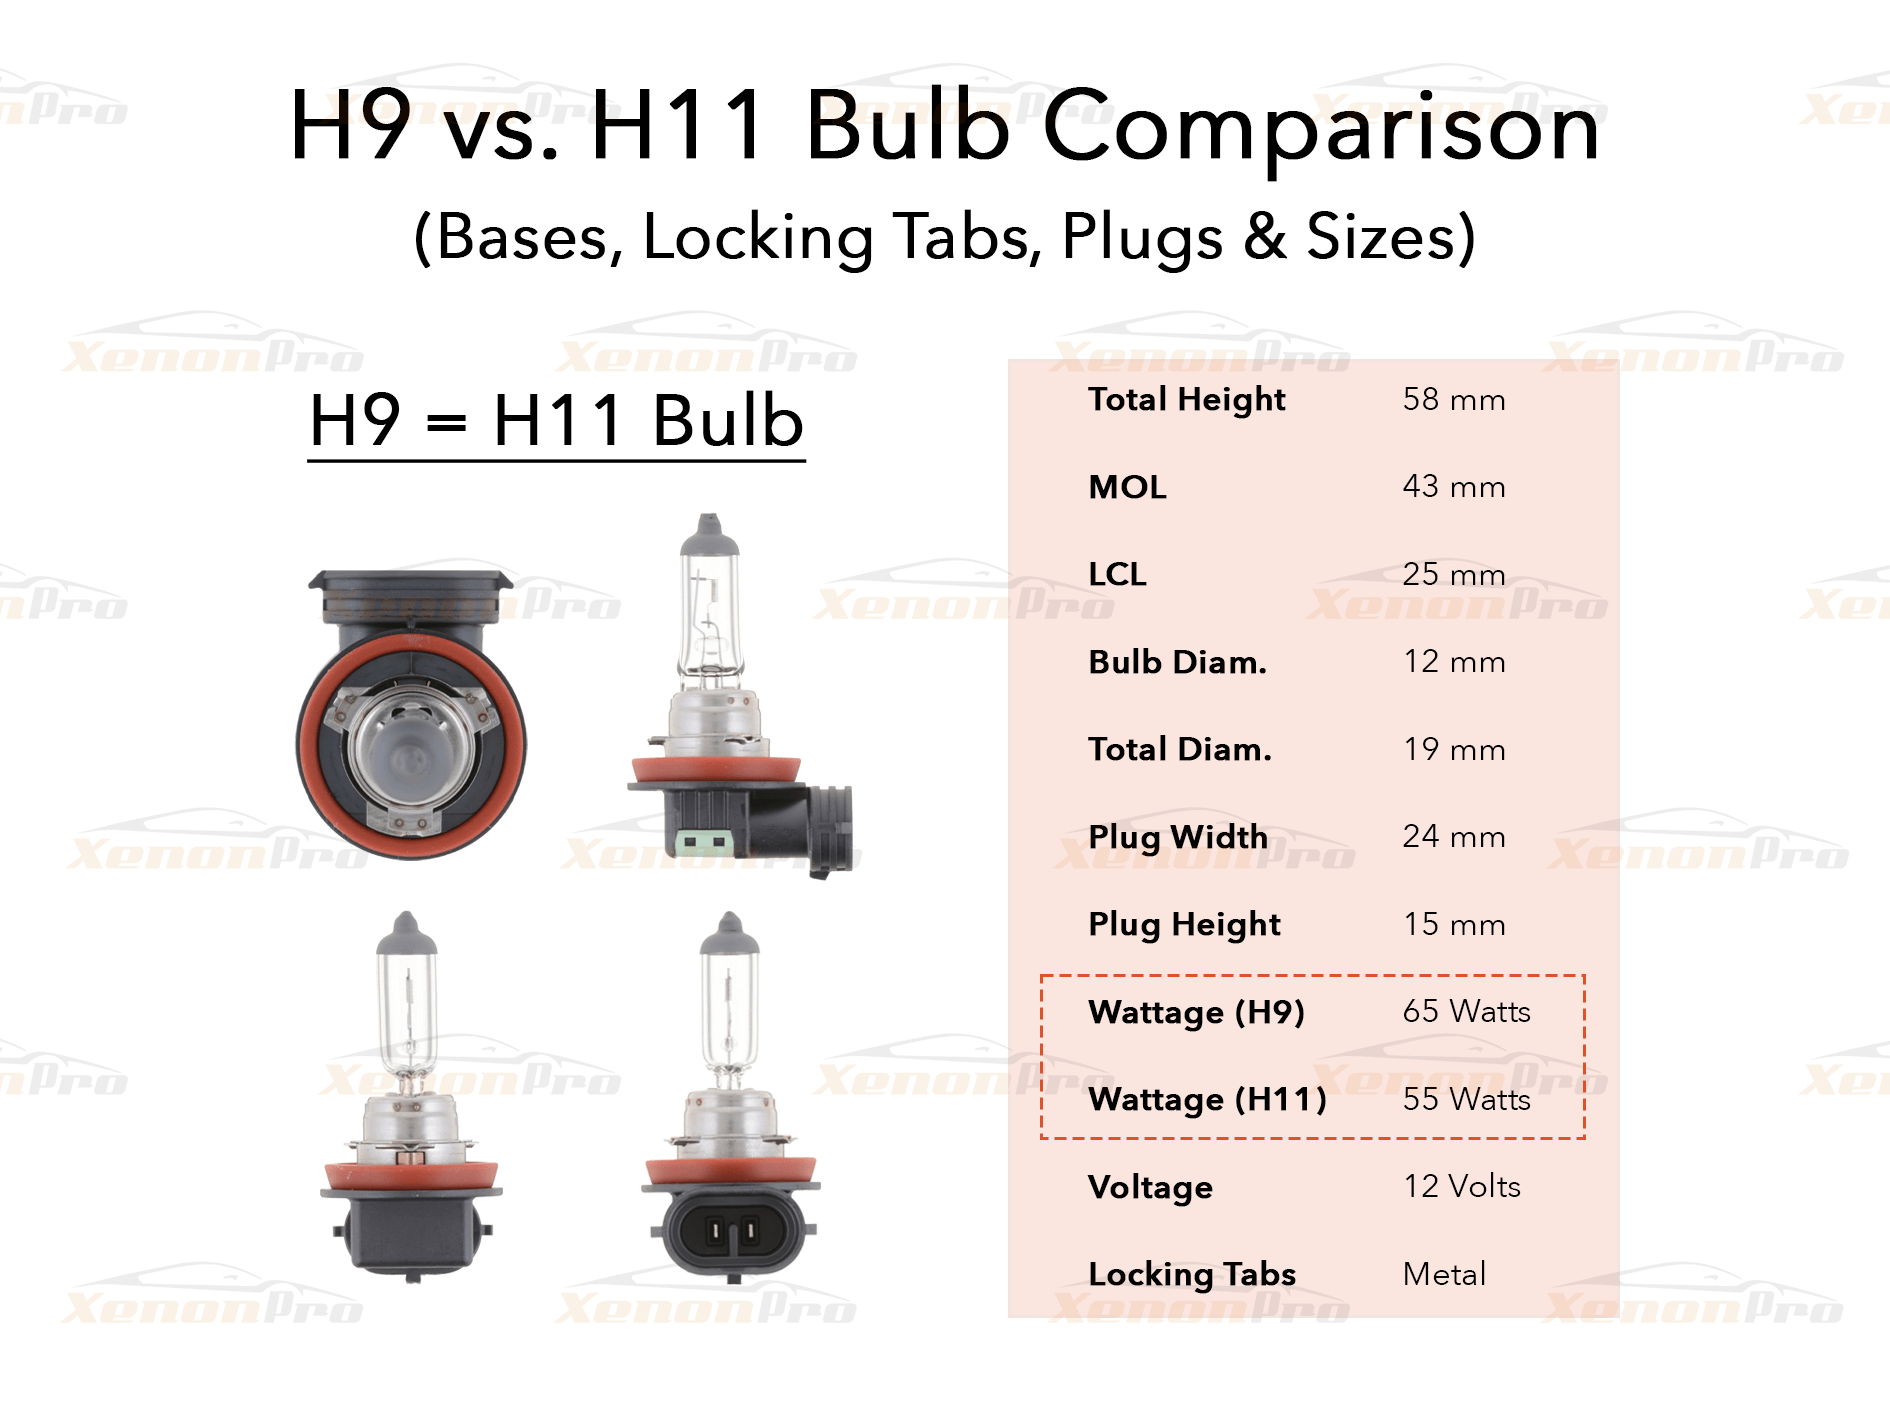
Understanding the Differences: H9 vs. H11
At first glance, H9 and H11 bulbs look very similar. They often have the same base type (usually a PGJ19-1 or similar), and they’re both single-filament bulbs. However, the key differences lie in their performance and intended application.
Wattage and Lumens
The primary difference is the wattage and light output (lumens). An H9 bulb typically operates at 65 watts and produces around 2100 lumens. This higher wattage translates to a brighter, more intense light output. Think of it as a spotlight versus a standard light.
An H11 bulb, on the other hand, usually runs at 55 watts and produces around 1350 lumens. It's designed for a more balanced approach, prioritizing longevity and reduced heat output over raw brightness.
Filament Design
The filament design also contributes to the difference in light output. H9 bulbs often have a more robust filament to handle the higher wattage, allowing for greater light intensity but potentially reducing the bulb's lifespan.
Application
H9 bulbs are commonly used in high beam applications, where maximum brightness is needed for short periods. The increased intensity helps improve visibility at a distance when driving on dark roads.
H11 bulbs are frequently found in low beam or fog light positions. Their lower wattage and heat output make them suitable for continuous use, reducing the risk of overheating and premature failure of the headlight assembly.
The "Can I Swap Them?" Question: A Qualified "Maybe"
Technically, yes, you can *physically* fit an H11 bulb into an H9 socket, and vice versa, in many cases. The bases are often the same. However, just because you *can* do something doesn't mean you *should*. Here's why:
Potential Issues with Using an H11 in Place of an H9
Reduced Brightness: The most obvious consequence is a significant reduction in light output. Your high beams, which are designed to provide maximum visibility, will be noticeably dimmer. This can compromise your ability to see far ahead and react to hazards in time.
Diminished Performance: An H11 bulb won't project the same beam pattern as an H9, which can negatively impact visibility. The light may be scattered, and you won't get the focused, long-range illumination that high beams are intended for.
Potential Issues with Using an H9 in Place of an H11
Overheating: This is the most significant risk. An H9 bulb draws more power than an H11, potentially overloading the wiring and connectors in your vehicle's electrical system. This can lead to overheating, melting wires, and even a fire hazard in extreme cases.
Damage to Headlight Assembly: The increased heat generated by an H9 bulb can also damage the headlight housing itself, especially if it's made of plastic. You might experience discoloration, melting, or cracking.
Reduced Bulb Lifespan: Running an H9 bulb in a system designed for an H11 can significantly shorten its lifespan. The bulb may burn out prematurely due to the stress on its filament.
When Might an H11 Substitute *Briefly* Work?
Let's be clear: We don't *recommend* substituting bulbs permanently. However, in an absolute emergency, if you're stranded on a dark road with a burned-out high beam (H9) and the only spare bulb you have is an H11, you *could* use it temporarily to get you to safety. Treat it as a very short-term fix, and replace it with the correct H9 bulb as soon as possible.
Never use an H9 in place of an H11, even temporarily. The risk of overheating and damage is too high.
Identifying Your Bulb Type
Before you even think about substitutions, make sure you know which bulb type your vehicle requires. The easiest way to find out is to:
- Check your owner's manual: This is the most reliable source of information.
- Look at the markings on the old bulb: The bulb type is usually printed on the base or the glass.
- Use an online bulb finder: Most auto parts stores have online tools where you can enter your vehicle's make, model, and year to find the correct bulb types.
Replacing a Headlight Bulb: A Step-by-Step Guide
Once you have the correct bulb type, replacing it is usually a straightforward process. Here's a general guide:
- Gather your tools: You'll typically need a screwdriver (Phillips or flathead, depending on your vehicle), gloves (to protect your hands and the bulb), and possibly a socket wrench.
- Disconnect the negative battery terminal: This is a crucial safety step to prevent electrical shock.
- Locate the headlight assembly: This is usually behind the headlight lens, accessible from the engine compartment or wheel well.
- Remove the bulb connector: Carefully detach the electrical connector from the back of the bulb. There may be a locking mechanism or clip that you need to release.
- Remove the old bulb: Depending on the bulb type, you may need to twist it, unclip it, or remove a retaining ring.
- Install the new bulb: Align the new bulb with the socket and secure it in place. Be careful not to touch the glass with your bare hands, as the oils from your skin can shorten the bulb's lifespan. Use gloves!
- Reconnect the bulb connector: Ensure the connector is securely attached to the bulb.
- Reconnect the negative battery terminal: Tighten the terminal securely.
- Test the headlights: Turn on your headlights to make sure the new bulb is working correctly.
Tools and Approximate Repair Costs
- Tools: Screwdrivers (Phillips and flathead), socket wrench (optional), gloves. These are typically items most DIYers already possess.
- Bulb Cost: H9 and H11 bulbs typically range from $10 to $50 each, depending on the brand and type (halogen, LED, etc.).
- DIY Cost: Primarily the cost of the bulb itself.
- Professional Installation Cost: If you choose to have a mechanic replace the bulb, you can expect to pay an additional $20 to $50 for labor, depending on the complexity of the job and the shop's hourly rate. Some dealerships may charge more.
Upgrading to LED Headlights
If you're considering upgrading your headlights for improved brightness and efficiency, LED bulbs are a popular option. However, it's important to choose LED bulbs that are specifically designed for your vehicle's headlight housings. Not all LEDs are created equal, and using the wrong type can result in poor beam patterns, glare for other drivers, and even overheating. Look for "DOT-approved" or "SAE-compliant" LED headlight bulbs to ensure they meet safety standards.
Final Thoughts
While it might be tempting to substitute an H11 bulb for an H9, or vice versa, it's generally not a good idea. The potential risks to your vehicle's electrical system and headlight assemblies outweigh the convenience of using the wrong bulb. Always use the correct bulb type specified for your vehicle to ensure optimal performance, safety, and longevity. When in doubt, consult your owner's manual or a qualified mechanic. Staying informed and using the right parts can save you time, money, and potential headaches down the road. Drive safely!