Brake Pad Spring Clip Install
Brake pad spring clips, often overlooked, are crucial components for ensuring proper brake function. These small metal pieces, also known as anti-rattle clips or shims, play a vital role in maintaining brake pad position, reducing noise, and preventing uneven wear. Ignoring their condition or improper installation can lead to a cascade of problems. This article will guide car owners and mechanics through the intricacies of brake pad spring clip installation, troubleshooting common issues, and providing practical advice for maintaining your braking system.
The Importance of Brake Pad Spring Clips
Brake pad spring clips perform several key functions:
- Positioning: They keep the brake pads properly aligned within the caliper, ensuring even contact with the rotor.
- Noise Reduction: They dampen vibrations between the pad and caliper, preventing squealing and other noises.
- Preventing Wear: Correct positioning minimizes uneven wear, extending the life of both the brake pads and rotors.
- Heat Dissipation: Some clips help dissipate heat away from the pads and calipers, reducing the risk of brake fade.
Without properly functioning spring clips, you're essentially setting yourself up for premature brake wear, reduced braking performance, and annoying noises. Imagine driving a Honda Civic and hearing a loud screech every time you brake; often, the culprit is a missing or damaged spring clip.
Identifying Common Problems with Brake Pad Spring Clips
Several symptoms can indicate problems with your brake pad spring clips:
Symptoms
- Brake Squealing or Screeching: This is the most common symptom, especially at low speeds.
- Uneven Brake Pad Wear: Inspect your pads regularly. If one pad is significantly thinner than the other on the same wheel, suspect clip issues.
- Rattling Noise While Driving: A loose or missing clip can cause the brake pads to rattle within the caliper.
- Reduced Braking Performance: Improper pad contact reduces the overall effectiveness of the brakes.
- Increased Brake Dust: Uneven wear can lead to excessive brake dust accumulation on the wheels.
Causes
- Corrosion: Over time, exposure to road salt and moisture can cause clips to corrode and weaken.
- Damage During Installation: Incorrect installation can bend or break the clips, rendering them ineffective.
- Missing Clips: Mechanics sometimes forget to reinstall the clips during brake jobs.
- Incompatible Clips: Using the wrong type of clip for your vehicle can cause fitment issues and prevent proper function. For instance, using a Toyota Camry clip on a Ford F-150 is a guaranteed recipe for disaster.
- Wear and Tear: Constant heat cycling and vibration can fatigue the metal, leading to breakage.
Step-by-Step Guide to Brake Pad Spring Clip Installation
Proper installation is crucial for the effectiveness of brake pad spring clips. Here's a detailed guide:
- Gather Your Tools and Materials: You'll need a jack, jack stands, lug wrench, socket set, brake cleaner, new brake pad spring clips (matching your vehicle's make and model), a wire brush, and a pair of pliers (optional).
- Safely Lift and Secure the Vehicle: Loosen the lug nuts on the wheel you're working on. Then, jack up the vehicle and securely support it with jack stands. Never work under a vehicle supported only by a jack.
- Remove the Wheel: Completely remove the lug nuts and take off the wheel.
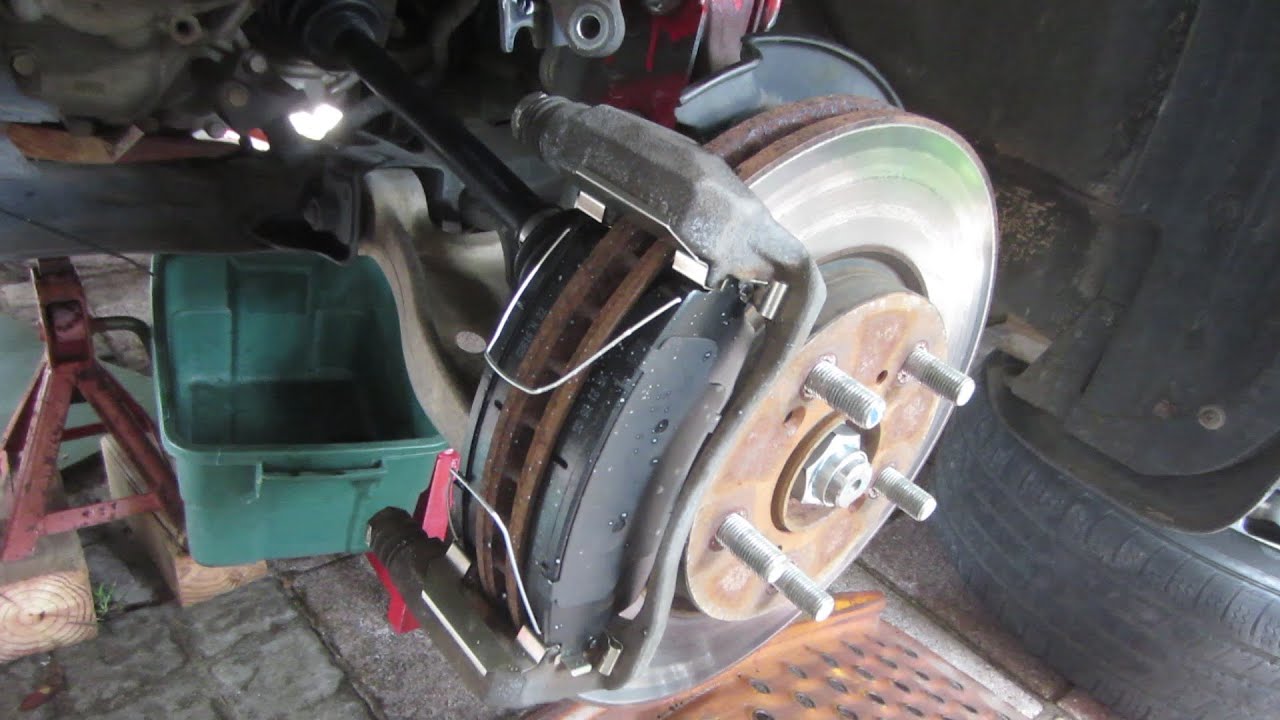
- Inspect the Brake Assembly: Carefully examine the caliper, rotor, and existing brake pads. Note the position of the old spring clips (if any are present). Take pictures for reference if needed.
- Remove the Caliper: Depending on your vehicle, you may need to remove bolts securing the caliper to the caliper bracket. Consult your vehicle's repair manual for specific instructions. Be careful not to damage the brake hose.
- Remove the Old Brake Pads: Slide the old brake pads out of the caliper bracket. Pay attention to how they're oriented.
- Clean the Caliper Bracket: Use a wire brush and brake cleaner to thoroughly clean the caliper bracket, removing any rust, dirt, or debris. This is essential for ensuring the new clips fit properly.
- Install the New Spring Clips: This is where precision matters. The spring clips must be installed correctly to maintain proper pad placement. Ensure each clip is seated correctly within the caliper bracket. Some clips may snap into place, while others may require slight bending or adjustment. Refer to your vehicle's repair manual or a reliable online resource for specific instructions. A common mistake is forcing the clips into the wrong position, potentially bending or breaking them. For example, on many Subaru models, the clips have a specific orientation to ensure proper pad retention.
- Install the New Brake Pads: Slide the new brake pads into the caliper bracket, ensuring they are properly seated against the spring clips.
- Reinstall the Caliper: Carefully reinstall the caliper over the new brake pads, ensuring it is properly aligned with the rotor. Tighten the caliper bolts to the manufacturer's specified torque.
- Repeat on the Other Side (if necessary): If you're replacing the brake pads and clips on both sides of the axle, repeat steps 3-10 on the other wheel.
- Reinstall the Wheel: Put the wheel back on, tighten the lug nuts hand-tight, lower the vehicle, and then torque the lug nuts to the manufacturer's specifications using a torque wrench.
- Pump the Brakes: Before driving, pump the brake pedal several times to ensure the brake pads are properly seated against the rotor.
- Test Drive Carefully: Perform a slow and controlled test drive to ensure the brakes are functioning properly and there are no unusual noises.
Troubleshooting Common Installation Issues
Even with careful attention, problems can arise during spring clip installation. Here are some common issues and their solutions:
Problem: Clips Won't Stay in Place
Symptom: The clips keep falling out of the caliper bracket.
Cause: The caliper bracket might be corroded or damaged, preventing the clips from seating properly. Or, you might be using the wrong type of clip.
Solution: Thoroughly clean the caliper bracket with a wire brush and brake cleaner. If the bracket is severely corroded, consider replacing it. Double-check that you are using the correct spring clips for your vehicle by comparing them to the old ones or consulting your vehicle's repair manual. If the clip is slightly loose, try gently bending it to increase its tension.
Problem: Pads are Too Tight or Too Loose
Symptom: The brake pads are either very difficult to install or have excessive play in the caliper bracket.
Cause: Incorrect spring clip installation or using the wrong size brake pads. Sometimes, aftermarket pads have slightly different dimensions.
Solution: Ensure the spring clips are installed correctly and are not interfering with the pad's movement. Double-check the brake pad part number to ensure it matches your vehicle. If using aftermarket pads, compare them to the old pads to verify their dimensions. A small amount of brake grease on the contact points between the pad and caliper bracket can sometimes help with smooth movement.
Problem: Brake Squealing Persists After Installation
Symptom: The brakes still squeal even after installing new pads and spring clips.
Cause: Rotor damage, worn rotors, incorrect pad bedding procedure, or other brake system components may be causing the noise.
Solution: Inspect the rotors for wear or damage. If they are scored or warped, they may need to be resurfaced or replaced. Properly bed in the new brake pads according to the manufacturer's instructions. Consider using a brake pad anti-squeal compound on the back of the pads to dampen vibrations. Also, inspect the caliper hardware and ensure everything is properly lubricated. If squealing persists even after these steps, it could indicate a more serious problem with the braking system.
Real-World Examples
- Ford F-150: Many F-150 owners experience brake squealing due to corrosion on the caliper brackets. Thorough cleaning and proper spring clip installation are essential.
- Toyota Camry: Camrys are known for their reliability, but the brake pad spring clips can still corrode over time, leading to uneven pad wear.
- Honda Civic: Civics often suffer from brake noise due to worn spring clips, especially in areas with heavy road salt usage.
- Subaru Outback: The rear brake spring clips on Outbacks can be particularly susceptible to corrosion and damage due to their location and exposure to the elements.
Maintaining Your Braking System for Optimal Performance
Regular maintenance is key to preventing brake problems and ensuring optimal braking performance:
- Regular Inspections: Inspect your brake pads, rotors, and spring clips at least twice a year or during every oil change.
- Proper Cleaning: Clean the caliper brackets and other brake components during brake pad replacements.
- Use Quality Parts: Always use high-quality brake pads and spring clips that are specifically designed for your vehicle.
- Proper Lubrication: Apply a small amount of brake grease to the contact points between the brake pads and caliper bracket to prevent squealing.
- Follow Bedding Procedures: Properly bed in new brake pads to ensure optimal performance and longevity.
- Address Problems Promptly: Don't ignore brake noises or other symptoms of brake problems. Address them promptly to prevent further damage.
By understanding the importance of brake pad spring clips, identifying potential problems, and following proper installation and maintenance procedures, you can ensure your braking system remains in top condition, providing safe and reliable stopping power. Remember, if you are uncomfortable working on your brakes, it's always best to consult a qualified mechanic. Safety should always be your top priority! A well-maintained braking system not only enhances safety but also saves you money in the long run by preventing premature wear and costly repairs. Don't underestimate the importance of these small but vital components!