Car Audio Speaker Wire Colors
Understanding car audio speaker wire colors is crucial for both DIY enthusiasts and seasoned mechanics. Incorrect wiring can lead to poor sound quality, speaker damage, or even amplifier failure. This article provides a practical guide to identifying speaker wire colors, troubleshooting common problems, and maintaining your car audio system for optimal performance.
Decoding Speaker Wire Colors: A General Guide
While there isn't a universally standardized color code across all car manufacturers, some common conventions exist. Knowing these will significantly aid you in identifying the correct wires. Keep in mind that these are general guidelines, and it's always best to consult your car's specific wiring diagram, which can usually be found online or in your vehicle's repair manual.
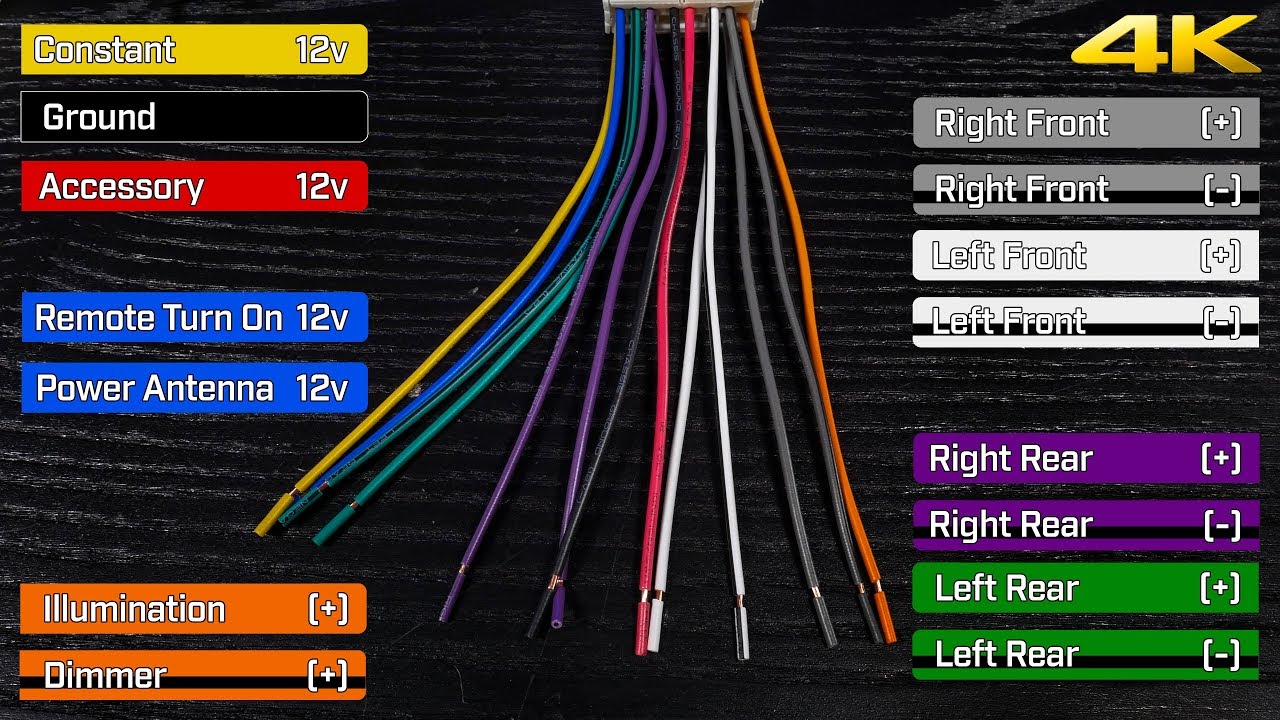
- Front Speakers:
- Left Front (+): White or White/Black
- Left Front (-): White/Black or White/Blue
- Right Front (+): Grey or Grey/Black
- Right Front (-): Grey/Black or Grey/Red
- Rear Speakers:
- Left Rear (+): Green or Green/Black
- Left Rear (-): Green/Black or Green/White
- Right Rear (+): Purple or Purple/Black
- Right Rear (-): Purple/Black or Purple/White
Important Note: The solid color wire is generally the positive (+) lead, and the wire with a black stripe or different color stripe is generally the negative (-) lead.
However, always verify these colors with your vehicle's wiring diagram. Especially in older cars, or if the wiring has been previously modified, relying solely on color conventions can be risky.
Common Car Audio Problems and Troubleshooting
Here's a look at some frequently encountered car audio issues related to speaker wiring and how to diagnose and resolve them:
Problem 1: No Sound from One or More Speakers
Symptom: One or more speakers are completely silent while others are working fine.
Possible Causes:
- Disconnected Speaker Wire: The most common culprit. A wire may have come loose from the speaker terminal, head unit, or amplifier.
- Broken Speaker Wire: Wires can become brittle and break, especially in areas that experience movement (like door jambs).
- Faulty Speaker: The speaker itself might be blown or damaged.
- Amplifier Issue (if applicable): If the speaker is powered by an external amplifier, the amp channel could be faulty.
Troubleshooting & Solutions:
- Visual Inspection: Start by visually inspecting the speaker wiring at the speaker, head unit, and amplifier (if used). Look for disconnected or frayed wires.
- Continuity Test: Use a multimeter to test the continuity of the speaker wire. Disconnect the wire at both ends and check for continuity. If there's no continuity, the wire is broken and needs replacement.
- Speaker Test: Temporarily swap the speaker with a known working speaker. If the problem follows the speaker, the speaker is faulty.
- Amplifier Test (if applicable): If you have an amplifier, test the output of the amplifier channel using a multimeter. If there's no output, the amplifier channel is likely faulty.
Example: In a Honda Civic, if the front left speaker is silent, check the white/black wire and the white wire at the speaker terminal and the head unit. Use a multimeter to check continuity. If the wire is good, test the speaker itself.
Problem 2: Distorted or Weak Sound from a Speaker
Symptom: The sound from a speaker is distorted, fuzzy, or significantly quieter than other speakers.
Possible Causes:
- Incorrect Polarity: Reversed positive and negative wires can cause phase cancellation, resulting in weak or distorted sound.
- Partially Broken Wire: A damaged wire might still carry a signal but with reduced current capacity, leading to distortion.
- Damaged Speaker: The speaker cone or voice coil might be damaged.
- Loose Connection: A loose connection can cause intermittent distortion.
- Overpowered Speaker: If the speaker is receiving too much power from the amplifier, it can distort.
Troubleshooting & Solutions:
- Polarity Check: Double-check the polarity of the speaker wires at both the speaker and the head unit/amplifier. Ensure that the positive wire is connected to the positive terminal and the negative wire is connected to the negative terminal. Refer to your vehicle's wiring diagram.
- Wire Inspection: Inspect the speaker wires for any signs of damage, such as cuts, frays, or corrosion. Replace damaged wires.
- Speaker Inspection: Visually inspect the speaker cone for any tears or damage. Listen closely for any rattling or buzzing sounds coming from the speaker.
- Connection Check: Ensure all connections are tight and secure. Clean corroded connections with a wire brush or contact cleaner.
- Gain Adjustment (if applicable): If you have an amplifier, adjust the gain settings to prevent overdriving the speakers.
Example: In a Ford F-150, if the rear right speaker sounds weak and distorted, check the purple and purple/black wires. Ensure the polarity is correct and inspect the wires for damage. Also, check the speaker for any physical damage.
Problem 3: Static or Crackling Sounds
Symptom: Static or crackling noises are heard coming from one or more speakers.
Possible Causes:
- Loose Connection: A loose connection can cause intermittent static or crackling.
- Corroded Connection: Corrosion on the speaker wire terminals or connectors can interfere with the signal.
- Poor Grounding: A bad ground connection can introduce noise into the system.
- Interference: External electrical interference from other car components can cause static.
Troubleshooting & Solutions:
- Connection Check: Thoroughly check all speaker wire connections for tightness and cleanliness.
- Grounding Check: Inspect the ground connections for the head unit, amplifier (if applicable), and any other audio components. Ensure they are securely attached to a clean, unpainted metal surface.
- Wire Routing: Make sure speaker wires are not running alongside power wires or other sources of electrical interference. Reroute the wires if necessary.
- Shielded Cables: Consider using shielded speaker cables to minimize interference.
Example: In a Toyota Camry, static from all speakers could indicate a grounding issue with the head unit. Check the ground wire connection behind the radio.
Real-World Issues and Considerations
- Aftermarket Installations: When installing aftermarket speakers or amplifiers, pay close attention to the speaker wire colors. Use a wiring harness adapter to simplify the installation and avoid cutting or splicing factory wires.
- Older Vehicles: In older vehicles, the speaker wire colors may have faded or become discolored, making them difficult to identify. Use a multimeter to test the wires and refer to the vehicle's wiring diagram.
- Door Jams: Speaker wires that run through door jambs are particularly susceptible to damage due to repeated opening and closing of the doors. Inspect these wires regularly for cracks or breaks.
- Factory Amplified Systems: If your car has a factory amplified system, the speaker wiring configuration may be more complex. Consult the vehicle's wiring diagram or seek professional help if you are unsure how to proceed.
Maintaining Your Car Audio System
Preventive maintenance is key to keeping your car audio system in top condition:
- Regular Inspection: Periodically inspect your speaker wires and connections for any signs of damage or corrosion.
- Proper Wiring: Ensure that all speaker wires are properly connected and secured to prevent them from coming loose or being damaged.
- Clean Connections: Keep your speaker wire connections clean and free of corrosion. Use a wire brush or contact cleaner to remove any buildup.
- Avoid Overpowering: Don't overpower your speakers with an amplifier that is too powerful. This can damage the speakers and lead to distortion.
- Professional Installation: If you're not comfortable working with car audio wiring, consider hiring a professional installer.
By understanding speaker wire colors, troubleshooting common problems, and performing regular maintenance, you can ensure that your car audio system delivers optimal sound quality for years to come. Remember to always consult your vehicle's specific wiring diagram before making any modifications to your audio system. This will help you avoid costly mistakes and ensure a safe and successful installation.
Furthermore, investing in high-quality speaker wire can significantly improve sound quality and durability. Look for oxygen-free copper (OFC) wire with a sufficient gauge for your speakers and amplifier. A thicker gauge wire will provide better signal transfer and less resistance. Finally, always disconnect the battery before working on any electrical components in your car to prevent electrical shocks or damage to the vehicle's electrical system.