Find Air Conditioner Leak Car
Keeping cool on the road is more than just a comfort; it's a safety issue, especially in hotter climates. A properly functioning car air conditioner (A/C) is essential. But what happens when that refreshing blast of cold air fades, leaving you sweating behind the wheel? Chances are, you've got an A/C leak. Finding it is the first step to fixing it, and this guide will equip you with the knowledge you need.
Understanding the Car A/C System
Before diving into leak detection, it's crucial to understand the fundamentals of your car's A/C system. It's a closed-loop system that relies on circulating a refrigerant – typically R-134a in older vehicles and R-1234yf in newer ones – under pressure. This refrigerant undergoes phase changes (liquid to gas and back) to absorb heat from the cabin and expel it outside.
Key components include:
- Compressor: The heart of the system, the compressor pumps refrigerant throughout the loop, increasing its pressure and temperature.
- Condenser: Located at the front of the vehicle, the condenser dissipates heat from the high-pressure refrigerant, converting it into a high-pressure liquid.
- Expansion Valve or Orifice Tube: This regulates the flow of refrigerant into the evaporator, causing a pressure drop and allowing the liquid refrigerant to vaporize.
- Evaporator: Situated inside the dashboard, the evaporator absorbs heat from the cabin air, cooling it down.
- Accumulator or Receiver Drier: This filters out moisture and debris from the refrigerant, protecting the compressor.
- Refrigerant Lines: Hoses and metal lines connect all these components, carrying the refrigerant.
A leak anywhere in this system can lead to refrigerant loss, resulting in poor cooling performance.
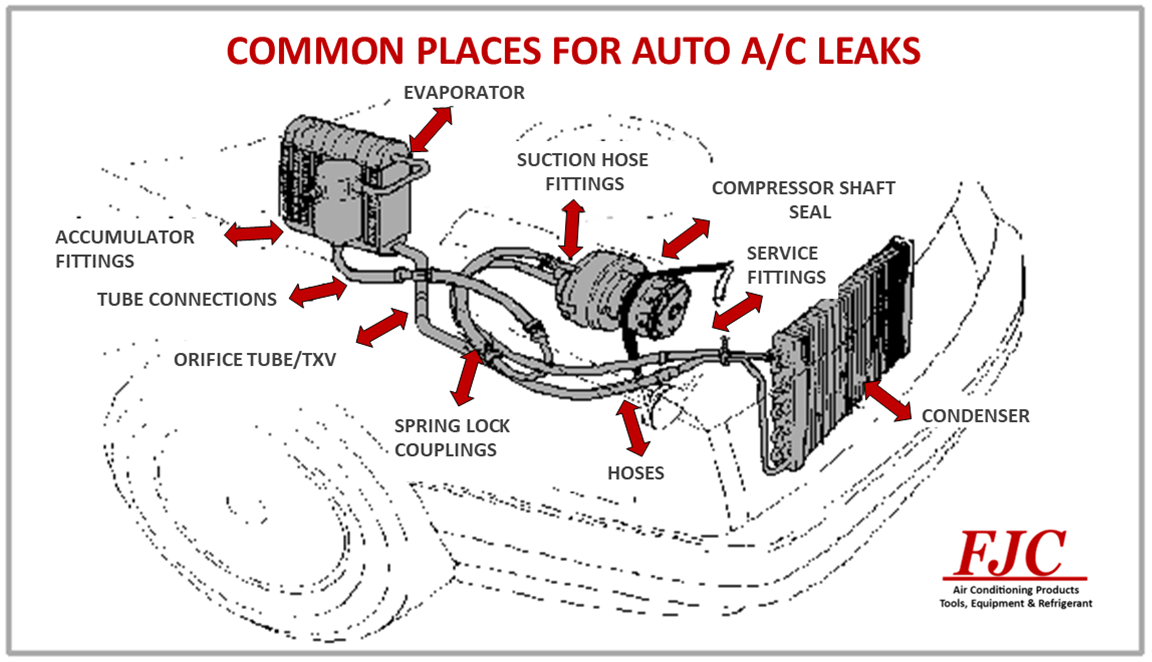
Common Leak Locations and Causes
A/C leaks can occur in various locations, each with its potential causes:
Compressor
The compressor is a common culprit. Leaks often occur around the shaft seal, where the compressor's rotating shaft enters the housing. Age, wear and tear, and lack of lubrication can degrade the seal, allowing refrigerant to escape. Leaks can also develop at the compressor's fittings or even within the compressor body itself.
Condenser
Positioned at the front of the car, the condenser is vulnerable to road debris. Rocks, bugs, and other projectiles can puncture the condenser's delicate fins and tubes, creating leaks. Corrosion due to exposure to road salt and moisture can also weaken the condenser over time.
Evaporator
The evaporator, located inside the dashboard, is protected from direct impacts, but it's still susceptible to corrosion. Moisture can accumulate on the evaporator's surface, leading to rust and leaks. Also, debris entering the system can clog the evaporator core, increasing pressure and potentially causing leaks.
Refrigerant Lines and Fittings
Hoses and metal lines that connect the A/C components can leak due to age, cracking, or damage. Fittings, where lines connect to components, are also prime leak locations. O-rings and seals within these fittings can dry out and become brittle, allowing refrigerant to escape. Vibration and engine movement can also loosen fittings over time.
Service Ports (Schrader Valves)
These valves, used for charging and servicing the A/C system, can sometimes leak. The valve core can become damaged or the valve stem can loosen, resulting in a slow refrigerant leak.
Leak Detection Methods
Several methods can be used to locate A/C leaks. The best approach depends on the severity of the leak and the available tools.
Visual Inspection
Start with a thorough visual inspection of all A/C components and lines. Look for signs of oil residue, which often indicates a refrigerant leak. Refrigerant contains oil that lubricates the compressor, so when refrigerant leaks, it carries oil with it. Pay close attention to fittings, connections, and areas where components are exposed to road debris.
UV Dye and UV Light
This is a popular and effective method for locating leaks. A special UV dye is injected into the A/C system. The system is then run for a period of time to allow the dye to circulate. Using a UV light, you can then inspect the A/C components and lines. Any leak will be highlighted by the fluorescent glow of the UV dye. This method is particularly useful for finding small, slow leaks that might be difficult to detect visually.
Electronic Leak Detector
An electronic leak detector, often called a "sniffer," is a handheld device that can detect refrigerant leaks by sensing the presence of refrigerant molecules in the air. These detectors are highly sensitive and can pinpoint even tiny leaks. It's important to use a detector specifically designed for the type of refrigerant in your system (R-134a or R-1234yf). Always calibrate the device according to the manufacturer's instructions before use.
Soap and Water Solution
A simple and inexpensive method involves applying a soap and water solution to suspected leak areas. Use a spray bottle to apply the solution liberally to fittings, connections, and around components. If a leak is present, bubbles will form where the refrigerant is escaping. This method is best for locating larger leaks.
Pressure Testing
Pressure testing involves pressurizing the A/C system with an inert gas, such as nitrogen, and monitoring the pressure gauge for leaks. This method requires specialized equipment and is typically performed by experienced technicians. It's an effective way to identify leaks in sealed systems and can help determine the severity of the leak.
Tools and Equipment
To effectively find A/C leaks, you'll need some essential tools and equipment:
- UV Leak Detection Kit: Includes a UV light, UV dye, and safety glasses.
- Electronic Leak Detector: A refrigerant-specific "sniffer" for detecting leaks.
- A/C Manifold Gauge Set: Used for checking system pressures.
- Vacuum Pump: Used for evacuating the A/C system before recharging.
- Nitrogen Tank and Regulator: For pressure testing (requires specific training).
- Spray Bottle: For applying soap and water solution.
- Wrenches and Sockets: For tightening fittings and connections.
- Safety Glasses and Gloves: To protect yourself from refrigerant and other chemicals.
Safety Precautions
Working with A/C systems involves handling refrigerant, which can be hazardous. Always follow these safety precautions:
- Wear safety glasses and gloves: Protect your eyes and skin from refrigerant and other chemicals.
- Work in a well-ventilated area: Avoid inhaling refrigerant vapors.
- Do not release refrigerant into the atmosphere: This is illegal and harmful to the environment. Recover refrigerant using a recovery machine before performing any repairs.
- Follow manufacturer's instructions: Read and understand the instructions for all tools and equipment before use.
- If in doubt, consult a professional: A/C systems can be complex, and improper repairs can be dangerous.
Real-World Example
Consider a common scenario: a customer complains that their A/C is blowing warm air. A quick inspection reveals no obvious signs of a leak. Using a UV dye kit, the technician injects dye into the system and runs the A/C for about 20 minutes. Upon inspection with the UV light, a bright green glow is observed around the compressor's shaft seal. This confirms a leak at the compressor. The technician replaces the compressor, evacuates and recharges the system, and the A/C is back to blowing cold air.
Preventative Maintenance
Preventing A/C leaks is always better than fixing them. Here are some tips for keeping your A/C system in good condition:
- Run your A/C regularly: Even in the winter, running the A/C for a few minutes each week helps to circulate refrigerant and lubricate the compressor seals.
- Inspect your A/C components periodically: Check for signs of oil residue or damage.
- Have your A/C system serviced regularly: A qualified technician can check system pressures, inspect components, and recharge the system if necessary.
- Protect the condenser: Consider installing a mesh screen in front of the condenser to protect it from road debris.
Conclusion
Finding an A/C leak in your car can seem daunting, but with the right knowledge and tools, it's a manageable task. Understanding the A/C system, knowing the common leak locations, and using appropriate detection methods are key to success. Remember to prioritize safety and, when in doubt, consult a qualified automotive technician. By taking proactive steps to maintain your A/C system, you can enjoy comfortable and safe driving, no matter the weather. From the basic soap and water test to the more advanced electronic sniffer, each method plays a crucial role in diagnosis. Remember that identifying a leak is only half the battle; proper repair and recharge procedures are essential for restoring optimal cooling performance. Whether you are a seasoned mechanic or a dedicated car enthusiast, mastering A/C leak detection is a valuable skill.