Fuel Pump Relay Wire Diagram
Alright folks, let's talk about a little part that can cause a whole lot of headache: the fuel pump relay. If your car is cranking but not starting, or if it suddenly dies while you're driving, a faulty fuel pump relay is often the culprit. And before you start tearing into your fuel tank, let's check the basics, starting with the wiring to that relay.
Understanding the Fuel Pump Relay and its Wiring
Think of the fuel pump relay as a switch. It's not the pump itself, but it's the gatekeeper that allows power to reach the pump and get fuel flowing to your engine. The relay is usually located in a fuse box, either under the hood or inside the cabin, but the exact location varies depending on your vehicle's make and model. It's a small, rectangular component, often marked with a fuel pump symbol or labeled “FUEL PUMP RELAY” or simply "FP".
The relay has several terminals, each connected to a specific wire. Here's a general breakdown of what you'll typically find in a fuel pump relay wiring diagram:
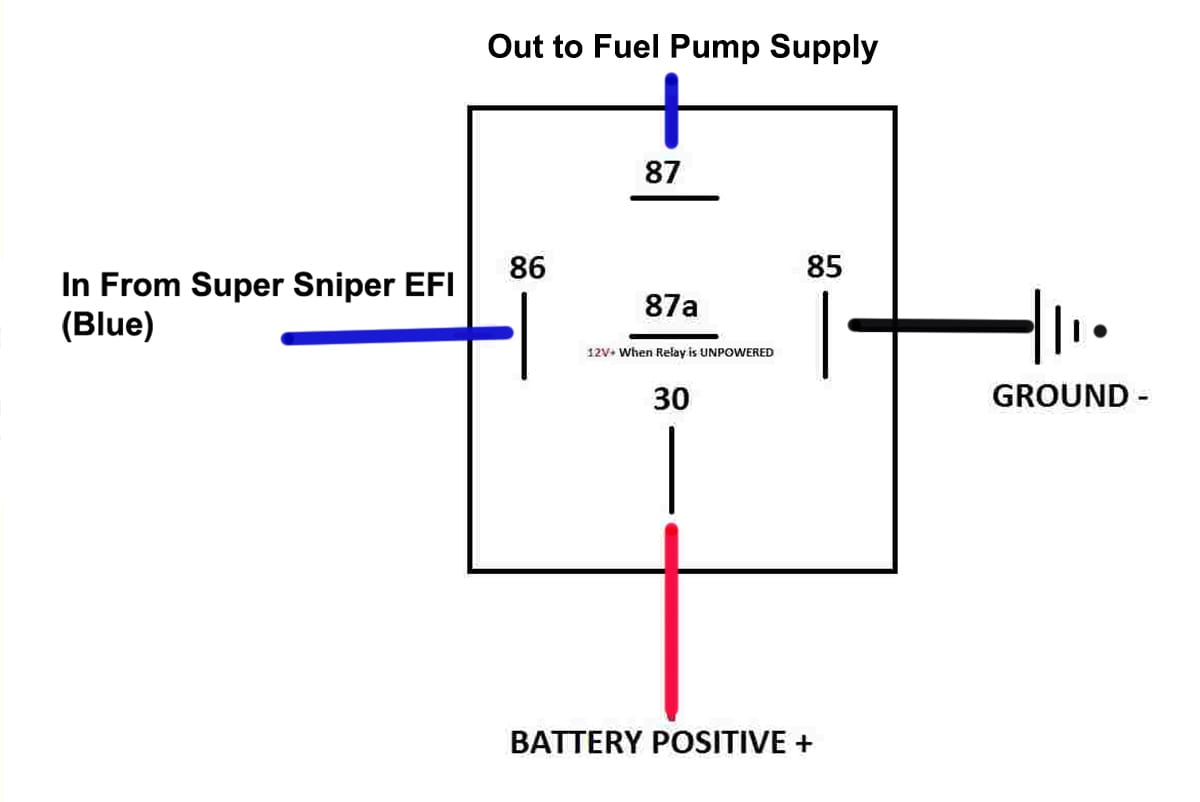
- Terminal 30: This is the main power supply to the relay, usually coming directly from the battery through a fuse. This is where the relay gets its “juice.”
- Terminal 85: This is the ground connection for the relay coil. A good ground is essential for the relay to function.
- Terminal 86: This is the trigger wire, usually coming from the Engine Control Unit (ECU) or Powertrain Control Module (PCM). When the ECU/PCM grounds this wire, it energizes the relay coil.
- Terminal 87: This is the output terminal that sends power to the fuel pump when the relay is activated. It's the wire that directly feeds the fuel pump positive terminal. Sometimes you'll see terminal 87A, which provides an alternative connection that is only active when the relay is *not* energized.
Important Note: Fuel pump relay wiring diagrams can vary slightly from vehicle to vehicle. Always consult the specific wiring diagram for your car's make, model, and year. You can usually find this information in your car's repair manual or online through subscription services like Alldata or Mitchell OnDemand.
Common Fuel Pump Relay Wiring Problems
Here's where things can go wrong:
- Corroded or Damaged Wires: Over time, wires can corrode, especially in damp environments. This corrosion can increase resistance, preventing the relay from receiving enough power or sending power to the fuel pump. Look for green or white powdery buildup on the wires and connectors.
- Loose Connections: Vibrations and temperature changes can cause connections to loosen. This can interrupt the flow of electricity.
- Broken Wires: Wires can break due to stress or damage. This is more common in areas where the wires are bent or flexed frequently.
- Short Circuits: If a wire's insulation is damaged, it can short to ground or another wire. This can cause the relay to blow fuses or malfunction.
- Faulty Relay Socket: The relay socket itself can become corroded or damaged, preventing a good connection with the relay.
Troubleshooting Fuel Pump Relay Wiring Issues
Okay, so you suspect a wiring problem. Here's how to diagnose it:
- Gather Your Tools: You'll need a multimeter, a test light, wire strippers, wire crimpers, electrical tape, and a wiring diagram for your specific vehicle. A good quality multimeter is essential for checking voltage and continuity. Consider investing in a decent one.
- Visually Inspect the Wiring: Start by visually inspecting the wires and connectors around the fuel pump relay. Look for any signs of corrosion, damage, or loose connections. Pay close attention to the terminals on the relay socket.
- Check for Power and Ground: Use your multimeter to check for power at terminal 30 and ground at terminal 85 with the ignition on. You should have battery voltage (around 12 volts) at terminal 30 and a solid ground at terminal 85. If you don't have power or ground, trace the wiring back to the battery or ground point, checking for blown fuses or open circuits along the way. A test light is helpful for quickly checking if a wire is carrying power.
- Check the Trigger Wire: With the ignition on and the engine cranking (or attempting to start), use your multimeter to check for a ground signal at terminal 86. The ECU/PCM should be grounding this wire to activate the relay. If you don't see a ground signal, the problem could be with the ECU/PCM or the wiring between the ECU/PCM and the relay.
- Check Output Voltage: With the relay energized (the engine cranking), use your multimeter to check for battery voltage at terminal 87. This is the voltage being sent to the fuel pump. If you have power at terminal 30, a good ground at terminal 85, a trigger signal at terminal 86, but no voltage at terminal 87, the relay itself is likely faulty.
- Continuity Testing: Use your multimeter's continuity setting to check the continuity of the wires between the relay and the fuel pump. Disconnect the battery before performing any continuity tests. This will prevent damage to your multimeter and the vehicle's electrical system.
- Bypass the Relay (Use with Caution!): As a temporary diagnostic step, you can bypass the relay by using a jumper wire to connect terminal 30 directly to terminal 87. *This will send constant power to the fuel pump, even when the engine is not running. Do not leave the jumper wire in place for extended periods, as it can drain the battery and potentially damage the fuel pump.* If the car starts with the relay bypassed, it confirms that the relay or its wiring is the problem. If the car still doesn't start, the problem lies elsewhere (fuel pump, fuel filter, etc.).
Repairing Fuel Pump Relay Wiring
Once you've identified the wiring problem, you can move on to the repair:
- Repair Corroded Wires: Clean corroded terminals with a wire brush or sandpaper. You can also use a specialized electrical contact cleaner. If the wire is severely corroded, cut out the damaged section and splice in a new piece of wire using butt connectors or solder and heat shrink tubing.
- Tighten Loose Connections: Ensure that all connectors are properly seated and secure. You may need to use pliers to gently tighten the terminals on the relay socket.
- Repair Broken Wires: Splice the broken wire back together using butt connectors or solder and heat shrink tubing. Be sure to use the correct gauge wire for the repair.
- Repair Short Circuits: Identify the source of the short circuit and repair the damaged insulation. You can use electrical tape or heat shrink tubing to insulate the wire.
- Replace the Relay Socket: If the relay socket is damaged or corroded beyond repair, replace it with a new one. Be sure to disconnect the battery before removing the old socket.
Tools Needed
- Multimeter
- Test light
- Wire strippers
- Wire crimpers
- Electrical tape
- Heat shrink tubing
- Butt connectors or soldering iron and solder
- Wiring diagram for your vehicle
Approximate Repair Costs
The cost of repairing fuel pump relay wiring can vary depending on the severity of the damage and the labor rate of your mechanic. Here's a rough estimate:
- Simple wire repair (corroded terminal, loose connection): $50 - $150
- Wire splicing (broken or damaged wire): $100 - $250
- Relay socket replacement: $150 - $300 (includes the cost of the new socket)
- Professional diagnosis and repair: $100 - $500+ (depending on the complexity of the problem and the shop's labor rate)
DIY Tip: If you're comfortable working with electrical wiring, you can save money by performing the repair yourself. However, if you're not sure what you're doing, it's best to take your car to a qualified mechanic. Electrical problems can be dangerous and can damage your car's electrical system.
Prevention is Key
To prevent fuel pump relay wiring problems, inspect the wiring regularly for signs of corrosion or damage. Keep the engine compartment clean and dry. Consider applying dielectric grease to the relay terminals to protect them from corrosion. By taking these simple precautions, you can help keep your fuel pump relay working properly and avoid the hassle of a no-start situation.
If after all this, you're still having trouble, it's time to consult a professional. A skilled mechanic can use advanced diagnostic tools to pinpoint the exact cause of the problem and get you back on the road. Good luck!