Heater Fan Only Works On High
One of the most frustrating issues, especially during extreme weather, is when your car's heater fan only works on the highest setting. You're either blasted with maximum airflow or nothing at all – no in-between. This article delves into the common causes, troubleshooting techniques, and practical solutions for this widespread problem, benefiting both car owners and mechanics.
Understanding the Problem: Symptoms and the Underlying Cause
The primary symptom is obvious: your heater/AC fan operates only on the highest speed setting. Lower speeds produce no airflow. Here's a breakdown of why this happens:
The Role of the Blower Motor Resistor
The culprit is almost always the blower motor resistor (or blower motor control module in newer vehicles). This component regulates the voltage supplied to the blower motor, controlling the fan speed. It's essentially a set of resistors connected in series that drop the voltage when lower fan speeds are selected. Think of it like a dimmer switch for your fan.
When one or more of these resistors fail (usually due to overheating, corrosion, or vibration), the corresponding fan speeds cease to function. The highest speed bypasses the resistor network entirely, providing full voltage directly to the blower motor, which explains why it's the only speed that works.
Troubleshooting the Heater Fan Issue
Before replacing any parts, let's perform some basic troubleshooting steps:
1. Confirming the Symptoms
Start by confirming that all lower fan speeds are indeed non-functional. Make sure the ignition is on, the engine is running (for best voltage), and cycle through each fan speed setting carefully. Note if any unusual noises are present, which might indicate a failing blower motor alongside the resistor issue.
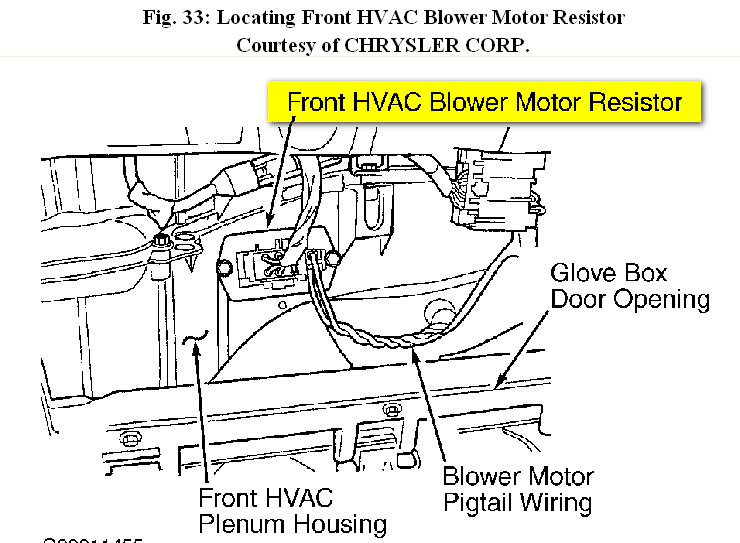
2. Location, Location, Location
The blower motor resistor is typically located in the HVAC housing, near the blower motor itself. Common locations include:
- Under the dashboard on the passenger side.
- Behind the glove box.
- In the engine compartment, near the firewall.
Consult your vehicle's repair manual or search online forums for the specific location for your car model. For example, on many Honda Civics and Toyota Corollas, it's accessible after removing the glove box. On some Ford F-150s, it might be found on the passenger side, under the dash but requiring more extensive panel removal.
3. Visual Inspection
Once you've located the resistor, visually inspect it. Look for:
- Burn marks or discoloration.
- Cracked or broken resistors.
- Corrosion on the connector pins.
Even if the resistor appears visually intact, it can still be faulty. A burnt smell emanating from the resistor's location is a strong indicator of failure.
4. Electrical Testing (Multimeter Required)
Using a multimeter, you can test the resistor's functionality. Safety First! Disconnect the battery's negative terminal before performing any electrical testing.
- Continuity Test: Set your multimeter to the continuity setting. Test between the input pin and each output pin corresponding to the different fan speeds. You should have continuity (a beep or a low resistance reading) between each pair of pins. If you have no continuity on one or more speeds, the resistor is likely faulty.
- Resistance Test: Refer to your vehicle's repair manual for the specific resistance values for each fan speed. Compare your measurements to the specifications. Significant deviations indicate a problem.
5. Checking the Blower Motor Connector
Inspect the wiring harness connector that plugs into the blower motor resistor. Look for:
- Melted or damaged wires.
- Loose or corroded connections.
A common issue, particularly in older vehicles, is a melted connector due to excessive current draw caused by a failing blower motor. In such cases, replacing only the resistor might be a temporary fix; the underlying problem with the blower motor will eventually damage the new resistor as well.
Replacing the Blower Motor Resistor
If your testing confirms that the resistor is faulty, replacement is the most common solution. Here's a general guide:
- Disconnect the Battery: As always, disconnect the negative terminal of the battery before working on any electrical components.
- Locate and Remove the Old Resistor: Follow the instructions in your vehicle's repair manual to access the resistor. It's usually held in place by screws.
- Disconnect the Wiring Harness: Carefully disconnect the wiring harness from the resistor. Note the orientation of the connector or take a picture for reference.
- Install the New Resistor: Connect the wiring harness to the new resistor. Ensure the connector is fully seated and locked in place.
- Secure the New Resistor: Mount the new resistor in its original location and secure it with the screws.
- Reconnect the Battery: Reconnect the negative terminal of the battery.
- Test the System: Turn on the ignition and test all fan speeds to ensure the new resistor is functioning correctly.
Important Tip: When purchasing a replacement resistor, use your vehicle's VIN (Vehicle Identification Number) to ensure you get the correct part. Aftermarket resistors are available, but OEM (Original Equipment Manufacturer) parts often offer better reliability and longevity.
Addressing Underlying Issues: Blower Motor and Wiring
Replacing the blower motor resistor is often the solution, but it's crucial to address any underlying issues that might have caused the failure in the first place.
The Blower Motor
A worn or failing blower motor can draw excessive current, overloading the resistor and causing it to fail prematurely. Symptoms of a failing blower motor include:
- Unusual noises (squealing, rattling, or grinding).
- Intermittent operation.
- Reduced airflow even on the highest speed.
If you suspect the blower motor is failing, consider replacing it along with the resistor. Testing the blower motor's current draw with an ammeter can confirm excessive current draw.
Wiring Issues
Damaged or corroded wiring can also contribute to resistor failure. Inspect the wiring harness leading to the blower motor and resistor for any signs of damage. Repair or replace any damaged wiring as needed.
In some cases, a corroded ground connection can cause increased resistance in the circuit, leading to overheating of the resistor. Ensure that all ground connections in the HVAC system are clean and tight.
Real-World Examples and Model-Specific Issues
Certain car models are known for specific issues related to the blower motor resistor. Here are a few examples:
- Jeep Grand Cherokee (WJ and WK models): These models are notorious for blower motor resistor failures. The resistor is located in a difficult-to-access location under the dashboard. Upgrading to a heavy-duty resistor is a common practice.
- Chevrolet Silverado/GMC Sierra (GMT800 platform): These trucks often experience blower motor resistor failure due to water intrusion into the HVAC housing. Addressing the water leak is crucial to prevent recurring problems.
- Nissan Altima: Premature failure of the blower motor resistor is common. Aftermarket units vary in quality, so consider a genuine Nissan part for best reliability.
Consult online forums and repair databases specific to your vehicle to learn about common issues and solutions specific to your model.
Preventative Maintenance for Long-Term Reliability
Here are some tips to keep your car's HVAC system in top condition and prevent blower motor resistor failures:
- Regularly Replace the Cabin Air Filter: A clogged cabin air filter restricts airflow, causing the blower motor to work harder and potentially overheat the resistor. Replace the cabin air filter according to the manufacturer's recommendations.
- Address Water Leaks Promptly: Water intrusion into the HVAC system can cause corrosion and damage to the resistor and other components. Fix any water leaks as soon as they are detected.
- Inspect and Clean Connectors: Periodically inspect the wiring harness connectors for corrosion. Clean any corroded connections with a wire brush and apply dielectric grease to prevent future corrosion.
- Listen for Unusual Noises: Pay attention to any unusual noises coming from the blower motor. Addressing a failing blower motor early can prevent further damage to the resistor.
By understanding the function of the blower motor resistor, troubleshooting the symptoms effectively, and addressing underlying issues, you can resolve the frustrating problem of a heater fan that only works on high and keep your car's HVAC system running smoothly for years to come.