Honda Pilot Cabin Air Filter
The Honda Pilot, known for its reliability and spaciousness, benefits greatly from a well-maintained cabin air filter. This often-overlooked component plays a crucial role in the air quality inside your vehicle. This article explores the importance of the cabin air filter in your Honda Pilot, offering practical advice for both car owners and mechanics on maintenance, troubleshooting, and addressing real-world issues.
Understanding the Cabin Air Filter
The cabin air filter is designed to clean the air entering the passenger compartment through the heating, ventilation, and air conditioning (HVAC) system. It traps dust, pollen, mold spores, and other airborne particles, providing a cleaner and healthier environment for you and your passengers. Think of it as your car's personal air purifier.
Location
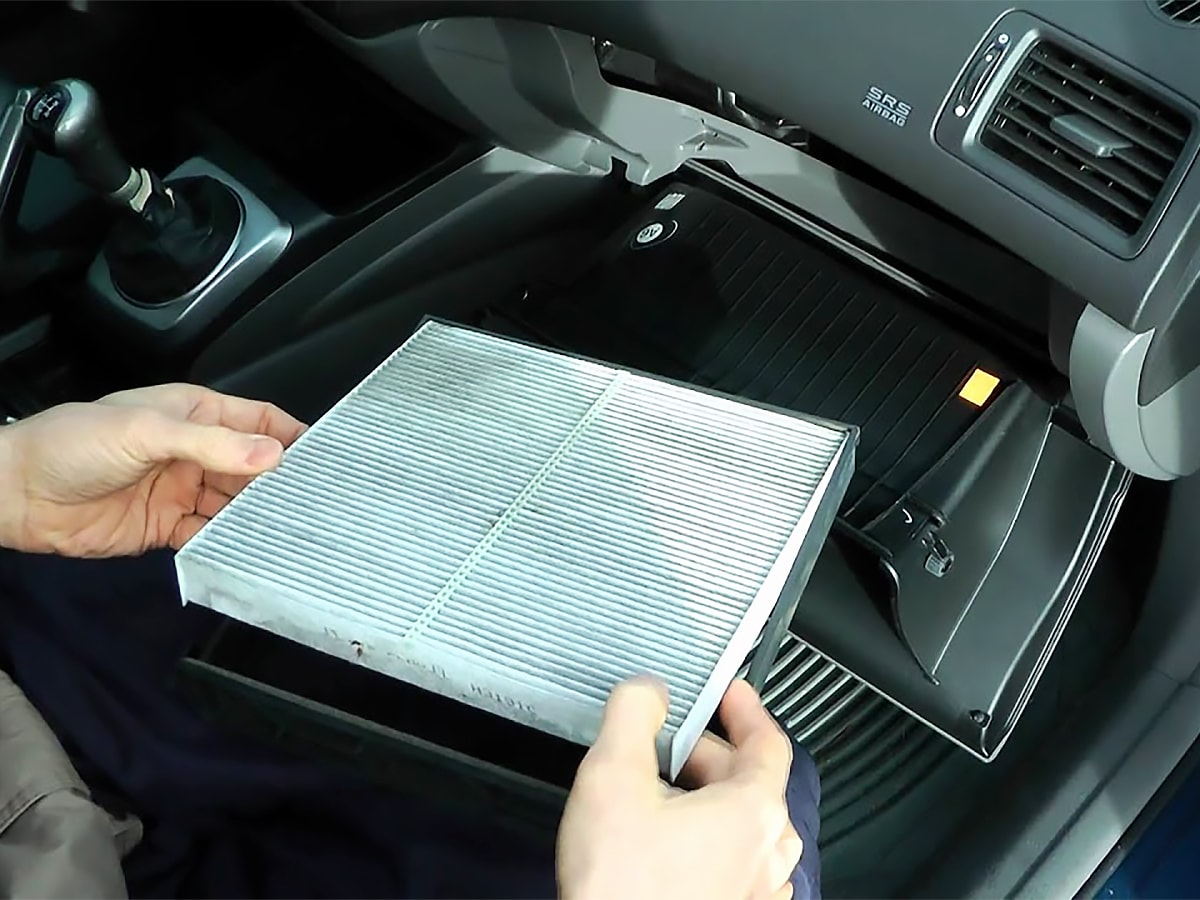
In most Honda Pilot models, the cabin air filter is located behind the glove compartment. While the exact procedure can vary slightly depending on the year of your Pilot, the general principle remains the same.
Maintenance: Keeping Your Air Clean
Regular maintenance is key to ensuring the cabin air filter performs its job effectively. Here's what you need to know:
Replacement Intervals
The recommended replacement interval for the cabin air filter in a Honda Pilot is typically every 15,000 to 30,000 miles, or once a year. However, this can vary depending on your driving conditions. If you frequently drive in dusty or polluted environments, you may need to replace the filter more often.
Inspection
Periodically inspect the cabin air filter for dirt, debris, and discoloration. A visibly dirty filter indicates that it's time for a replacement. Even if the filter doesn't look particularly dirty, it's still a good idea to replace it at the recommended intervals.
The Replacement Process
Replacing the cabin air filter is a relatively simple task that most car owners can perform themselves. Here's a step-by-step guide:
- Open the Glove Compartment: Empty the glove compartment to provide easier access.
- Detach the Glove Compartment Damper: Locate the damper arm on the side of the glove compartment. Disconnect it by gently pushing it inward and sliding it off the mounting pin.
- Release the Glove Compartment Stoppers: Squeeze the sides of the glove compartment inward to release the stoppers, allowing the glove compartment to swing down further.
- Locate the Filter Housing: Behind the glove compartment, you'll find the cabin air filter housing.
- Remove the Filter Housing Cover: There will be a clip or tab securing the cover. Release the clip or tab and remove the cover.
- Remove the Old Filter: Carefully slide out the old cabin air filter. Note the direction of airflow (indicated by an arrow on the filter) for proper installation of the new filter.
- Install the New Filter: Insert the new cabin air filter, ensuring the airflow arrow points in the correct direction.
- Reinstall the Filter Housing Cover: Replace the cover and secure it with the clip or tab.
- Reattach the Glove Compartment Stoppers: Push the sides of the glove compartment inward and reattach the stoppers.
- Reattach the Glove Compartment Damper: Reconnect the damper arm to the mounting pin.
- Close the Glove Compartment: Ensure the glove compartment closes properly.
Troubleshooting: Identifying and Resolving Issues
A clogged or dirty cabin air filter can cause a variety of problems. Here's how to troubleshoot common issues:
Symptom: Reduced Airflow
Problem: One of the most common symptoms of a clogged cabin air filter is reduced airflow from the vents. You might notice that the fan is blowing, but the air coming out is weak.
Cause: A buildup of dirt and debris in the filter restricts airflow.
Solution: Replace the cabin air filter. This is almost always the solution to reduced airflow caused by a clogged filter.
Symptom: Musty or Unpleasant Odors
Problem: A musty or unpleasant odor coming from the vents is another sign of a problem with the cabin air filter.
Cause: Mold, mildew, and bacteria can grow on a dirty cabin air filter, especially in humid conditions. This is common in vehicles like the Honda Pilot, which are often used for family trips and can accumulate moisture.
Solution: Replace the cabin air filter. Consider using a cabin air filter with activated carbon, which helps to absorb odors. You may also want to use an HVAC cleaner to disinfect the system and eliminate any lingering odors. Some mechanics recommend spraying an anti-bacterial solution into the intake vents (usually located near the windshield wipers) with the HVAC system running to disinfect the ductwork.
Symptom: Excessive Noise from the HVAC System
Problem: A whistling or rattling noise from the HVAC system, especially when the fan is on high, can indicate a problem with the cabin air filter.
Cause: A severely clogged filter can restrict airflow so much that it causes the fan motor to work harder and make more noise. In some cases, debris caught in the filter can vibrate and create noise.
Solution: Replace the cabin air filter. If the noise persists after replacing the filter, there may be an issue with the fan motor itself, requiring further inspection.
Symptom: Foggy Windows
Problem: Difficulty defogging the windows, especially in humid conditions.
Cause: A clogged cabin air filter restricts airflow, making it harder for the HVAC system to remove moisture from the air. This is particularly noticeable in vehicles driven in rainy climates.
Solution: Replace the cabin air filter. Ensure the air conditioning system is functioning properly, as it plays a crucial role in dehumidifying the air. Check the refrigerant level if the AC isn't blowing cold air.
Real-World Issues and Solutions
Here are some real-world scenarios and practical solutions related to cabin air filters:
Issue: Premature Clogging in Dusty Environments
Problem: You live in an area with high levels of dust or pollen, and your cabin air filter clogs up much faster than the recommended interval.
Solution: Use a high-quality cabin air filter designed for dusty environments. These filters often have multiple layers of filtration or a higher dust-holding capacity. Consider replacing the filter more frequently, perhaps every 6 months or 10,000 miles. Some people even opt for reusable, washable filters, but they require more frequent cleaning.
Issue: Choosing the Right Filter
Problem: You're unsure which type of cabin air filter to buy for your Honda Pilot.
Solution: Consult your owner's manual or a reputable auto parts store to determine the correct filter type for your specific model and year. Consider the benefits of different filter types, such as activated carbon filters for odor control or HEPA filters for superior filtration. Online parts websites like RockAuto are great for confirming correct part numbers.
Issue: Damaged Filter Housing
Problem: The cabin air filter housing is damaged, making it difficult to install or remove the filter.
Solution: If the damage is minor, you may be able to repair the housing with adhesive or by fabricating a small replacement piece. However, if the damage is significant, it's best to replace the entire filter housing. This may require removing the glove compartment assembly for easier access.
Issue: Mechanic Over-tightening Screws
Problem: Some models of cars may have screws that hold the cabin air filter housing. Over-tightening of these screws may result in damage to the plastic housing, stripping the threads.
Solution: Exercise caution while tightening screws. Hand-tighten to a snug fit instead of applying excessive torque with a wrench.
Examples from Other Car Models
The principles of cabin air filter maintenance and troubleshooting apply to many vehicles. For example:
- Toyota Camry: Similar to the Honda Pilot, the Camry's cabin air filter is located behind the glove compartment. The replacement procedure is also quite similar.
- Ford F-150: The F-150's cabin air filter is also behind the glove compartment but may require slightly different steps to access.
- Subaru Outback: The Outback's cabin air filter location is consistent with others – behind the glove compartment.
While the specific location and access methods may vary, the importance of regular maintenance and the troubleshooting steps remain the same across different car models.
Keeping Your Car in Top Condition
Maintaining your car's cabin air filter is just one aspect of overall vehicle maintenance. Here are some additional tips to keep your Honda Pilot in top condition:
- Follow the Recommended Maintenance Schedule: Adhere to the maintenance schedule outlined in your owner's manual, including oil changes, filter replacements, and fluid flushes.
- Check Fluids Regularly: Monitor the levels of engine oil, coolant, brake fluid, power steering fluid, and transmission fluid. Top up or replace fluids as needed.
- Inspect Tires Regularly: Check tire pressure, tread depth, and overall condition. Rotate tires every 6,000 to 8,000 miles to ensure even wear.
- Address Issues Promptly: Don't ignore warning lights or unusual noises. Have any problems diagnosed and repaired as soon as possible to prevent further damage.
- Keep Your Car Clean: Regular washing and waxing can protect the paint from the elements. Clean the interior regularly to prevent the buildup of dirt and debris.
- Use Quality Parts: When replacing parts, opt for OEM (Original Equipment Manufacturer) or reputable aftermarket brands to ensure quality and reliability.
- Consider Professional Service: For complex repairs or maintenance tasks, consider taking your car to a qualified mechanic.
By following these tips and paying attention to the condition of your cabin air filter, you can enjoy a cleaner, healthier, and more comfortable driving experience in your Honda Pilot.