How Do You Check The Fuel Pump Pressure
Hey there, fellow gearheads! Today, we're diving into a critical aspect of diagnosing fuel delivery issues: checking your fuel pump pressure. A weak or failing fuel pump can wreak havoc on your engine's performance, causing everything from rough idling and poor acceleration to a complete no-start situation. This guide will walk you through the process, assuming you're comfortable with basic automotive tools and safety procedures. We'll cover the tools you need, the steps involved, and what the readings actually *mean*. Remember, fuel systems operate under pressure, so safety is paramount. Always disconnect the negative battery cable before starting any work on the fuel system to prevent sparks.
Gathering Your Tools and Materials
Before we get our hands dirty, let's assemble the necessary equipment. You'll need:
- Fuel Pressure Test Kit: This is the heart of the operation. A good kit will include a pressure gauge, various adaptors to connect to different fuel systems, and a bleed valve for releasing pressure. Make sure the kit is compatible with your vehicle's fuel system type (more on that later).
- Safety Glasses: Protect those peepers! Fuel can spray and cause irritation.
- Shop Rags: For wiping up spills. Trust me, there will be some.
- Wrench Set or Adjustable Wrench: For loosening and tightening fittings.
- Screwdrivers (various sizes): To remove any access panels or covers.
- Fuel Line Disconnect Tool (if required): Some vehicles use quick-connect fittings that require a special tool to detach. These are inexpensive and essential if your vehicle uses them.
- Jack and Jack Stands (optional): Depending on the location of your fuel filter or test port, you might need to raise the vehicle for better access. Always use jack stands for safety!
- Service Manual or Online Resource: To identify the correct test port location and the specified fuel pressure for *your* vehicle. This is critical information!
Understanding Your Fuel System
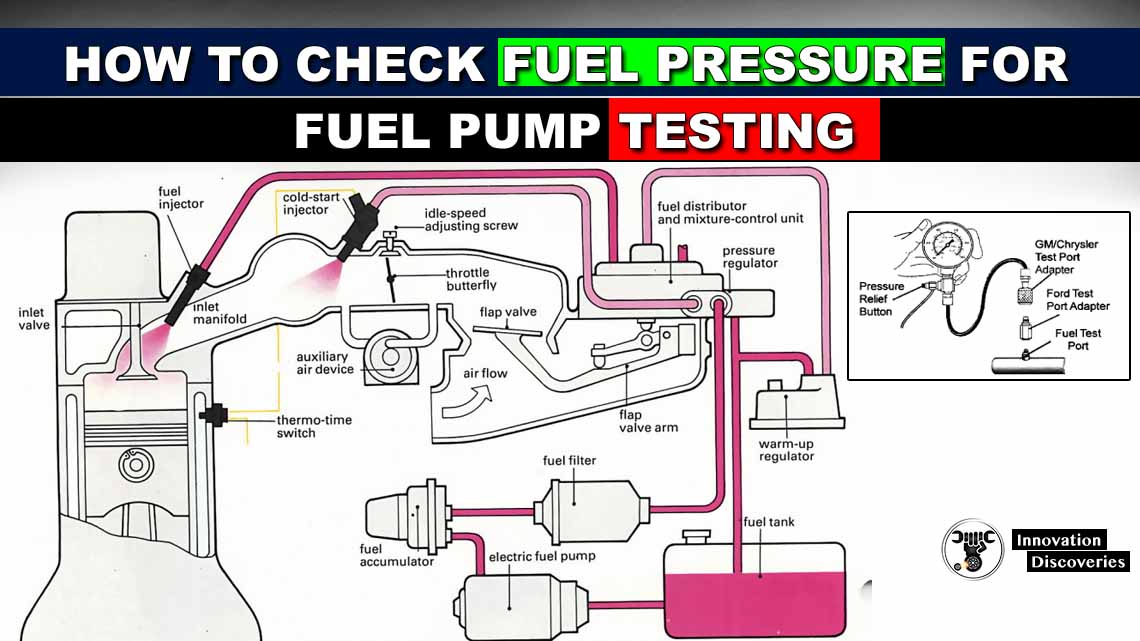
Before we hook up the gauge, let's briefly discuss the basics of a fuel system. Most modern vehicles use an electronic fuel injection (EFI) system. The fuel pump, typically located inside the fuel tank, draws fuel and pushes it through a fuel filter to remove contaminants. From there, the fuel travels to the fuel rail, which distributes fuel to the individual fuel injectors. A pressure regulator maintains a constant pressure in the fuel rail. Any excess fuel is returned to the fuel tank via a return line (in return-type systems).
There are two main types of EFI systems:
- Return-Type Systems: These systems have a fuel pressure regulator located on the fuel rail or near the engine. Excess fuel is returned to the fuel tank. These are older systems and often have an easily accessible test port on the fuel rail.
- Returnless Systems: These systems typically have the fuel pressure regulator integrated with the fuel pump inside the fuel tank. They lack a return line. Testing these systems can be a bit trickier, often requiring access to the fuel filter or a specific test port elsewhere in the fuel line.
Identifying your system type will help you locate the correct test point.
Locating the Fuel Pressure Test Port
The fuel pressure test port is usually a Schrader valve – similar to the valve on your tire – located on the fuel rail. It’s often covered with a small cap. Here's how to find it:
- Consult Your Service Manual: This is the best resource. It will pinpoint the exact location of the test port for your specific make and model.
- Visually Inspect the Fuel Rail: Look for a small, capped valve on the fuel rail. It's usually a metallic color and stands out.
- Check Near the Fuel Filter: If you have a returnless system and can't find a test port on the fuel rail, check near the fuel filter. Some returnless systems have a test port integrated into the fuel filter assembly or in the fuel line near it.
Important: Be absolutely certain you’ve identified the correct port. Don’t connect to any random fitting on the fuel system! This can lead to inaccurate readings or, worse, fuel leaks.
Connecting the Fuel Pressure Test Gauge
Now for the moment of truth. Follow these steps carefully:
- Relieve Fuel Pressure: This is crucial for safety. Refer to your service manual for the recommended procedure. Some vehicles have a fuel pump relay you can temporarily disconnect, while others require bleeding the pressure through a specific port (often the test port itself using the gauge's bleed valve – but verify this!).
- Remove the Protective Cap: Unscrew the cap on the fuel pressure test port.
- Connect the Test Gauge: Attach the appropriate adaptor from your fuel pressure test kit to the Schrader valve. Ensure it's a snug and secure fit. You should hear a slight hiss as the gauge connects, but no significant fuel leak.
- Double-Check Connections: Make sure all connections are tight and secure before proceeding.
Testing Fuel Pump Pressure
With the gauge connected, we can finally test the fuel pressure:
- Turn the Ignition Key to the "ON" Position (without starting the engine): This will activate the fuel pump for a few seconds to prime the system. Observe the pressure reading on the gauge. Note this reading.
- Start the Engine: Allow the engine to idle. Observe the pressure reading on the gauge while the engine is running. This is your running fuel pressure. Note this reading.
- Check Pressure Under Load (Optional): If possible and safe, have someone briefly rev the engine while you monitor the fuel pressure. The pressure should remain relatively stable. A significant drop in pressure during acceleration suggests a fuel supply problem. This may require a helper and a safe environment.
- Check for Pressure Drop After Shut Off: After turning off the engine, observe the fuel pressure gauge. It should hold pressure for a period of time (usually 15-20 minutes, but consult your service manual). A rapid drop in pressure indicates a leak in the fuel system – either an internal leak in the fuel pump, a leaky injector, or a leak at a fuel line connection.
Interpreting the Results
This is where your service manual is absolutely essential! You need to know the specified fuel pressure for your vehicle to accurately interpret the readings. Here's a general guide:
- Low Pressure: If the pressure is significantly below the specified range, it could indicate a weak fuel pump, a clogged fuel filter, a faulty fuel pressure regulator (if applicable), or a leak in the fuel line.
- High Pressure: If the pressure is significantly above the specified range, it could indicate a faulty fuel pressure regulator (if applicable) or a blocked return line (in return-type systems).
- Fluctuating Pressure: Erratic pressure readings can indicate a failing fuel pump, a clogged fuel filter, or a vacuum leak in the fuel pressure regulator control line (if applicable).
- Rapid Pressure Drop After Shut Off: As mentioned earlier, this points to a leak in the system. Investigate fuel injectors, fuel lines, and the fuel pump itself.
Example: Let’s say your service manual states that the fuel pressure should be between 45 and 55 PSI at idle. If you’re reading 30 PSI, you definitely have a problem. If you're reading 65 PSI, you *also* have a problem, but a different one!
Troubleshooting Steps
Based on your pressure readings, you can begin troubleshooting the problem. Here's a logical approach:
- Check the Fuel Filter: A clogged fuel filter is a common cause of low fuel pressure. Replace it and retest.
- Inspect Fuel Lines: Look for any kinks, leaks, or damage to the fuel lines.
- Test the Fuel Pressure Regulator (if applicable): If your vehicle has a fuel pressure regulator, check its vacuum line for leaks. You can also test the regulator itself using a vacuum pump and a pressure gauge (consult your service manual for the proper procedure).
- Test the Fuel Pump Relay and Wiring: Ensure the fuel pump is receiving proper voltage. Check the fuel pump relay and wiring harness for any issues.
- Consider Fuel Pump Replacement: If all other components check out, the fuel pump itself is likely the culprit. Replacing the fuel pump is a more involved procedure, but with patience and the right tools, it's a job many DIYers can tackle.
Releasing Pressure and Disconnecting
Once you’ve completed your testing and troubleshooting, you need to safely disconnect the fuel pressure test gauge:
- Relieve Fuel Pressure: Use the bleed valve on your fuel pressure test gauge to release any remaining pressure. Direct the fuel into a shop rag to avoid spills.
- Disconnect the Test Gauge: Carefully disconnect the test gauge from the Schrader valve.
- Reinstall the Protective Cap: Screw the protective cap back onto the fuel pressure test port.
- Reconnect the Negative Battery Cable: Reconnect the negative battery cable to the battery.
- Dispose of Used Rags Properly: Fuel-soaked rags are a fire hazard. Dispose of them properly in a sealed metal container.
Checking your fuel pump pressure is a crucial step in diagnosing fuel delivery problems. By following these steps and using the information in your service manual, you can accurately assess your fuel system's performance and take the necessary steps to get your engine running smoothly again. Good luck, and remember to always prioritize safety!