How Do You Install A Helicoil
Thread repair is a common task in automotive maintenance and repair. Stripped threads can render components unusable, leading to costly replacements. Among the various thread repair methods available, the Helicoil insert stands out as a versatile and reliable solution. This article delves into the installation process of Helicoils, explores the engineering behind their design, compares them with alternative thread repair techniques, and discusses their reliability, maintenance, and future in the automotive industry.
Helicoil Installation: A Step-by-Step Guide
Installing a Helicoil involves a series of precise steps to ensure a secure and durable thread repair. Neglecting any of these steps can compromise the integrity of the repair.
- Preparation: The first step is identifying the damaged thread and determining the correct Helicoil size. This information is typically found in the vehicle's service manual or by measuring the original bolt. Gather the necessary tools: a drill, a Helicoil tap, a Helicoil installation tool, a tang break-off tool, cutting fluid, and safety glasses.
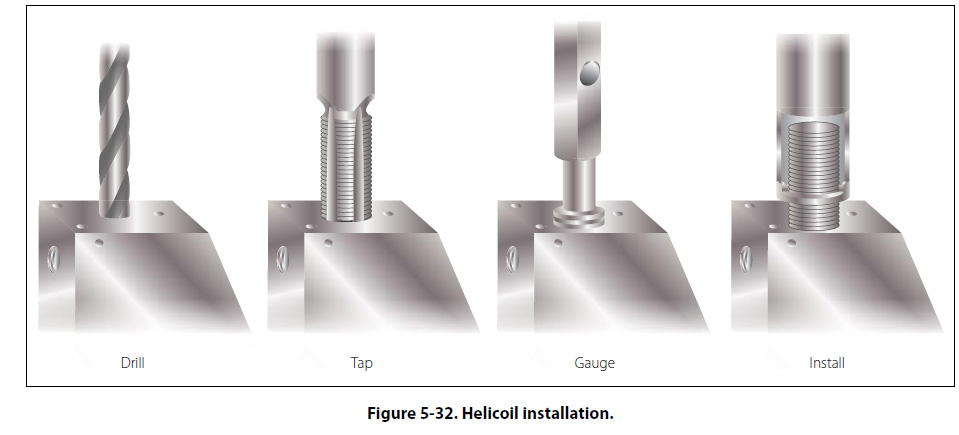
- Drilling: Using the specified drill size (usually slightly larger than the original thread diameter), carefully drill out the damaged threads. It's crucial to maintain a straight and perpendicular drilling angle to the workpiece. Applying cutting fluid during drilling helps to lubricate the drill bit, reduce heat, and improve the surface finish.
- Tapping: This step involves creating new threads to accept the Helicoil insert. Use the Helicoil tap specifically designed for the chosen Helicoil size. Apply cutting fluid generously and turn the tap slowly and steadily, ensuring it follows the drilled hole's axis. Backing the tap out periodically helps to clear chips and prevent binding. Over-tapping can lead to a loose fit for the Helicoil, while under-tapping can make installation difficult.
- Installation: Insert the Helicoil insert into the installation tool. Thread the insert into the newly tapped hole, applying gentle pressure. The installation tool will engage with the insert's tang, allowing you to wind the insert into the hole. Continue threading until the insert is positioned just below the surface of the workpiece. Avoid over-tightening, as this can damage the insert or the surrounding material.
- Tang Removal: Once the insert is installed, the tang (a small protruding piece used for installation) needs to be removed. Use the tang break-off tool to snap the tang off at the notch. In some cases, a sharp tap with a punch and hammer may be required. Inspect the installation to ensure the tang is fully removed and there are no sharp edges.
- Inspection and Verification: Finally, test the repaired thread by threading in a bolt of the correct size and thread pitch. Ensure the bolt engages smoothly and securely. Apply the specified torque value recommended for the bolt.
Engineering Considerations and Material Science
Helicoil inserts are typically made from high-strength stainless steel wire, often 304 or 316. This material offers excellent corrosion resistance, high tensile strength, and resistance to wear. The diamond-shaped cross-section of the wire allows it to form a strong mechanical lock with both the parent material and the bolt. This design distributes the load evenly across the threads, reducing stress concentration and increasing the joint's overall strength.
The pitch of the Helicoil insert is crucial for proper thread engagement. It must match the pitch of the original bolt to ensure compatibility and prevent cross-threading. The installation torque is also critical; excessive torque can deform the insert or damage the surrounding material, while insufficient torque can lead to a loose joint.
Alternatives to Helicoils
Several alternative thread repair methods exist, each with its own advantages and disadvantages:
- Thread Chasing: This involves using a tap or die to clean and restore damaged threads. It's suitable for minor thread damage but ineffective for stripped threads.
- Oversized Bolts: This method involves drilling out the damaged threads and using a larger diameter bolt. While simple, it requires replacing the original bolt and may weaken the surrounding material.
- Solid Thread Inserts: These are solid bushings with internal and external threads. They offer superior strength compared to Helicoils but require more extensive machining and are more expensive.
- Time-Sert Inserts: Similar to solid inserts but feature a self-locking design, providing excellent resistance to vibration and loosening. They are often used in high-stress applications.
- Welding and Re-tapping: This involves welding the damaged area and then re-tapping the threads. This method can be effective but requires specialized welding skills and may distort the surrounding material. It can also affect the heat treatment of the part.
Pros and Cons Comparison
Helicoil Inserts:Pros: Relatively inexpensive, easy to install, widely available, restores thread strength, suitable for a variety of materials.
Cons: Not as strong as solid inserts, can be susceptible to pull-out in very soft materials, requires precise installation.
Solid Thread Inserts:Pros: High strength, excellent resistance to vibration and loosening, suitable for high-stress applications.
Cons: More expensive, requires more extensive machining, less versatile than Helicoils.
Time-Sert Inserts:Pros: Very high strength, self-locking design, excellent resistance to vibration and loosening.
Cons: Most expensive option, requires specialized installation tools.
Reliability and Maintenance
A properly installed Helicoil insert provides a reliable and durable thread repair. However, several factors can affect its long-term performance.
- Material Compatibility: Ensure the Helicoil material is compatible with the parent material to prevent galvanic corrosion.
- Proper Installation: Following the correct installation procedure and using the appropriate tools is crucial for a secure and reliable repair.
- Torque Specifications: Always tighten the bolt to the specified torque value to prevent over-stressing the threads.
- Lubrication: Applying a small amount of thread lubricant can help to reduce friction and prevent galling.
Regular inspection of the repaired threads can help to identify any potential problems early on. Look for signs of loosening, corrosion, or damage. If any issues are detected, the Helicoil insert may need to be replaced.
Future Trends in Thread Repair
The automotive industry is constantly evolving, and thread repair technology is no exception. Future trends include:
- Advanced Materials: The development of new high-strength, lightweight materials for Helicoil inserts, such as titanium alloys and composites.
- Improved Installation Tools: The development of automated and precision installation tools to ensure consistent and reliable results.
- Self-Monitoring Inserts: The integration of sensors into Helicoil inserts to monitor thread tension and detect potential failures.
- 3D-Printed Inserts: The potential for on-demand manufacturing of custom Helicoil inserts using 3D printing technology.
Conclusion
The Helicoil insert remains a valuable tool for automotive professionals, offering a cost-effective and reliable solution for thread repair. By understanding the engineering principles behind its design, following the correct installation procedures, and considering the alternatives, technicians can ensure a successful and durable repair. As the automotive industry continues to advance, the development of new materials and technologies will further enhance the performance and reliability of thread repair solutions, ensuring the longevity and safety of vehicles.