How To Adjust Car Headlights
Are your headlights aiming too low, leaving you struggling to see the road ahead? Or maybe they're pointed too high, blinding oncoming drivers? Misaligned headlights are a common problem, impacting visibility and safety. Fortunately, adjusting them is often a straightforward process you can tackle yourself. This guide will walk you through how to adjust your car's headlights, ensuring optimal illumination and a safer driving experience.
Why Adjust Your Headlights?
Before we dive into the "how-to," let's understand the "why." Properly aligned headlights are crucial for several reasons:
- Safety: Correctly aimed headlights provide optimal visibility at night and in low-light conditions, allowing you to see potential hazards, pedestrians, and other vehicles well in advance.
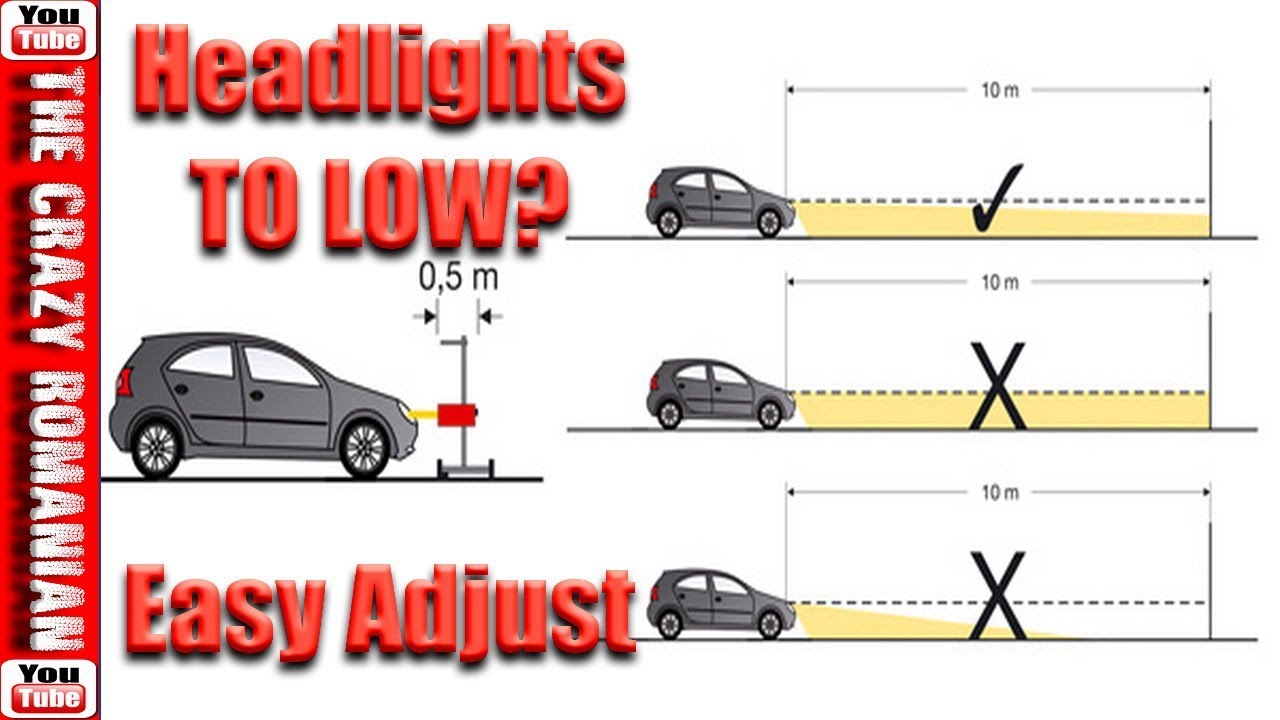
- Preventing Accidents: Headlights that are too low reduce your visibility range, potentially leading to accidents. Conversely, headlights that are too high can blind oncoming drivers, increasing the risk of collisions.
- Legal Compliance: Many jurisdictions have regulations regarding headlight alignment. Improperly aligned headlights can result in a citation during a vehicle inspection.
- Optimal Light Output: Even the brightest headlights are ineffective if they're not aimed correctly. Adjusting them ensures you're maximizing the use of your headlight's light output.
Diagnosing Headlight Alignment Issues
How do you know if your headlights need adjusting? Here are some common indicators:
- Reduced Visibility: You find it difficult to see clearly at night, even with your high beams on.
- Complaints from Other Drivers: Oncoming drivers frequently flash their high beams at you.
- Uneven Illumination: The road ahead is not evenly lit, with noticeable dark spots or areas of uneven brightness.
- Recent Suspension Work: If you've recently had suspension work done, your headlight alignment may have been affected.
- Accident Repair: Following a collision repair, it's essential to have your headlights checked and adjusted.
- Obvious Misalignment: Park your car on a level surface facing a wall and visually inspect the headlight beams. If they appear uneven or pointed in different directions, they likely need adjustment.
Tools and Materials You'll Need
Before you begin, gather the following tools and materials:
- A Phillips and/or Flathead Screwdriver: Most headlights are adjusted using screws or bolts. The type of screwdriver you need will depend on your vehicle.
- Measuring Tape: You'll need this to accurately measure the distance from the ground to your headlights and the distance between them.
- Masking Tape: Use masking tape to mark the wall where your headlights should be aimed.
- Level Ground and a Wall: You'll need a level surface to park your car and a flat wall to project the headlight beams onto. A garage door or the side of a building works well.
- A Helper (Optional but Recommended): Having someone to sit in the driver's seat while you make adjustments can be helpful.
- Owner's Manual: Your owner's manual may contain specific instructions for adjusting the headlights on your vehicle.
- Safety Glasses: Protect your eyes from dirt and debris.
- Gloves: Keep your hands clean and protected.
Step-by-Step Guide to Adjusting Your Headlights
Follow these steps to adjust your car's headlights:
1. Prepare Your Vehicle
First, ensure your vehicle is properly prepared:
- Check Tire Pressure: Make sure your tires are properly inflated to the manufacturer's recommended pressure.
- Empty the Trunk: Remove any heavy items from your trunk that could affect the vehicle's ride height.
- Have a Full Tank of Gas (Ideal): A full tank of gas can also subtly affect ride height. If possible, fill up your tank before adjusting your headlights.
- Clean Headlight Lenses: Ensure your headlight lenses are clean and free of dirt and debris.
2. Position Your Vehicle
Next, position your vehicle correctly:
- Park on a Level Surface: Park your car on a level surface, facing a flat wall. The wall should be at least 10-25 feet away. The greater the distance, the more accurate the adjustment will be.
- Align the Vehicle: Make sure your car is parked straight and perpendicular to the wall.
3. Mark the Wall
Now, mark the wall with tape to guide your adjustments:
- Measure Headlight Height: Measure the distance from the ground to the center of your headlights. Transfer this measurement to the wall and mark it with a horizontal line using masking tape. This line represents the center of your headlights.
- Measure Headlight Distance: Measure the distance between the centers of your two headlights. Transfer this measurement to the wall, centering it around the vertical center of your car. Mark each point with a vertical line using masking tape. These lines represent the horizontal centers of your headlights.
- Create Target Points: For optimal alignment, the center of the headlight beam should fall slightly below the horizontal line and slightly to the side of the vertical line. For the horizontal line, mark a point 2 inches below the line. The horizontal aiming point depends on your car, consult with the car repair manual to know the appropriate location. These are your aiming targets.
4. Locate the Adjustment Screws
Find the adjustment screws on your headlights. These are usually located on the back or top of the headlight assembly. Your owner's manual will show the precise location. There are typically two screws for each headlight:
- Vertical Adjustment: This screw controls the up-and-down aiming of the headlight beam.
- Horizontal Adjustment: This screw controls the left-and-right aiming of the headlight beam.
5. Adjust the Headlights
Now, make the adjustments. Make small adjustments and recheck the beam pattern after each adjustment.
- Turn on the Headlights: Turn on your headlights and observe the beam pattern on the wall.
- Adjust Vertical Aim: Use the vertical adjustment screw to raise or lower the headlight beam until the brightest part of the beam is aligned with your vertical target on the wall.
- Adjust Horizontal Aim: Use the horizontal adjustment screw to move the headlight beam left or right until the brightest part of the beam is aligned with your horizontal target on the wall.
- Repeat for the Other Headlight: Repeat the adjustment process for the other headlight.
6. Test Your Adjustments
After making the adjustments, take your car for a test drive at night to see how well your headlights are aimed. Pay attention to:
- Visibility Range: Can you see clearly far enough ahead?
- Glare: Are you blinding oncoming drivers?
- Beam Pattern: Is the road evenly illuminated?
If necessary, repeat the adjustment process until you're satisfied with the headlight alignment. It's always better to err on the side of aiming slightly too low rather than too high.
When to Seek Professional Help
While adjusting your headlights is often a DIY task, there are situations where it's best to seek professional help:
- Difficulty Locating Adjustment Screws: If you can't find the adjustment screws or are unsure how to access them, a mechanic can help.
- Damaged Headlight Assembly: If your headlight assembly is damaged or broken, it may need to be replaced before it can be adjusted.
- Persistent Misalignment: If you've tried adjusting your headlights multiple times and they still won't stay aligned, there may be an underlying issue, such as a worn suspension component.
- Complex Headlight Systems: Some vehicles have more complex headlight systems, such as auto-leveling headlights, that require specialized equipment to adjust.
Approximate Repair Costs
If you choose to have a professional adjust your headlights, the cost will typically range from $30 to $75, depending on the shop and your location. Replacing a damaged headlight assembly can cost anywhere from $100 to $500 or more, depending on the make and model of your vehicle and the type of headlight (halogen, LED, HID).
Preventive Maintenance
To keep your headlights properly aligned, consider these preventive measures:
- Regular Inspections: Have your headlights checked during routine vehicle maintenance.
- Avoid Bumping Curbs: Hitting curbs can knock your headlights out of alignment.
- Be Mindful of Load: Avoid carrying excessive weight in your vehicle, as this can affect the ride height and headlight alignment.
Conclusion
Adjusting your car's headlights is a simple yet crucial task that can significantly improve your driving safety and the safety of others on the road. By following these steps, you can ensure your headlights are properly aligned, providing optimal visibility and preventing accidents. If you're not comfortable performing the adjustment yourself, don't hesitate to seek professional help. A small investment in headlight alignment can make a big difference in your driving experience and overall safety.
Disclaimer: This guide provides general instructions for adjusting car headlights. Specific procedures may vary depending on your vehicle's make and model. Always consult your owner's manual for detailed instructions and safety precautions. If you are uncomfortable performing this task, seek the assistance of a qualified mechanic.