How To Buff Out Scratches On Plastic Bumper
Plastic bumpers, a ubiquitous feature on modern cars from the humble Toyota Corolla to the luxurious BMW 7 Series, are designed to absorb impacts and protect the vehicle's body. However, their inherent softness makes them susceptible to scratches. Whether it's a brush with a rogue shopping cart in a parking lot or a close encounter with a low-hanging branch, scratches on your plastic bumper can be unsightly. Fortunately, many of these blemishes can be buffed out at home with the right tools and techniques. This guide will walk you through the process, explaining the complexities in an easy-to-understand manner.
Understanding the Types of Scratches
Before you grab your buffer, it's crucial to understand the depth of the scratch. Not all scratches are created equal, and attempting to buff out a deep scratch will only lead to frustration (and potentially damage).
Clear Coat Scratches: The Surface Blemishes
These are the most common and easiest to fix. The clear coat is the outermost layer of paint, designed to protect the color coat underneath. Clear coat scratches are often superficial and feel smooth to the touch. You might see them as swirling marks or light hazing, especially under direct sunlight. Think of the minor swirl marks you often see on a well-used Honda Civic. These are typically clear coat scratches.
Paint Scratches: A Step Deeper
These scratches penetrate the clear coat and reach the color coat. They will be slightly more noticeable and may catch your fingernail when you run it across the surface. A scratch that reveals a slightly different color underneath indicates it's likely a paint scratch. On a dark-colored car like a Mercedes-Benz C-Class, even a light paint scratch can be quite visible as it exposes the primer underneath.
Primer Scratches: Getting Serious
Primer scratches have gone through the clear coat and the paint coat, exposing the primer layer underneath. The primer is usually a grey or white coating. These scratches are deeper and more noticeable. Trying to buff out a primer scratch is unlikely to produce satisfactory results; it will likely require filling and repainting.
Base Plastic Scratches: The Deepest Wounds
The deepest and most challenging scratches penetrate all the layers of paint and reach the raw plastic of the bumper itself. These scratches are often caused by significant impacts or abrasive contact. You’ll clearly see the color of the plastic underneath. Repairing these types of scratches usually involves filling the damaged area with a plastic repair compound, sanding, priming, and repainting the bumper. This is a job best left to professionals.
Tools and Materials You'll Need
Having the right tools and materials is essential for achieving a professional-looking result. Here's a comprehensive list:
- Car Wash Soap and Water: For cleaning the bumper before and after buffing.
- Microfiber Towels: For washing, drying, and buffing. Avoid using shop rags, as they can contain abrasive particles.
- Detailing Clay Bar and Lubricant (optional): For removing embedded contaminants before polishing. This will create a smoother surface for polishing.
- Painter's Tape: To protect surrounding areas and prevent accidental damage.
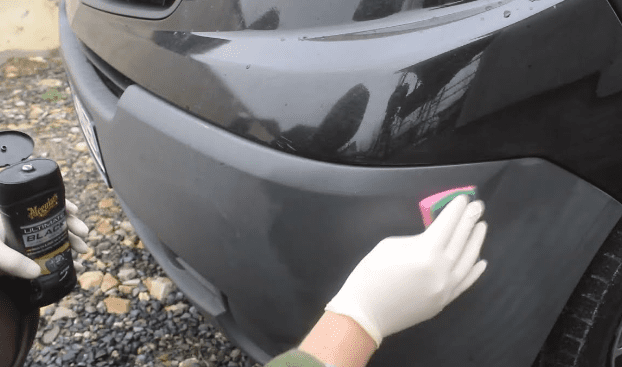
- Scratch Remover Compound: Choose a compound specifically designed for plastic surfaces. Meguiar's PlastX and similar products are good choices.
- Polishing Compound (optional): For refining the finish after using scratch remover.
- Buffing Pads: You'll need different types of pads:
- Cutting Pad: For removing the scratch.
- Polishing Pad: For refining the finish.
- Finishing Pad: For the final gloss.
- Dual-Action (DA) Polisher: A DA polisher is recommended for beginners because it's less likely to cause swirl marks. A rotary polisher can be used, but it requires more skill and care.
- Spray Bottle with Water: To keep the buffing pad cool and prevent the compound from drying out too quickly.
- Gloves: To protect your hands.
- Eye Protection: Safety glasses or goggles are a must.
- Good Lighting: To clearly see the scratches and monitor your progress.
Step-by-Step Guide to Buffing Out Scratches
Follow these steps carefully to buff out scratches on your plastic bumper:
1. Clean the Bumper
Wash the bumper thoroughly with car wash soap and water to remove any dirt, grime, or debris. Rinse well and dry with a clean microfiber towel. This is an important step because buffing dirt and grime into the bumper will create more scratches.
2. Clay Bar Treatment (Optional)
If the bumper feels rough or contaminated, use a detailing clay bar and lubricant to remove embedded particles. This will ensure a smoother surface for polishing. Follow the instructions on the clay bar kit. This is very helpful, especially if you live in an area with a lot of road grime or industrial fallout, which is common in larger cities.
3. Tape Off Surrounding Areas
Use painter's tape to protect any adjacent painted surfaces, trim, or headlights. This will prevent the buffer from accidentally damaging these areas.
4. Apply Scratch Remover Compound
Apply a small amount of scratch remover compound to the cutting pad. Start with a small amount, as you can always add more if needed. It’s better to apply too little compound to start, and add more as necessary to ensure even spread across the pad and work area.
5. Buff the Scratch
Turn on the DA polisher to a low speed (around 2-3 on most polishers). Gently move the polisher back and forth over the scratch, overlapping each pass by about 50%. Apply light to medium pressure. Keep the pad moving to avoid overheating the plastic. Periodically spray the pad with water to keep it cool and prevent the compound from drying out. Work in small sections, about 1 foot by 1 foot, at a time. You should see the scratch begin to diminish after a few passes. For deeper scratches, you may need to repeat this process several times.
6. Polish the Area (Optional)
After using the scratch remover compound, switch to a polishing pad and a polishing compound. This will refine the finish and remove any hazing left by the scratch remover. Use the same technique as above, moving the polisher back and forth with overlapping passes. This step will further enhance the gloss and clarity of the plastic. On a car with a darker finish, like a Tesla Model S with black paint, this step is even more crucial to get a mirror-like finish.
7. Finish with a Finishing Pad (Optional)
For the ultimate shine, use a finishing pad with a very light finishing polish or even just water. This will remove any remaining imperfections and leave the plastic looking like new. This step is similar to the polishing step, just with a softer pad and lighter compound (or water).
8. Clean and Inspect
Wipe the area with a clean microfiber towel to remove any remaining compound. Inspect the area under good lighting to ensure that the scratch has been effectively removed. If the scratch is still visible, you may need to repeat the buffing process or consider seeking professional help.
9. Apply a Plastic Protectant (Optional)
To protect the newly buffed plastic and prevent future scratches, apply a plastic protectant. This will also help to restore the original luster and prevent fading.
Troubleshooting
Swirl Marks: If you notice swirl marks after buffing, you may be using too much pressure or too aggressive of a pad. Try switching to a softer pad and a lighter compound, or reduce the pressure you're applying.
Hazing: Hazing can occur if the compound dries out too quickly. Make sure to keep the pad moist by spraying it with water periodically. You can also try using a polishing compound after the scratch remover to refine the finish.
Scratch Still Visible: If the scratch is still visible after multiple attempts, it may be too deep to buff out. In this case, you may need to consider filling the scratch with a plastic repair compound and repainting the bumper.
When to Seek Professional Help
While many scratches can be successfully buffed out at home, there are situations where it's best to seek professional help. These include:
- Deep Scratches: Scratches that penetrate to the base plastic or have significantly damaged the bumper's structure.
- Large Areas of Damage: Extensive scratches or damage covering a significant portion of the bumper.
- Lack of Confidence: If you're uncomfortable using power tools or lack experience with paint correction, it's best to leave the job to a professional.
Practical Takeaways
- Identify the scratch depth: This is crucial for determining if buffing is a viable solution.
- Use the right tools and materials: Invest in quality products designed for plastic surfaces.
- Start with a light approach: It's always better to start with a less aggressive method and work your way up if necessary.
- Keep the pad cool and moist: This will prevent overheating and hazing.
- Work in small sections: This will allow you to control the process and achieve better results.
- Don't be afraid to seek professional help: If you're unsure or the damage is severe, it's best to consult a professional.
By following these steps and tips, you can successfully buff out scratches on your plastic bumper and restore its original appearance. Remember to be patient, take your time, and always prioritize safety. A little elbow grease and the right techniques can save you a lot of money compared to professional repair costs, and leave your car, whether it's a daily driver or a weekend show car, looking its best.