How To Change Distributor Cap And Rotor
The distributor cap and rotor are crucial components of a vehicle's ignition system, especially in older, non-electronic ignition systems. They work in concert to deliver high-voltage electricity from the ignition coil to the correct spark plug at the right time, ensuring efficient combustion. Over time, these parts wear out due to heat, arcing, and contamination, leading to misfires, poor performance, and even starting problems. Fortunately, replacing them is a relatively straightforward DIY task that can save you money and improve your car's reliability. This article will guide you through the process, providing detailed instructions and helpful tips.
Understanding the Ignition System (briefly)
Before diving into the replacement procedure, let's quickly review the ignition system's function. The battery provides low-voltage DC power. The ignition coil steps this voltage up to tens of thousands of volts. This high voltage is then routed to the distributor. The distributor cap, sitting atop the distributor, is a molded plastic piece with metal terminals that correspond to each spark plug. The rotor, spinning inside the distributor cap, acts as a rotary switch, connecting the coil's high-voltage output to each terminal in sequence, thus firing the spark plugs in the correct firing order.
Tools and Materials Needed
Gather the following tools and materials before starting:
- New distributor cap
- New rotor
- Screwdriver (usually flathead, but check your vehicle)
- Socket set or wrench set (for distributor hold-down bolts, if applicable)
- Spark plug wire puller (optional, but recommended)
- Pen or marker
- Clean rags
- Wire brush or sandpaper (for cleaning distributor contact points)
- Dielectric grease
- Timing light (if you suspect distributor timing might be affected)
- Safety glasses
- Gloves
Step-by-Step Replacement Procedure
Follow these steps carefully for a successful distributor cap and rotor replacement:
1. Safety First!
Disconnect the negative battery cable. This is the most important step to prevent electrical shock or damage to the ignition system. Use a wrench to loosen the clamp on the negative terminal and carefully remove the cable. Secure it away from the terminal to prevent accidental reconnection.
Wear safety glasses and gloves to protect your eyes and hands.
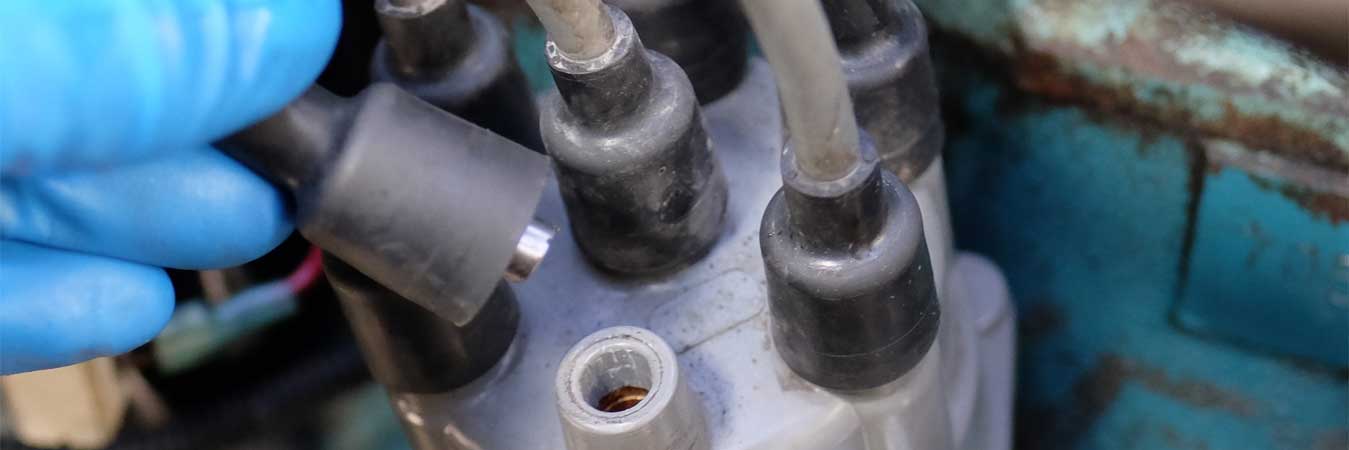
2. Identify and Label Spark Plug Wires
The spark plug wires connect the distributor cap to the spark plugs. It is absolutely critical to maintain the correct firing order. Incorrectly connected wires will result in misfires, engine damage, or a no-start condition. Before removing any wires, carefully identify and label each one. Use a pen or marker to number each wire and the corresponding terminal on the distributor cap. You can also use masking tape and write the cylinder number on it. Alternatively, take a clear photo of the distributor cap with the wires attached. Referencing a vehicle-specific repair manual or online resource for the correct firing order is highly recommended.
Example: If your engine's firing order is 1-3-4-2, label the terminals on the cap accordingly, noting which terminal corresponds to cylinder #1, #3, #4, and #2.
Use a spark plug wire puller (if available) to gently remove the wires from the distributor cap. Avoid pulling directly on the wire, as this can damage the connector or the wire itself. If you don't have a wire puller, carefully twist and pull the boot to disconnect it from the terminal.
3. Remove the Old Distributor Cap
Most distributor caps are held in place by either screws or clips. Locate these fasteners and carefully remove them. If using a screwdriver, apply firm pressure to prevent stripping the screw heads. If using clips, gently pry them open with a screwdriver. Be careful not to damage the distributor body. Once the fasteners are removed, carefully lift the distributor cap straight up and off the distributor.
4. Inspect the Distributor Cap and Rotor
Before discarding the old distributor cap and rotor, carefully inspect them for signs of wear or damage. Look for cracks, burns, corrosion, or excessive wear on the terminals inside the cap and on the rotor tip. These visual cues can help diagnose ignition system problems. Compare the old parts to the new ones to ensure they are identical in size, shape, and terminal configuration.
5. Remove the Old Rotor
The rotor is typically held in place by a screw or by friction. If there's a screw, remove it. If the rotor is held by friction, carefully pull it straight up and off the distributor shaft. It might require a bit of force, but avoid twisting or damaging the shaft.
6. Clean the Distributor Contact Points
With the rotor removed, inspect the contact points inside the distributor. These are the points where the rotor makes contact to transfer the high-voltage electricity. Use a wire brush or sandpaper to gently clean any corrosion or deposits from these contact points. This will ensure good electrical contact and optimal performance.
7. Install the New Rotor
Align the new rotor with the distributor shaft and push it down firmly until it is fully seated. If there's a screw, tighten it securely. Make sure the rotor spins freely after installation.
8. Install the New Distributor Cap
Align the new distributor cap with the distributor body. Ensure that the cap is properly seated and that the terminals line up correctly. Secure the cap with the screws or clips, tightening them evenly to prevent cracking the cap.
9. Reconnect Spark Plug Wires
This is the most crucial step! Reconnect the spark plug wires to the distributor cap in the correct firing order, referring to your labels, photos, or vehicle-specific repair manual. Push each wire firmly onto the terminal until it clicks into place. Ensure that the wires are securely connected to both the distributor cap and the spark plugs.
10. Apply Dielectric Grease
Apply a small amount of dielectric grease to the inside of the spark plug wire boots before connecting them. This will help prevent corrosion and moisture from entering the connection, ensuring a good electrical contact and prolonging the life of the wires.
11. Reconnect the Battery
Reconnect the negative battery cable to the negative terminal and tighten the clamp securely.
12. Start the Engine and Test
Start the engine and listen for any unusual noises or misfires. If the engine starts and runs smoothly, congratulations! You have successfully replaced the distributor cap and rotor. If the engine misfires or doesn't start, double-check the spark plug wire connections and firing order. If you are unsure, consult a qualified mechanic.
13. Check Ignition Timing (if necessary)
If you suspect that the distributor timing may have been affected during the replacement process (e.g., if you accidentally loosened the distributor hold-down bolts), use a timing light to check and adjust the ignition timing according to your vehicle's specifications. This is a more advanced procedure and may require specialized tools and knowledge. Refer to your vehicle's repair manual for instructions.
Troubleshooting
Here are some common issues you might encounter and how to address them:
- Engine won't start: Double-check the spark plug wire connections, firing order, and battery connections. Also, ensure that the distributor cap and rotor are properly seated.
- Engine misfires: Incorrect spark plug wire connections are the most likely cause. Re-verify the firing order.
- Rough idle: Could be due to incorrect spark plug wire connections, a cracked distributor cap, or a faulty rotor.
- Poor performance: A worn distributor cap or rotor can cause reduced power and fuel economy. Replacing them should improve performance.
Maintenance Tips
To prolong the life of your distributor cap and rotor, consider these maintenance tips:
- Inspect the distributor cap and rotor regularly for signs of wear or damage.
- Replace the spark plug wires along with the distributor cap and rotor, especially if they are old or worn.
- Keep the distributor cap and rotor clean and free of debris.
- Apply dielectric grease to the spark plug wire boots to prevent corrosion.
Replacing the distributor cap and rotor is a worthwhile maintenance task that can improve your vehicle's performance and reliability. By following these instructions carefully, you can save money and gain a better understanding of your car's ignition system.