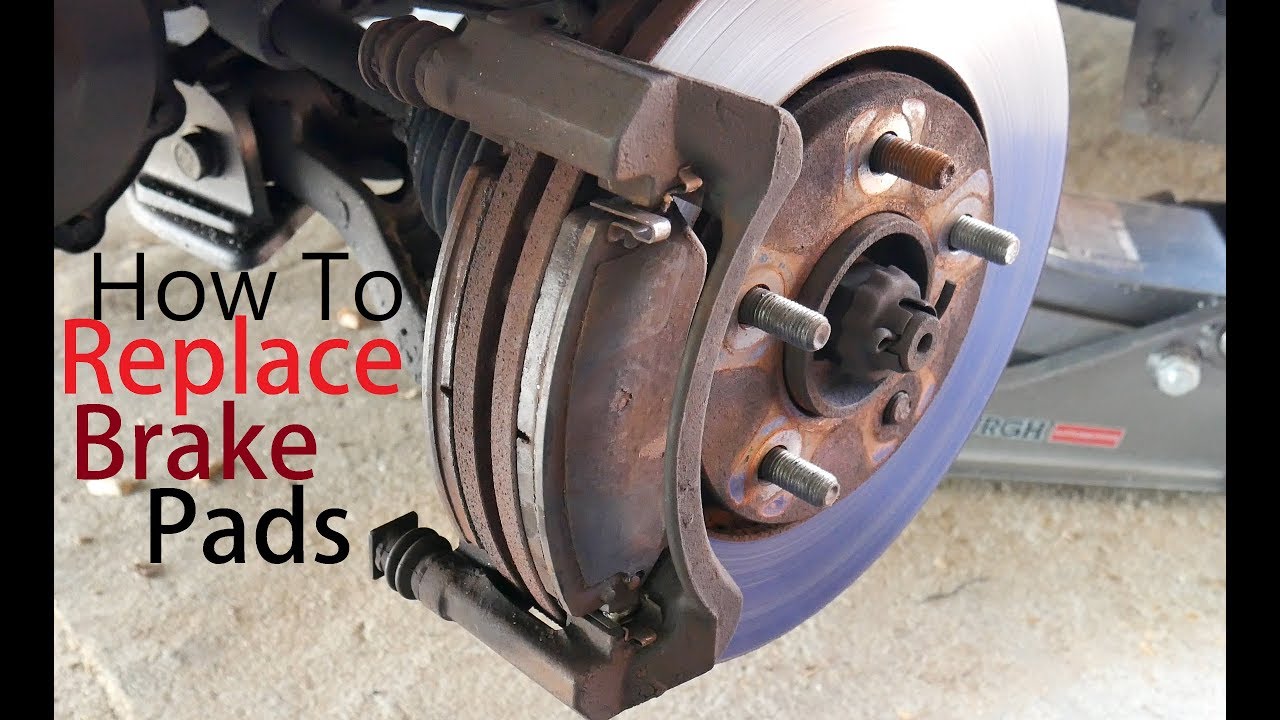
How To Change Your Brake Pads
So, you're feeling that familiar shudder in the steering wheel, or maybe hearing that tell-tale squeal? It’s likely time to face the music and tackle a brake pad replacement. Changing brake pads is a quintessential DIY task for any car enthusiast, saving you money and giving you a deeper understanding of your machine. But before you grab your wrench and YouTube tutorials, let's dive into the nitty-gritty, because not all brake jobs are created equal.
Understanding the Differences: Model, Engine, and Technology
The fundamental principle remains the same – pistons squeeze pads against rotors to slow you down. However, the specifics vary wildly. Let’s break down the key differences that influence your brake pad replacement experience.
Model-Specific Considerations:
A Honda Civic's brake system differs significantly from a BMW M3’s. The Civic might feature smaller rotors, single-piston calipers, and a simpler overall design, while the M3 boasts larger, potentially cross-drilled or slotted rotors, multi-piston calipers, and possibly even carbon-ceramic brakes. This affects everything from the tools you need to the complexity of the procedure.
Example: Changing pads on a 2015 Honda Civic is often a straightforward job, requiring basic hand tools and a caliper compressor. Conversely, replacing pads on a 2018 BMW M3 with the optional carbon-ceramic brakes requires specialized tools, precise torque settings, and adherence to specific bedding-in procedures.
Engine-Specific Nuances:
Even within the same model, the engine choice can influence brake size. A base model with a smaller engine might have smaller front rotors and calipers compared to a higher-performance variant. This is because more powerful engines generate more speed and require more stopping power.
Example: A Ford Mustang EcoBoost generally has smaller front brakes than a Mustang GT. When ordering parts, always double-check the exact specifications based on your VIN to ensure compatibility.
Technological Advancements:
Modern vehicles are increasingly equipped with advanced braking systems, such as electronic parking brakes (EPB) and brake-by-wire technology. These systems add complexity to the pad replacement process.
Electronic Parking Brakes: EPBs require you to retract the rear calipers electronically before pushing the pistons back. This typically involves using a scan tool or a specific procedure accessible through the car’s infotainment system. Failing to retract the calipers can damage the EPB motor.
Brake-by-Wire: While not yet widespread, brake-by-wire systems eliminate the direct mechanical linkage between the brake pedal and the calipers. Pad replacement procedures are similar to conventional systems, but special attention needs to be paid to diagnostic procedures and potential fault codes.
The Nitty-Gritty: A Step-by-Step Guide (with Model-Specific Cautions)
While a universal guide is impossible, here's a general outline with key considerations:
- Preparation: Gather your tools (wrench set, socket set, caliper compressor, brake cleaner, torque wrench, gloves, safety glasses), new brake pads, brake lubricant, and potentially new rotors if needed. Park on a level surface, engage the parking brake (unless it's an EPB!), and chock the wheels.
- Loosen Lug Nuts: Before jacking up the car, loosen the lug nuts on the wheel you'll be working on.
- Jack Up the Car and Secure It: Use a jack to lift the car and securely place it on jack stands. Never work under a car supported only by a jack.
- Remove the Wheel: Finish removing the lug nuts and take off the wheel.
- Inspect the Brakes: Assess the condition of the rotors, calipers, brake lines, and brake pads. Look for signs of wear, damage, or leaks.
- Remove the Caliper: Depending on the vehicle, you'll either unbolt the entire caliper or just the caliper slide bolts. Be careful not to damage the brake lines. Support the caliper with a bungee cord to prevent strain on the lines.
- Remove the Old Brake Pads: Take out the old brake pads. Note their orientation for reference.
- Compress the Caliper Piston: Use a caliper compressor to push the piston back into the caliper. Important: For EPB systems, you must retract the calipers electronically first. Open the brake fluid reservoir cap before compressing the pistons to prevent pressure build-up.
- Clean and Lubricate: Clean the caliper bracket and apply brake lubricant to the caliper slide pins, the back of the brake pads (where they contact the caliper piston), and the contact points between the pads and the caliper bracket.
- Install New Brake Pads: Install the new brake pads in the correct orientation.
- Reinstall the Caliper: Reinstall the caliper and torque the bolts to the manufacturer's specifications.
- Reinstall the Wheel: Put the wheel back on and tighten the lug nuts hand-tight.
- Lower the Car and Torque Lug Nuts: Lower the car and torque the lug nuts to the manufacturer's specifications.
- Repeat for Other Wheels: Repeat the process for the other wheels.
- Pump the Brakes: Pump the brake pedal several times until it feels firm. This ensures the pads are properly seated against the rotors.
- Bed-In the Brakes: Follow the brake pad manufacturer's instructions for bedding in the new brakes. This typically involves a series of moderate to hard stops from a specific speed. Avoid panic stops during the bedding-in process.
- Check Brake Fluid Level: After bedding in the brakes, check the brake fluid level in the reservoir and top it off if necessary.
Spec Table: Brake Pad Comparison
| Pad Type | Pros | Cons | Typical Applications |
|---|---|---|---|
| Organic (Non-Asbestos Organic - NAO) | Quiet, Gentle on Rotors, Inexpensive | High Dust, Low Fade Resistance, Short Lifespan | Daily Drivers, Economy Cars |
| Semi-Metallic | Good Stopping Power, Decent Lifespan, Affordable | Noisy, More Rotor Wear, Can be Dusty | Most Vehicles, Performance Street Cars |
| Ceramic | Low Dust, Quiet, Good Fade Resistance, Long Lifespan | More Expensive than Semi-Metallic, Can be Less Initial Bite | Luxury Cars, Performance Street Cars |
| Track/Racing | Excellent Stopping Power, High Fade Resistance | Noisy, High Dust, Abrasive on Rotors, Poor Cold Performance | Track Days, Racing |
Real-World Driving Impressions: Choosing the Right Pad
The pad material dramatically impacts the driving experience. Organic pads offer a comfortable, quiet ride for everyday commuting, but lack bite when pushed hard. Semi-metallic pads provide a noticeable improvement in stopping power, but can generate more noise and dust. Ceramic pads offer a good balance of performance, comfort, and longevity, making them a popular choice for many drivers. Track/racing pads are designed for extreme performance and are not suitable for street use due to their noise, dust, and poor cold performance.
Pros and Cons: A Quick Recap
- DIY Brake Pad Replacement:
- Pros: Save money, learn about your car, gain a sense of accomplishment.
- Cons: Time-consuming, requires tools and knowledge, potential for mistakes if not done correctly.
"The key to a successful brake job is preparation, patience, and attention to detail. Don't rush the process, and always double-check your work."
Important Safety Note: If you are not comfortable performing brake work, it is best to take your car to a qualified mechanic. Brakes are a critical safety system, and improper installation can have serious consequences.
So, there you have it – a comprehensive guide to changing your brake pads. Remember to always consult your vehicle's service manual for specific instructions and torque specifications. Now, go forth and conquer those squealing brakes!
Fun Debate Starter: What's the absolute worst brake pad brand you've ever used, and why? Let the arguments begin!