How To Check Headlight Relay
Headlights are crucial for safe driving, especially at night or in poor weather conditions. A faulty headlight relay can lead to dim headlights, flickering, or complete headlight failure. This article will guide car owners and mechanics through the process of checking a headlight relay, troubleshooting common issues, and performing necessary maintenance.
Understanding the Headlight Relay
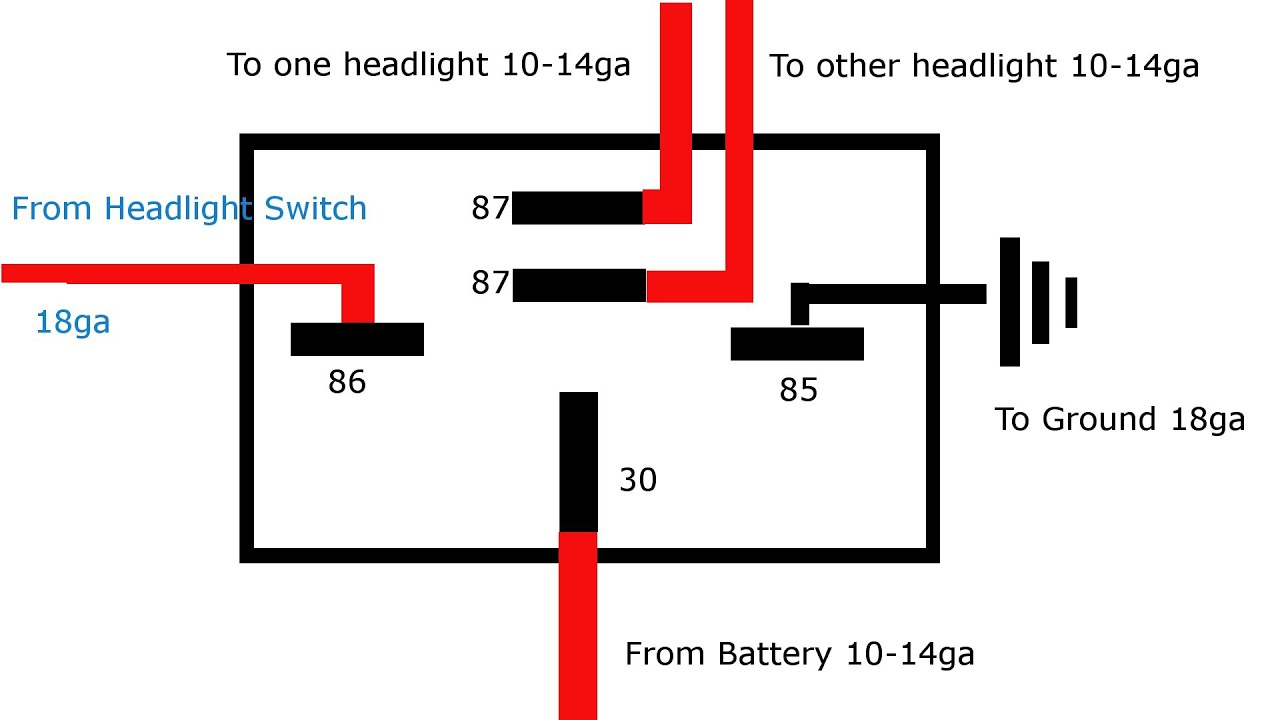
The headlight relay is an electromagnetic switch that controls the power supply to your headlights. It acts as an intermediary between the headlight switch and the headlights themselves. When you turn on your headlights, the headlight switch sends a small electrical signal to the relay. This signal activates the relay's internal electromagnet, which pulls a contact closed, allowing a high-current circuit to power the headlights. Relays are used because the headlight switch isn't designed to handle the high current required by the headlights.
Relays protect the headlight switch from damage and ensure the headlights receive a stable and sufficient power supply. A failing relay can lead to several problems.
Common Symptoms of a Failing Headlight Relay
Identifying the symptoms of a bad headlight relay is the first step in troubleshooting headlight problems. Here are some of the most common indicators:
- Dim Headlights: If your headlights are noticeably dimmer than usual, a failing relay might be the culprit. The relay could be struggling to provide the full voltage required by the headlights.
- Flickering Headlights: Intermittent flickering can also indicate a relay issue. The relay's contacts might be worn or corroded, causing an unstable connection.
- Headlights Not Turning On: If one or both headlights fail to turn on, the relay could be completely dead. This is a common and easily identifiable symptom.
- Headlights Staying On: In rare cases, a relay can become stuck in the "on" position, causing the headlights to remain illuminated even when the headlight switch is off.
- Clicking Sound from the Relay Box: A rapid clicking sound from the relay box, usually located under the hood, can indicate a faulty relay that's rapidly switching on and off.
Troubleshooting a Headlight Relay: A Step-by-Step Guide
Before replacing the relay, it's important to rule out other potential causes, such as a blown fuse, a faulty headlight switch, or damaged wiring.
Step 1: Visual Inspection
Start by visually inspecting the relay. Look for signs of damage, such as:
- Cracks or Melted Plastic: These indicate overheating or a short circuit within the relay.
- Corrosion on the Terminals: Corrosion can prevent a good electrical connection.
- Loose Connections: Ensure the relay is securely plugged into its socket.
Step 2: Check the Headlight Fuse
Before delving into the relay itself, check the headlight fuse. A blown fuse is a much simpler problem to fix. Locate the fuse box (usually under the hood or inside the cabin) and consult your owner's manual to identify the headlight fuse. Replace the fuse with a new one of the same amperage.
Example: On a 2010 Honda Civic, the headlight fuse is typically located in the under-hood fuse box and is a 15-amp fuse.
Step 3: The Relay Swap Test
This is a simple and effective way to determine if the relay is the problem. Most cars have multiple identical relays used for different functions (e.g., horn, fog lights).
- Locate the Headlight Relay: Consult your owner's manual to find the location of the headlight relay in the relay box. The diagram inside the fuse box cover can also be helpful.
- Identify an Identical Relay: Find another relay in the box that is identical in size, shape, and pin configuration. The horn relay is often a good candidate.
- Swap the Relays: Carefully remove the headlight relay and the identified identical relay. Swap their positions.
- Test the Headlights: Turn on the headlights. If the headlights now work, and the function controlled by the swapped relay (e.g., the horn) no longer works, then the original headlight relay is faulty and needs to be replaced.
Important: Make sure the replacement relay has the same part number or specifications as the original. Using an incorrect relay can damage your electrical system.
Step 4: Using a Multimeter
If the relay swap test isn't conclusive, you can use a multimeter to test the relay's functionality. This requires some basic electrical knowledge.
- Identify the Relay's Terminals: Most relays have four or five terminals. Refer to the relay's diagram (often printed on the relay itself) to identify the coil terminals and the switch terminals.
- Test the Coil: Set your multimeter to the resistance (Ohms) setting. Connect the multimeter probes to the coil terminals. You should read a resistance value. A reading of zero or infinite resistance indicates a faulty coil. The expected resistance value varies depending on the relay, but it's typically between 50 and 120 ohms.
- Test the Switch: With the multimeter still set to resistance (Ohms), connect the probes to the switch terminals. With the relay unactivated (no power applied to the coil), you should read infinite resistance (open circuit).
- Activate the Relay: Apply 12V DC power to the coil terminals (you can use a small 12V battery or a bench power supply). You should hear a click as the relay activates.
- Test the Switch Again: With the relay activated, test the resistance across the switch terminals again. You should now read close to zero resistance (closed circuit). If you still read infinite resistance, the relay's switch is faulty.
Caution: Be careful when applying power to the relay coil. Incorrect voltage or polarity can damage the relay.
Step 5: Checking the Relay Socket
Sometimes, the problem isn't the relay itself, but the relay socket. Corroded or loose terminals in the socket can prevent the relay from functioning properly.
- Inspect the Socket Terminals: Visually inspect the terminals in the relay socket for corrosion or damage.
- Clean the Terminals: Use a small wire brush or electrical contact cleaner to clean the terminals.
- Check for Voltage: With the headlight switch on, use a multimeter to check for voltage at the appropriate terminals in the socket (the terminals that power the relay coil). If there's no voltage, there's a wiring problem between the headlight switch and the relay socket.
Real-World Examples
Here are some examples of headlight relay issues encountered in popular car models:
- Toyota Camry (2007-2011): Reports of dim headlights are common in this generation. Often, the headlight relay is the culprit. Replacing the relay usually resolves the issue.
- Ford F-150 (2004-2008): Flickering headlights are a known problem. The headlight relay is often the cause, but it's also important to check the wiring harness and headlight switch.
- Chevrolet Impala (2006-2013): Complete headlight failure is sometimes attributed to a faulty headlight relay. Checking the fuse and relay socket is also recommended.
Replacing the Headlight Relay
If you've determined that the headlight relay is faulty, replacing it is a straightforward process. Simply purchase a new relay with the correct part number or specifications and plug it into the relay socket. Ensure the relay is firmly seated.
Preventative Maintenance
While relays don't require regular maintenance, there are steps you can take to prevent premature failure:
- Keep the Relay Box Clean and Dry: Moisture and debris can corrode the relay terminals and accelerate wear.
- Use Dielectric Grease: Applying a small amount of dielectric grease to the relay terminals can help prevent corrosion.
- Avoid Overloading the Headlight Circuit: If you're upgrading your headlights to higher-wattage bulbs, consider upgrading the headlight relay and wiring to handle the increased current.
Conclusion
Checking a headlight relay is a relatively simple task that can save you time and money. By understanding the symptoms of a failing relay, following the troubleshooting steps outlined in this article, and performing preventative maintenance, you can keep your headlights working properly and ensure safe driving. Remember to consult your vehicle's owner's manual for specific information about your car's electrical system. Always disconnect the negative battery terminal before working on electrical components. Regular vehicle maintenance, including checking the condition of your headlights and electrical system, is essential for keeping your car in top condition and ensuring your safety on the road. Don't underestimate the importance of properly functioning headlights – they are critical for your safety and the safety of others.