How To Fix A Floppy Sun Visor
How To Fix a Floppy Sun Visor: A Comprehensive Guide
Is your car's sun visor constantly drooping, blocking your view instead of protecting you from the sun? A floppy sun visor is a common and frustrating problem, but thankfully, it's often fixable with a little DIY effort. This guide will walk you through several methods to fix a floppy sun visor, ranging from simple temporary solutions to more involved, but ultimately more permanent, fixes.
Understanding Why Sun Visors Droop
Before we dive into the fixes, it's helpful to understand why sun visors become floppy in the first place. The most common reasons include:
- Wear and Tear: Over time, the friction of swiveling the visor back and forth wears down the internal components that provide resistance.
- Loose Screws: The screws that hold the visor assembly to the roof of your car can loosen over time due to vibrations and regular use.
- Broken Clip: Many visors rely on a clip or detent mechanism to hold them in the "up" position. This clip can break, rendering the visor unable to stay up.
- Worn-Out Pivot: The pivot point itself, the joint that allows the visor to swivel, can wear down, losing its ability to hold the visor firmly.
- Sagging Headliner: In some cases, the headliner (the fabric lining the roof of your car) can sag, pulling the visor down with it. While the visor itself isn't broken in this case, the sagging headliner needs to be addressed.
Temporary Solutions: Quick Fixes for Immediate Relief
If you need a quick and temporary fix for a floppy sun visor, these solutions can provide immediate relief:
- Binder Clip: A simple binder clip can be clipped onto the visor and the headliner to hold the visor in place. This is a very temporary solution and may not be aesthetically pleasing, but it can get you by in a pinch.
- Velcro Strips: Attach a strip of Velcro to the visor and another to the headliner. This will allow you to secure the visor in the "up" position. Choose heavy-duty Velcro for better holding power.
- Rubber Band: Loop a rubber band around the visor and the mounting point. This provides tension that can help keep the visor up.
- Safety Pin: If the fabric covering the visor is loose, a safety pin can be used to secure it to the internal structure, potentially adding a bit of resistance. Be careful not to damage any wiring within the visor.
Important Note: These temporary solutions are just that – temporary. They are not a long-term fix and may not be suitable for all vehicles. Use them with caution and be prepared to implement a more permanent solution.
Permanent Solutions: Fixing a Floppy Sun Visor for Good
For a more lasting solution, consider these methods:
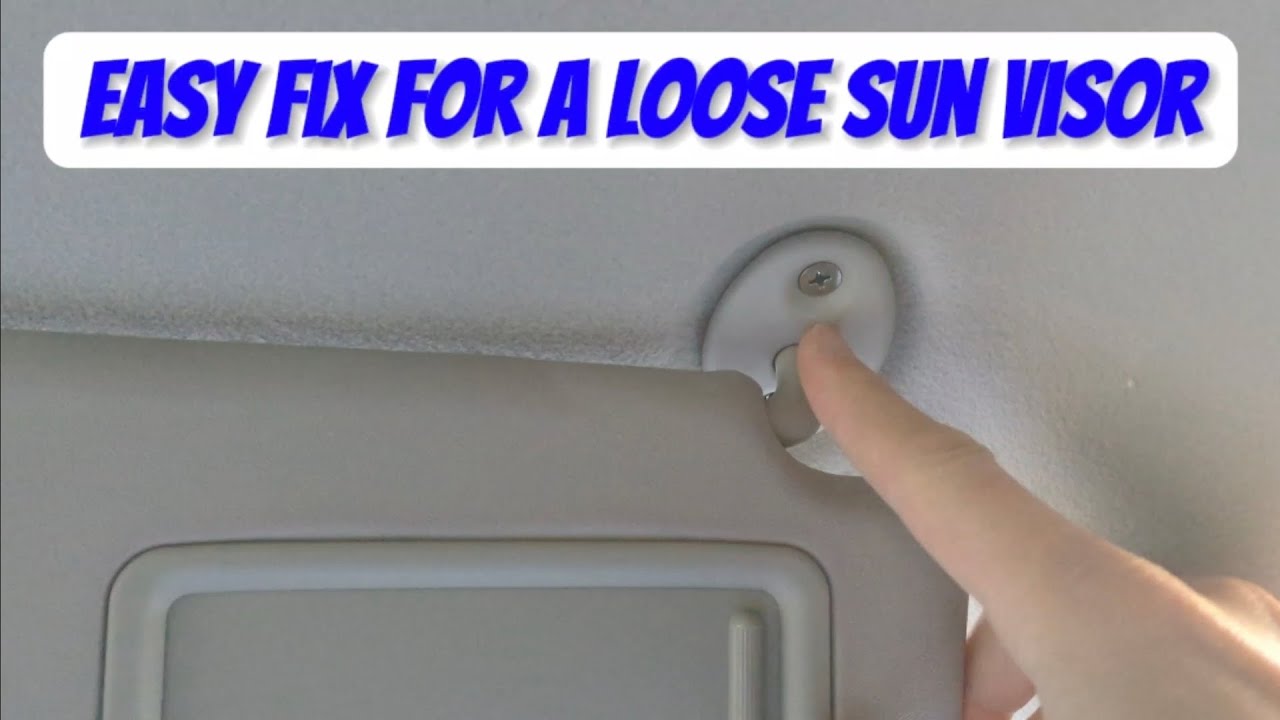
1. Tightening Loose Screws
This is the simplest and often the most effective fix. Follow these steps:
- Locate the Screws: Identify the screws that hold the visor assembly to the roof of your car. They are usually located near the pivot point.
- Choose the Right Screwdriver: Use the correct size and type of screwdriver (usually Phillips head or Torx) to avoid stripping the screws.
- Tighten the Screws: Carefully tighten the screws. Don't overtighten them, as this could damage the plastic or strip the threads. Tighten them until they are snug but not excessively tight.
- Test the Visor: Check if the visor now stays in the desired position. If it's still floppy, proceed to the next step.
2. Adding Washers
If tightening the screws doesn't work, the screws may be too long, or the holes may be slightly enlarged. Adding washers can help:
- Remove the Screws: Remove the screws holding the visor in place.
- Add Washers: Place one or two small washers onto the screws before reinserting them. The washers will fill the gap and provide a tighter fit.
- Reinstall the Screws: Reinstall the screws and tighten them securely.
- Test the Visor: Test the visor to see if it now stays in place.
3. Replacing the Friction Washers or Pivot Bushings
Over time, the friction washers or pivot bushings inside the visor mechanism can wear down, causing the visor to lose its resistance. Replacing these components can restore the visor's functionality. This is often a more involved process.
- Disassemble the Visor: Carefully disassemble the visor assembly. This may involve removing screws, clips, or other fasteners. Take pictures as you go to help you reassemble it later.
- Locate the Worn Components: Identify the friction washers or pivot bushings. These are usually small plastic or nylon parts located at the pivot point.
- Source Replacement Parts: You may be able to find replacement parts online or at an auto parts store. Sometimes, you might need to find a similar visor from a junkyard to salvage the parts.
- Install the New Components: Install the new friction washers or pivot bushings.
- Reassemble the Visor: Carefully reassemble the visor assembly, referring to the pictures you took earlier.
- Reinstall the Visor: Reinstall the visor in your car and test its functionality.
Important: This repair can be tricky and may require some mechanical skill. If you are not comfortable disassembling the visor, it's best to consult a professional.
4. Using a Spring Clamp or Clothes Pin (Hidden Method)
This method requires disassembling the visor, but the results can be very effective. The principle involves adding extra tension inside the pivoting mechanism.
- Disassemble the Visor: As with the previous method, carefully disassemble the visor.
- Identify the Pivot Point: Examine the pivot point. The goal is to find a way to increase the friction here.
- Introduce a Spring Clamp/Clothes Pin: A small spring clamp or a durable wooden clothes pin can be modified to act as a tensioner. If using a clothes pin, you might need to sand it down to fit inside the visor housing. The goal is to place this tensioner near the pivot to increase the resistance when the visor is moved.
- Reassemble the Visor: Carefully reassemble, ensuring the clamp/pin is applying pressure to the pivot. You might need to experiment with the positioning.
- Test and Adjust: Test and adjust as needed. It might take a few attempts to get the perfect amount of tension.
5. Replacing the Entire Sun Visor
If all else fails, or if the visor is severely damaged, the easiest solution is to replace the entire sun visor. You can purchase a new sun visor from an auto parts store, online retailer, or dealership.
- Find the Right Replacement: Make sure to purchase a sun visor that is compatible with your vehicle's make, model, and year.
- Remove the Old Visor: Remove the old visor by unscrewing the mounting screws or releasing any clips that hold it in place.
- Install the New Visor: Install the new visor by aligning it with the mounting holes and screwing it in place.
Preventing Future Problems
To help prevent your sun visor from becoming floppy again, consider these tips:
- Avoid Overuse: Minimize unnecessary swiveling of the visor.
- Gentle Handling: Handle the visor gently to avoid putting excessive stress on the pivot point.
- Regular Inspection: Periodically check the screws and tighten them if necessary.
- Avoid Hanging Heavy Items: Avoid hanging heavy items from the visor, as this can accelerate wear and tear.
When to Consult a Professional
While many sun visor repairs can be done at home, there are situations where it's best to consult a professional mechanic:
- You're Unsure: If you're not comfortable working on your car or if you're unsure how to proceed, it's always best to seek professional help.
- Complex Issues: If the problem is related to the headliner or other complex components, a mechanic may be better equipped to diagnose and fix the issue.
- Electrical Issues: Some sun visors have integrated lights or other electrical components. If you suspect an electrical problem, consult a qualified electrician.
By following these tips and techniques, you can fix a floppy sun visor and restore your car's comfort and safety. Remember to prioritize safety and consult a professional if you're unsure about any part of the repair process. A functioning sun visor improves your driving experience and overall visibility, and it's an important part of vehicle maintenance. Good luck!