How To Get Scratches Out Of A Plastic Bumper
Plastic bumpers, once a novelty, are now ubiquitous on modern vehicles. Their ability to absorb impacts and return to their original shape makes them invaluable for low-speed collisions. However, their plastic construction also makes them susceptible to scratches, scrapes, and scuffs. While a deep gouge might necessitate professional repair, many minor scratches can be addressed at home with the right tools and techniques. This guide will walk you through the process, from identifying the type of scratch to executing the necessary repairs.
Understanding the Scratch: A Diagnostic Approach
Before grabbing any tools, assess the damage. Scratches aren't all created equal. Understanding the type of scratch will dictate the repair method.
- Surface Scratches: These are the most common and easiest to fix. They only affect the clear coat or the very top layer of the bumper's plastic. You can usually feel them with your fingernail, but they don't "catch."
- Clear Coat Scratches: Deeper than surface scratches, these penetrate the clear coat but don't reach the base coat of paint.
- Base Coat Scratches: These are more serious, as they expose the colored base coat layer underneath the clear coat. They'll usually be a different color than the surrounding paint.
- Plastic Scratches: The most severe type, these penetrate through the paint layers and into the plastic itself. These often require more extensive repair.
A quick test: Clean the area and then lightly wet it. If the scratch seems to disappear or become significantly less visible when wet, it's likely a surface or clear coat scratch. If it remains visible, it's deeper and requires more attention.
Essential Tools and Materials
Having the right tools on hand will make the repair process smoother and more effective.
- Cleaning Supplies: Car wash soap, microfiber cloths, and a detailing spray.
- Sandpaper: A range of grits, typically from 1500 to 3000. Wet/dry sandpaper is preferred.
- Sanding Block: Provides a flat, even surface for sanding.
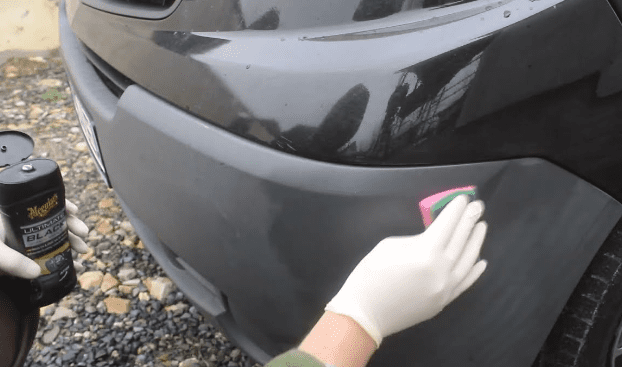
- Rubbing Compound: A mildly abrasive compound used to level the clear coat. Brands like Meguiar's Ultimate Compound are popular.
- Polishing Compound: Finer than rubbing compound, it refines the finish after compounding.
- Polishing Pads: Foam pads designed for applying compound and polish. A dual-action (DA) polisher is highly recommended, but hand polishing is possible.
- Dual-Action (DA) Polisher (Optional but Recommended): Significantly speeds up the polishing process and provides more consistent results. Brands like Griot's Garage and Chemical Guys offer excellent options.
- Masking Tape: To protect surrounding areas from accidental damage.
- Touch-Up Paint (For Base Coat and Plastic Scratches): Matching the exact paint code of your vehicle is crucial. You can find the paint code on a sticker usually located in the driver's side door jamb or engine bay.
- Clear Coat (For Base Coat and Plastic Scratches): To protect the touch-up paint.
- Primer (For Plastic Scratches): To promote adhesion of the paint to the plastic.
- Plastic Bumper Filler (For Deep Plastic Scratches): To fill in deep gouges before painting.
The Repair Process: Step-by-Step Guide
Follow these steps for optimal results. Always work in a well-lit and ventilated area.
Step 1: Cleaning and Preparation
Thoroughly wash the bumper with car wash soap and water to remove any dirt, grime, or wax. Dry it completely with a clean microfiber cloth. Use detailing spray to remove any remaining residue. Mask off the area around the scratch with masking tape to protect the surrounding paint.
Step 2: Sanding (For Clear Coat, Base Coat, and Plastic Scratches)
For surface scratches, you can often skip sanding and move directly to compounding. For deeper scratches, start with 2000 grit wet/dry sandpaper. Wet the sandpaper and the bumper with water. Gently sand the area in straight, even strokes, following the direction of the scratch. Avoid applying too much pressure. The goal is to level the edges of the scratch, not to remove the entire clear coat.
Progress to finer grits (2500 and 3000) after each sanding session, cleaning the area and inspecting your work. The area should look hazy but feel smooth to the touch.
Step 3: Compounding
Apply a small amount of rubbing compound to a polishing pad. If using a DA polisher, start with a low speed setting and gradually increase it. Work the compound into the sanded area using overlapping passes. Apply moderate pressure, but avoid overheating the paint. If polishing by hand, use a clean microfiber cloth and apply the compound in circular motions, using moderate pressure.
After compounding, wipe away any residue with a clean microfiber cloth.
Step 4: Polishing
Apply a small amount of polishing compound to a clean polishing pad. Repeat the polishing process as described in Step 3. This step will further refine the finish and remove any swirl marks left by the rubbing compound.
After polishing, wipe away any residue with a clean microfiber cloth.
Step 5: Touch-Up Paint (For Base Coat and Plastic Scratches)
If the scratch has penetrated to the base coat or plastic, you'll need to use touch-up paint. Clean the scratch thoroughly with a degreaser. Apply a thin coat of primer to the scratch, allowing it to dry completely according to the manufacturer's instructions. Apply thin, even coats of touch-up paint, allowing each coat to dry before applying the next. Multiple thin coats are better than one thick coat.
Once the touch-up paint is completely dry, apply a thin coat of clear coat to protect the paint and blend it with the surrounding finish. Let the clear coat dry completely.
Step 6: Plastic Bumper Filler (For Deep Plastic Scratches)
For deep scratches in the plastic itself, you'll need to use a plastic bumper filler. Clean the area thoroughly and roughen the surface with sandpaper to promote adhesion. Mix the filler according to the manufacturer's instructions and apply it to the scratch, filling it slightly above the surrounding surface. Allow the filler to dry completely. Sand the filler smooth, starting with a coarser grit (e.g., 400) and progressing to finer grits (e.g., 800, 1000) until it is flush with the surrounding surface. Then, proceed with priming and painting as described in Step 5.
Step 7: Final Polishing (After Touch-Up Paint)
After the touch-up paint and clear coat have dried completely, you may notice a slight difference in the finish compared to the surrounding paint. To blend the repair seamlessly, gently wet sand the area with 3000 grit sandpaper. Then, repeat the compounding and polishing steps as described above.
Step 8: Waxing or Sealing
To protect your newly repaired bumper and enhance its shine, apply a coat of wax or sealant. This will help to prevent future scratches and keep your bumper looking its best. Popular choices include Collinite 845 Insulator Wax and ceramic coatings from brands like Gtechniq.
Important Considerations and Best Practices
- Color Matching: Achieving a perfect color match with touch-up paint can be challenging. If possible, test the paint on a hidden area of the bumper before applying it to the scratch.
- Paint Application: Use thin, even coats of touch-up paint to avoid runs and drips.
- Patience: Allow sufficient drying time between coats of paint and clear coat. Rushing the process can lead to unsatisfactory results.
- Practice Makes Perfect: If you're unsure about any of the steps, practice on a small, inconspicuous area of the bumper first.
- Professional Help: For deep or complex scratches, consider seeking professional help from an auto body shop. They have the expertise and equipment to perform more extensive repairs.
Prevention is Key
The best way to deal with scratches is to prevent them in the first place. Consider these preventative measures:
- Careful Parking: Park in areas with ample space to avoid bumping into other vehicles or objects.
- Protective Films: Consider installing a paint protection film (PPF) on your bumper. PPF is a clear, durable film that protects the paint from scratches, chips, and other damage.
- Regular Washing and Waxing: Keeping your bumper clean and waxed will help to protect it from the elements and make it easier to remove minor scratches and scuffs.
By following these steps and taking preventative measures, you can keep your plastic bumper looking its best for years to come. Remember to always prioritize safety and use the appropriate protective gear when working with power tools and chemicals.