How To Install Fuel Injectors
So, your ride's feeling a bit… *off*? Stumbling idle? Hesitation on acceleration? Maybe your fuel injectors are singing the blues. Don't despair, gearheads! Swapping out fuel injectors is a job most experienced DIYers can tackle, saving you a chunk of change compared to a shop visit. But before you dive in headfirst, understand that not all injectors are created equal, and the process can vary depending on your car and engine.
Understanding Your Injectors: The Heart of Fuel Delivery
Fuel injectors are essentially precisely controlled valves that spray fuel into the engine's intake manifold (or directly into the cylinder in the case of direct injection). Their performance directly impacts fuel economy, power, and emissions. Over time, they can become clogged with deposits, leak, or simply fail. Choosing the right replacement is crucial, and that starts with understanding the different types.
Injector Types: A Quick Rundown
- Top-Feed Injectors: The most common type, found in older and many newer port fuel injection (PFI) systems. Fuel enters from the top.
- Side-Feed Injectors: Less common, but still found in some applications, primarily older Japanese cars. Fuel enters from the side.
- Direct Injectors: Found in Gasoline Direct Injection (GDI) engines, these injectors spray fuel directly into the combustion chamber. They operate at much higher pressures than PFI injectors.
Let's look at a quick comparison table to illustrate the differences:
| Feature | Top-Feed | Side-Feed | Direct Injection |
|---|---|---|---|
| Fuel Entry | Top | Side | Tip (Directly into cylinder) |
| Fuel Pressure | Lower (30-60 PSI) | Lower (30-60 PSI) | Very High (500-3000+ PSI) |
| Typical Applications | Most PFI Engines | Older Japanese PFI Engines | GDI Engines |
| Ease of Replacement (DIY) | Easiest | Moderate | More Complex, Requires Specialized Tools & Knowledge |
The Installation Process: General Steps and Key Differences
While specific steps will vary, here's a general outline of the fuel injector installation process. Always consult your vehicle's repair manual for specific instructions!
- Preparation is Key: Disconnect the negative battery terminal. This is *crucial* for safety. Relieve fuel pressure – there's a schrader valve on the fuel rail for this purpose on most vehicles. Work in a well-ventilated area, and have a fire extinguisher handy.
- Accessing the Injectors: This often involves removing the intake manifold or portions thereof. Label all hoses and connectors before disconnecting them to avoid confusion during reassembly. Take pictures – they're a lifesaver!
- Removing the Old Injectors: Disconnect the electrical connector from each injector. Carefully remove the retaining clips or bolts that hold the injector in place. Gently wiggle and pull the injector out of the fuel rail and intake manifold. Be careful not to damage the O-rings!
- Preparing the New Injectors: Lightly lubricate the new injector O-rings with clean engine oil or silicone grease. This helps them seal properly and prevents damage during installation.
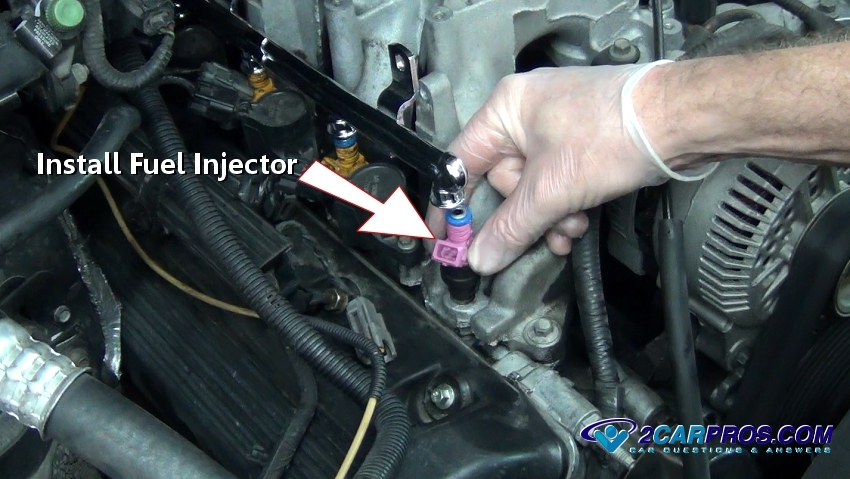
- Installing the New Injectors: Carefully insert the new injectors into the fuel rail and intake manifold, making sure they are fully seated. Secure them with the retaining clips or bolts.
- Reassembly: Reconnect the electrical connectors, fuel lines, and any other components you removed. Double-check all connections.
- Priming the Fuel System: Reconnect the negative battery terminal. Turn the ignition key to the "on" position (without starting the engine) for a few seconds to allow the fuel pump to prime the system. Repeat this a few times.
- Starting and Testing: Start the engine and check for fuel leaks. Let the engine idle for a few minutes and monitor for any unusual noises or vibrations.
Model-Specific Considerations
Now, let's dive into some specifics that differentiate the installation process across various scenarios:
Scenario 1: Replacing Top-Feed Injectors on a 1990s Honda Civic (D-Series Engine)
This is arguably one of the easiest DIY injector jobs. Access is generally good, and the fuel rail is relatively straightforward to remove.
Pros:
- Simple design, easy access.
- Readily available parts and online resources.
- Minimal specialized tools required.
Cons:
- Old rubber hoses can be brittle and crack during disassembly.
- Fuel rail bolts can be seized due to corrosion.
Real-World Driving Impression: After replacing the injectors on a '94 Civic with a D16Z6, the difference was night and day. The rough idle disappeared, throttle response was noticeably improved, and fuel economy went up by a couple of MPG. It felt like a brand-new engine!
Scenario 2: Replacing Side-Feed Injectors on a 1990s Nissan 300ZX (VG30DETT Engine)
This is a step up in complexity. Side-feed injectors can be trickier to remove, and the 300ZX's engine bay is notoriously cramped.
Pros:
- Improved fuel atomization (when using upgraded injectors).
Cons:
- Limited injector options compared to top-feed.
- Potential for leaking due to the side-feed design.
- Difficult access to the injectors.
Real-World Driving Impression: Swapping the injectors on a '93 300ZX required patience and nimble fingers. The improved fuel delivery resulted in smoother boost response and a slight power increase, but the risk of leaks always lingered in the back of my mind. Quality O-rings are paramount!
Scenario 3: Replacing Direct Injectors on a Modern BMW (N54/N55 Engine)
This is where things get serious. Direct injection systems operate at extremely high pressures, requiring specialized tools and knowledge. Unless you have significant experience and the proper equipment, this job is best left to a professional.
Pros:
- Improved fuel economy and reduced emissions (when injectors are functioning properly).
- Higher power potential compared to port fuel injection.
Cons:
- Extremely high fuel pressures pose a safety risk.
- Requires specialized tools for removal and installation.
- Complex engine management system requires proper coding after injector replacement.
Real-World Driving Impression: I watched a seasoned BMW technician replace the injectors on an N54 engine. The precision and expertise required were impressive. The owner reported a dramatic improvement in engine smoothness and responsiveness, but the cost of the job reflected the complexity of the system.
Important Considerations
- Injector Sizing: Don't just throw in any injector! Ensure the new injectors have the correct flow rate for your engine and modifications. Using injectors that are too large can lead to poor fuel economy and drivability issues.
- Injector Impedance: Injectors come in high-impedance (saturated) and low-impedance (peak and hold) varieties. Use the correct type for your vehicle's ECU.
- Injector Cleaning: Consider having your old injectors professionally cleaned and flow-tested before replacing them. Sometimes, a good cleaning is all they need.
- ECU Tuning: If you're upgrading to larger injectors, you'll likely need to have your ECU tuned to compensate for the increased fuel flow.
Before you begin, make sure you have the right tools: a good socket set, wrenches, screwdrivers, pliers, a fuel pressure gauge, and potentially a fuel line disconnect tool. A torque wrench is essential for tightening bolts to the proper specification. And don't forget those all-important safety glasses!
Installing fuel injectors can be a rewarding experience, giving you a deeper understanding of your engine and saving you money in the process. Just remember to do your research, take your time, and follow the proper procedures. If you're ever unsure, don't hesitate to consult a professional.
Now, for the fun part: What's the most frustrating car repair you've ever tackled? Was it something simple that turned into a nightmare, or a complex job that pushed your skills to the limit? Let's hear your stories!