How To Install Stabilizer Bar
The humble stabilizer bar, often called an anti-roll bar or sway bar, is a crucial component in a vehicle's suspension system. Its primary function is to reduce body roll during cornering, improving handling and stability. While it might seem like a simple piece of metal, the stabilizer bar's design and function are rooted in sound engineering principles. This guide will delve into the installation process, offering a detailed understanding of each step and the underlying mechanics involved.
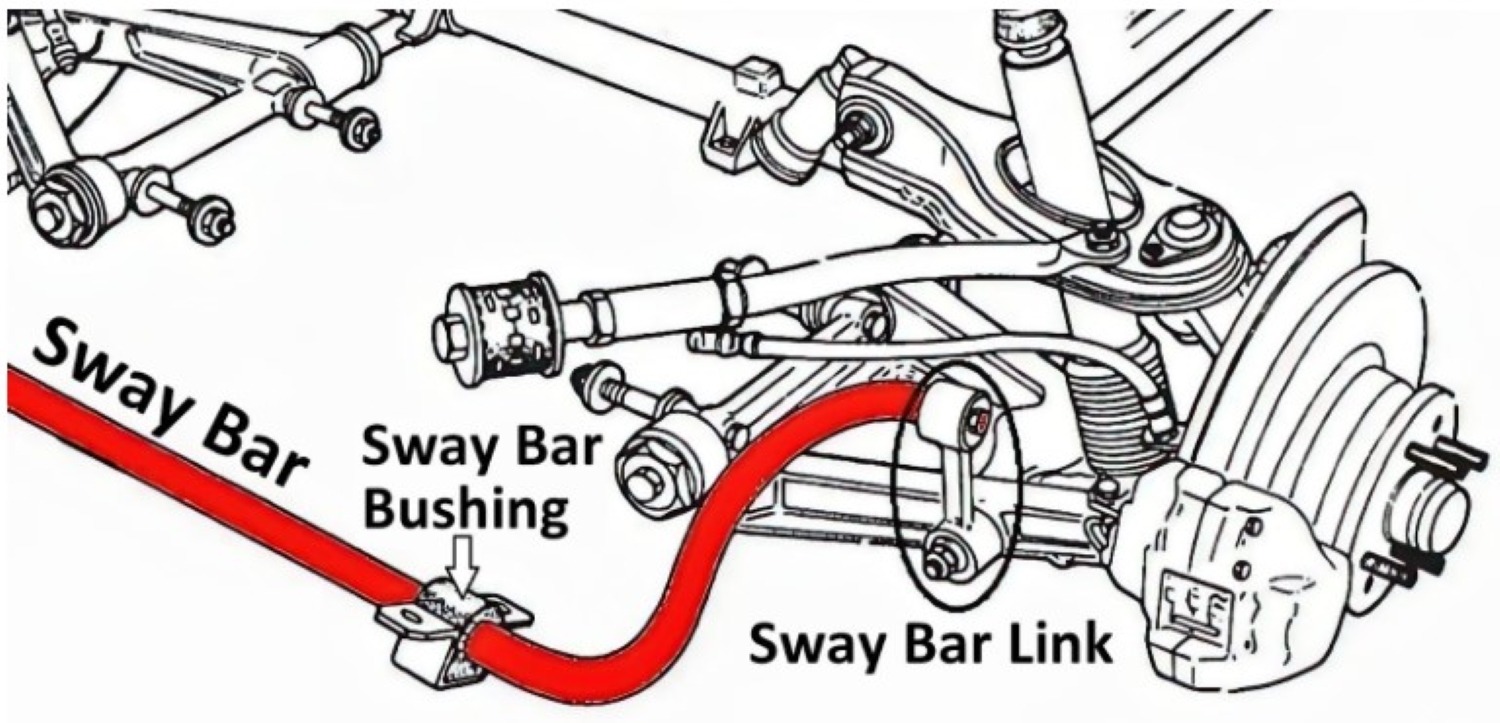
Understanding the Stabilizer Bar's Role
Before we get into the nuts and bolts (literally), let's clarify how a stabilizer bar works. Imagine a car entering a turn. The vehicle's weight shifts towards the outside wheels, compressing the outside suspension and extending the inside suspension. This difference in suspension travel causes the body to lean or roll. A stabilizer bar connects the left and right sides of the suspension, typically to the lower control arms or struts. When one side of the suspension is compressed, the stabilizer bar resists twisting. This resistance transfers force to the opposite side, limiting the extension of that suspension component and reducing the overall body roll.
Think of it like this: the stabilizer bar acts as a torsion spring. When the wheels move in opposite directions (as in a turn), the bar twists, providing resistance. The stiffness of the bar determines how much it resists twisting, and consequently, how much it reduces body roll. A thicker or stronger stabilizer bar will provide more resistance and reduce body roll further, often at the expense of ride comfort on uneven surfaces. The stabilizer bar effectively reduces independent movement of the wheels. The result is that vehicle stability is increased.
Tools and Materials Required
Before beginning the installation, gather the necessary tools and materials. This will streamline the process and prevent frustrating delays. Here's a comprehensive list:
- New Stabilizer Bar Kit: This should include the bar itself, bushings, brackets, end links, and any necessary hardware. Ensure the kit is compatible with your vehicle's make, model, and year. Check part numbers carefully!
- Jack and Jack Stands: Essential for safely lifting and supporting the vehicle. Never work under a vehicle supported only by a jack.
- Wheel Chocks: To secure the rear wheels (if working on the front) or front wheels (if working on the rear).
- Socket Set: Metric or SAE, depending on your vehicle. Include a range of sizes, and consider having both standard and deep sockets.
- Wrench Set: Matching your socket set, ensuring you have the correct sizes for all nuts and bolts.
- Torque Wrench: Crucial for tightening fasteners to the manufacturer's specified torque. Over-tightening can damage components, while under-tightening can lead to loosening and failure.
- Penetrating Oil: To loosen stubborn or rusted bolts. Apply liberally and allow time to soak.
- Grease Gun with Lithium Grease: For lubricating the bushings. This reduces friction and prevents squeaking.
- Hammer: A rubber mallet can be helpful for gently persuading parts into place.
- Pry Bar: To assist in removing old components or aligning new ones.
- Safety Glasses: Protect your eyes from debris.
- Gloves: Protect your hands.
- Work Light: Adequate lighting is essential for visibility.
- Shop Rags: For cleaning up grease and spills.
- Vehicle Service Manual: A crucial resource for torque specifications, diagrams, and vehicle-specific instructions.
Step-by-Step Installation Guide
This guide provides a general overview. Always refer to your vehicle's service manual for specific instructions and torque specifications. Safety is paramount; never compromise on it.
1. Preparation
Park the vehicle on a level surface, engage the parking brake, and chock the rear wheels. Loosen the lug nuts on the wheels that will be removed.
2. Lifting the Vehicle
Use the jack to lift the vehicle at the designated jacking points. Place jack stands securely under the frame rails, ensuring they are properly positioned and locked in place. Lower the vehicle onto the jack stands. Never work under a vehicle supported only by a jack. Remove the wheels.
3. Removing the Old Stabilizer Bar
This is often the most challenging part, especially on older vehicles. Start by spraying penetrating oil on all nuts and bolts associated with the stabilizer bar, including the end links and bracket mounting bolts. Allow the oil to soak for at least 15-20 minutes.
A. Disconnect the End Links: These connect the stabilizer bar to the suspension (usually the strut or lower control arm). Use a wrench and socket to remove the end link bolts. Be prepared for them to be seized. If necessary, use a breaker bar or impact wrench. Sometimes, you may need to use a cutting torch to remove severely corroded end links, but exercise extreme caution if doing so. Once the bolts are removed, detach the end links from the stabilizer bar and the suspension.
B. Remove the Stabilizer Bar Brackets: These brackets secure the stabilizer bar to the vehicle's frame or subframe. Unbolt the brackets and remove them. Note the orientation of the brackets before removal, as they often have a specific left and right side. The stabilizer bar may now be free to move. Depending on your vehicle's design, you may need to maneuver the bar around other suspension components to remove it.
4. Installing the New Stabilizer Bar
With the old stabilizer bar removed, you can now install the new one. This is essentially the reverse of the removal process, but with a few key considerations.
A. Install New Bushings: Most aftermarket stabilizer bar kits come with new bushings. Apply a generous amount of lithium grease to the inside of the bushings. This will prevent squeaking and ensure smooth movement. Install the bushings onto the new stabilizer bar.
B. Install the Stabilizer Bar Brackets: Position the stabilizer bar under the vehicle and attach the brackets. Ensure the brackets are oriented correctly (refer to your notes from the removal process). Tighten the bracket bolts to the manufacturer's specified torque using a torque wrench. Do not over-tighten. Over-tightening can crush the bushings or damage the brackets.
C. Attach the End Links: Connect the new end links to the stabilizer bar and the suspension components. Again, apply a small amount of lithium grease to the end link bushings (if applicable). Tighten the end link bolts to the specified torque. Some end links require a specific tightening sequence or have adjustable features; refer to the instructions included with the kit.
5. Final Checks and Adjustments
Once the stabilizer bar is installed, double-check all connections to ensure they are secure and tightened to the correct torque. Make sure the stabilizer bar is not rubbing against any other components. Inspect the bushings to ensure they are properly seated in the brackets.
6. Reinstall Wheels and Lower the Vehicle
Reinstall the wheels and hand-tighten the lug nuts. Lower the vehicle to the ground and remove the jack stands. Torque the lug nuts to the manufacturer's specified torque in a star pattern. Double-check the torque after driving a short distance (around 50 miles).
7. Test Drive and Inspection
Take the vehicle for a test drive to evaluate the handling. Pay attention to any unusual noises or vibrations. After the test drive, re-inspect all connections to ensure nothing has loosened. The new stabilizer bar should noticeably improve handling and reduce body roll during cornering.
Troubleshooting Common Issues
Even with careful installation, some issues may arise. Here are a few common problems and their solutions:
- Squeaking: Squeaking is usually caused by dry bushings. Re-grease the bushings thoroughly. If the squeaking persists, the bushings may be damaged or worn and need to be replaced.
- Clunking: Clunking noises can be caused by loose end links or brackets. Double-check the torque on all fasteners. Also, inspect the end links for wear or damage.
- Poor Handling: If the handling does not improve as expected, the stabilizer bar may not be compatible with your vehicle, or the end links may be the wrong length. Verify the part numbers and consult with a suspension specialist.
- Broken End Links: Aggressive driving or extremely stiff stabilizer bars can cause end link failure. Consider upgrading to heavy-duty end links if you experience this problem.
Conclusion
Installing a stabilizer bar is a relatively straightforward process, but it requires attention to detail and a thorough understanding of the components involved. By following this guide and consulting your vehicle's service manual, you can successfully upgrade your vehicle's handling and enjoy improved stability on the road. Remember to prioritize safety and double-check all connections to ensure a successful and reliable installation. Upgrading your stabilizer bar can vastly improve your vehicle's handling performance and give you the confidence and control you need on the road or track. Always consult a qualified mechanic if you are unsure about any aspect of the installation process.