How To Make Rose Gold Paint
So, you're looking to achieve that gorgeous rose gold finish on your project? Excellent choice! It's a sophisticated and eye-catching color that's surprisingly achievable at home. This guide will walk you through the process of mixing your own rose gold paint, tailored for car customization and DIY projects. We'll cover the materials, mixing ratios, application techniques, and troubleshooting tips to ensure you get a professional-looking result. Get ready to roll up your sleeves, because we're about to dive into the alchemy of rose gold!
Understanding the Components
Before we start mixing, let's break down the key components of your rose gold paint. We're essentially building the color from scratch, so understanding how each ingredient contributes is crucial.
1. Base Paint:
This is the foundation of your paint. Ideally, you'll want a high-quality automotive-grade basecoat. These are designed to adhere well to metal and plastic, and they offer excellent durability. White or a very light neutral tint (like off-white or pale gray) is preferred because it provides a clean canvas for your colorants. A darker basecoat will muddy the rose gold effect.
Choose a basecoat compatible with your project's clearcoat. This ensures proper adhesion and prevents issues like peeling or cracking later on. Consult the manufacturer's specifications for both the basecoat and clearcoat.
2. Metallic Pigments:
Metallic pigments are the key to creating that shimmering, reflective quality characteristic of rose gold. We'll be using a combination of gold and potentially copper metallic pigments to achieve the right hue. These pigments are usually available in powder form and are finely ground to ensure smooth dispersion within the paint.
Different grades of metallic pigments exist. Finer pigments create a smoother, more refined metallic effect, while coarser pigments can add more sparkle. For a subtle, elegant rose gold, opt for finer pigments. Look for "automotive-grade" to ensure they can withstand the rigors of exterior applications.
3. Tinters/Dyes:
This is where the "rose" comes into rose gold! We need to introduce a subtle pink or reddish hue. This can be achieved with automotive-grade universal tinters or dyes. These are highly concentrated colorants designed to be mixed with paint. Red, magenta, and even a touch of brown tinters are your tools here. Proceed with extreme caution: a little goes a long way!
4. Reducer/Thinner:
Your paint will likely be too thick to spray or apply evenly. A reducer, or thinner, is used to adjust the viscosity of the paint to the correct consistency. Always use a reducer that is compatible with your basecoat and clearcoat. Using the wrong reducer can cause the paint to curdle, separate, or dry improperly.
The type of reducer you use will depend on the type of paint you're using (lacquer, enamel, urethane, etc.). Check the manufacturer's recommendations for the appropriate reducer.
5. Clearcoat:
The clearcoat is the final layer of protection for your paint job. It provides UV resistance, scratch resistance, and gloss. A high-quality 2K (two-component) clearcoat is highly recommended for automotive applications. The "2K" refers to the fact that it requires a hardener to cure properly.
The choice of clearcoat can significantly impact the final appearance. Some clearcoats are designed for high gloss, while others offer a more matte finish. Consider your desired aesthetic when selecting your clearcoat.
Mixing Your Rose Gold Paint: The Recipe
Now for the fun part! Here's a general guideline for mixing your rose gold paint. Remember, this is more of an art than a science, so experimentation is key. Start with small batches and test your color on a scrap piece before committing to your project.
- Prepare Your Workspace: Work in a well-ventilated area. Wear a respirator mask to protect yourself from harmful fumes. Cover your work surface with drop cloths or newspaper. Have all your materials ready and within easy reach.
- Mix the Basecoat: Follow the manufacturer's instructions for mixing the basecoat with the appropriate reducer. Typically, this involves a specific ratio of paint to reducer (e.g., 4:1 or 2:1). Use a measuring stick to ensure accuracy.
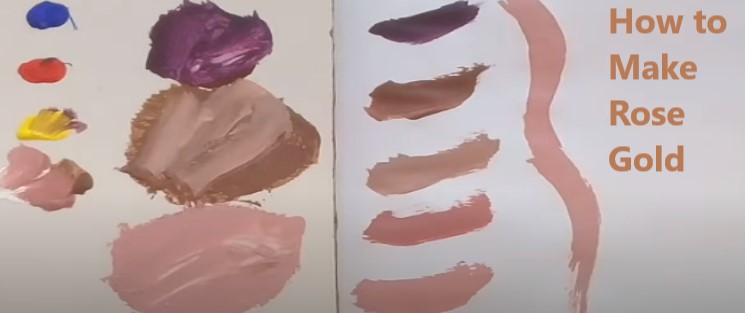
- Add Metallic Pigments: Start with a small amount of gold metallic pigment (around 0.5% to 1% by weight of the basecoat). Stir thoroughly to ensure even dispersion. Add a *very* small amount of copper pigment (around 0.1% to 0.2% by weight of the basecoat) if you want a warmer tone. Overdoing the copper can easily lead to an undesirable brassy appearance.
- Introduce the "Rose" Tone: This is the trickiest step. Add red or magenta tinter *one drop at a time*. Stir thoroughly after each drop. Aim for a subtle pink hue that complements the gold metallic shimmer. Brown tinter can also be used in *very* small amounts to 'dirty' the color slightly, making it appear more sophisticated and less bubblegum pink. Think of it like seasoning – a pinch can make all the difference, but too much will ruin the dish.
- Test Your Color: Spray a small amount of the mixed paint onto a test panel. Let it dry completely and assess the color under different lighting conditions. Adjust the pigment and tinter amounts as needed to achieve your desired rose gold shade. Remember to keep track of the changes you make to the formula so you can replicate it accurately for larger batches.
- Adjust Viscosity: Once you're happy with the color, check the viscosity of the paint. It should be thin enough to spray evenly but not so thin that it runs. Add reducer gradually until you reach the desired consistency. Refer to your spray gun's manual for recommended viscosity settings.
Application Techniques
Applying rose gold paint is similar to applying any other automotive paint. However, the metallic pigments require special attention to ensure even distribution and prevent a blotchy finish.
- Surface Preparation: This is paramount. Ensure the surface is clean, smooth, and properly primed. Remove any rust, dirt, grease, or old paint. Use sandpaper to create a smooth, even surface for the paint to adhere to. Apply a primer that is compatible with your basecoat.
- Spraying: Use a high-quality spray gun with appropriate settings. Apply several thin, even coats of rose gold paint, allowing each coat to dry slightly before applying the next. Overlapping each coat by about 50% will ensure uniform coverage. Avoid applying thick coats, as this can lead to runs and sags.
- Clearcoating: After the basecoat has dried completely (refer to the manufacturer's instructions for drying times), apply several coats of clearcoat. Follow the manufacturer's instructions for mixing and application. Again, thin, even coats are key.
- Wet Sanding and Polishing (Optional): For a truly flawless finish, you can wet sand the clearcoat with fine-grit sandpaper (e.g., 2000-grit or higher) to remove any imperfections. Follow this with polishing to restore the gloss.
Troubleshooting
Even with careful planning, things can sometimes go wrong. Here are some common problems and solutions:
- Blotchy Finish: This is usually caused by uneven distribution of metallic pigments. Ensure you are stirring the paint thoroughly and using consistent spraying techniques. Adjust the air pressure on your spray gun.
- Runs and Sags: This is caused by applying too much paint at once. Apply thinner coats and allow each coat to dry slightly before applying the next.
- Orange Peel: This is a textured finish that resembles the skin of an orange. It can be caused by several factors, including improper thinning, incorrect spray gun settings, or spraying in hot or humid conditions. Adjust your technique accordingly. Wet sanding and polishing can often correct minor orange peel.
- Color Mismatch: If the color of the dried paint doesn't match your test panel, double-check your mixing ratios and ensure you are using the same materials. Lighting can also affect how the color appears.
- Poor Adhesion: This is usually caused by improper surface preparation or using incompatible materials. Ensure the surface is clean, smooth, and properly primed. Use a basecoat and clearcoat that are designed to work together.
Safety Precautions
Working with automotive paint can be hazardous. Always follow these safety precautions:
- Work in a well-ventilated area.
- Wear a respirator mask to protect yourself from harmful fumes.
- Wear eye protection to prevent paint from splashing in your eyes.
- Wear gloves to protect your skin.
- Dispose of waste paint and materials properly according to local regulations.
Creating your own rose gold paint is a rewarding experience. With careful planning, patience, and attention to detail, you can achieve a stunning finish that will set your project apart. Remember to experiment, learn from your mistakes, and most importantly, have fun!