How To Manually Drain Washer
Modern washing machines, technological marvels of automated cleaning, are generally reliable. However, sometimes things go wrong. Whether it's a power outage mid-cycle, a malfunctioning drain pump, or simply a desire to troubleshoot a persistent error code, knowing how to manually drain your washing machine can save you from a flooded laundry room and potentially expensive service calls. This guide dissects the process, not just providing steps but explaining the why behind each action, offering insight into the washer's plumbing and mechanics.
Understanding the Basics: The Washer's Drainage System
Before diving into the manual drain procedure, it's crucial to grasp the fundamentals of how your washing machine evacuates water. The drainage system typically consists of the following components:
- Tub: This is where the clothes are washed and rinsed.
- Drain Hose: A flexible hose connected to the tub, channeling water away. This hose is often corrugated for flexibility and resistance to kinking.
- Drain Pump: The workhorse responsible for actively pumping water out of the tub and through the drain hose. These are typically small, electrically driven centrifugal pumps.
- Drain Standpipe (or Sink): The destination for the drain hose's output. A standpipe is a vertical pipe connected to your home's plumbing system, preventing sewer gases from backing up into your laundry room. Alternatively, some washers drain directly into a utility sink.
- Air Gap (if applicable): Some plumbing codes require an air gap between the drain hose and the drain standpipe. This prevents back-siphonage of contaminated water into the washer. It's a physical break in the line, allowing air to enter and prevent a vacuum.
When a washing machine operates normally, the drain pump engages at the appropriate points in the cycle. It draws water from the bottom of the tub and forces it through the drain hose. The pump impeller, a rotating component within the pump housing, creates a centrifugal force that pushes the water outwards. A check valve, often integrated into the pump design, prevents water from flowing back into the tub after the pump stops.
The need for manual draining arises when this automated process fails. A clogged drain pump, a kinked hose, or a completely dead pump will all prevent the machine from self-evacuating. Electricity is also a key component, a power cut or a dead circuit breaker will shut the draining process down.
Safety First: Preparation and Precautions
Working with water and electrical appliances demands caution. Before starting, ensure you've taken the following safety measures:
- Disconnect Power: Unplug the washing machine from the electrical outlet. This eliminates the risk of electric shock during the draining process. Never assume the machine is off just because the cycle is paused; physically remove the plug.
- Locate the Water Supply Valves: Find the hot and cold water supply valves connected to the washer. These are typically located behind the machine. Turn both valves off completely. This prevents more water from entering the tub while you're draining it.
- Prepare for Spillage: Manual draining will involve some water spillage. Have plenty of towels, buckets, and potentially a wet/dry vacuum cleaner on hand. Placing old towels or a plastic sheet under the washer can minimize mess.
- Consider the Weight: A washing machine filled with water is very heavy. Avoid attempting to move or tilt the machine while it's full, as this could cause injury or damage.
The Manual Drain Procedure: Step-by-Step
Here's a detailed guide to manually draining a washing machine, outlining the steps and explaining the reasoning behind them:
Step 1: Locating the Drain Hose
The drain hose is usually located at the back of the washing machine. Trace the hose from where it connects to the drain standpipe (or sink) back to the washer. You'll likely find it secured with clips or clamps. Carefully detach the hose from the standpipe. Be prepared for some water to spill out at this point. Have a bucket ready to catch it. Some washers have a small access panel on the back to easily reach the hose connection.
Step 2: Lowering the Drain Hose
The principle behind this step is simple: gravity. By lowering the drain hose below the level of the water in the tub, you create a siphon effect, allowing the water to drain out naturally. Place the free end of the drain hose into a large bucket or container positioned on the floor. Make sure the bucket is large enough to hold a significant amount of water. A five-gallon bucket is a good starting point, but you might need a larger one depending on the washer's capacity.
Observe the water flow. If the siphon effect is working correctly, water should begin to flow steadily from the hose into the bucket. If the flow is slow or nonexistent, there might be a kink or blockage in the hose. Inspect the hose carefully for any bends or obstructions. You can also try gently blowing into the hose to dislodge any minor blockages (ensure the other end is pointed into a bucket to avoid spraying water).
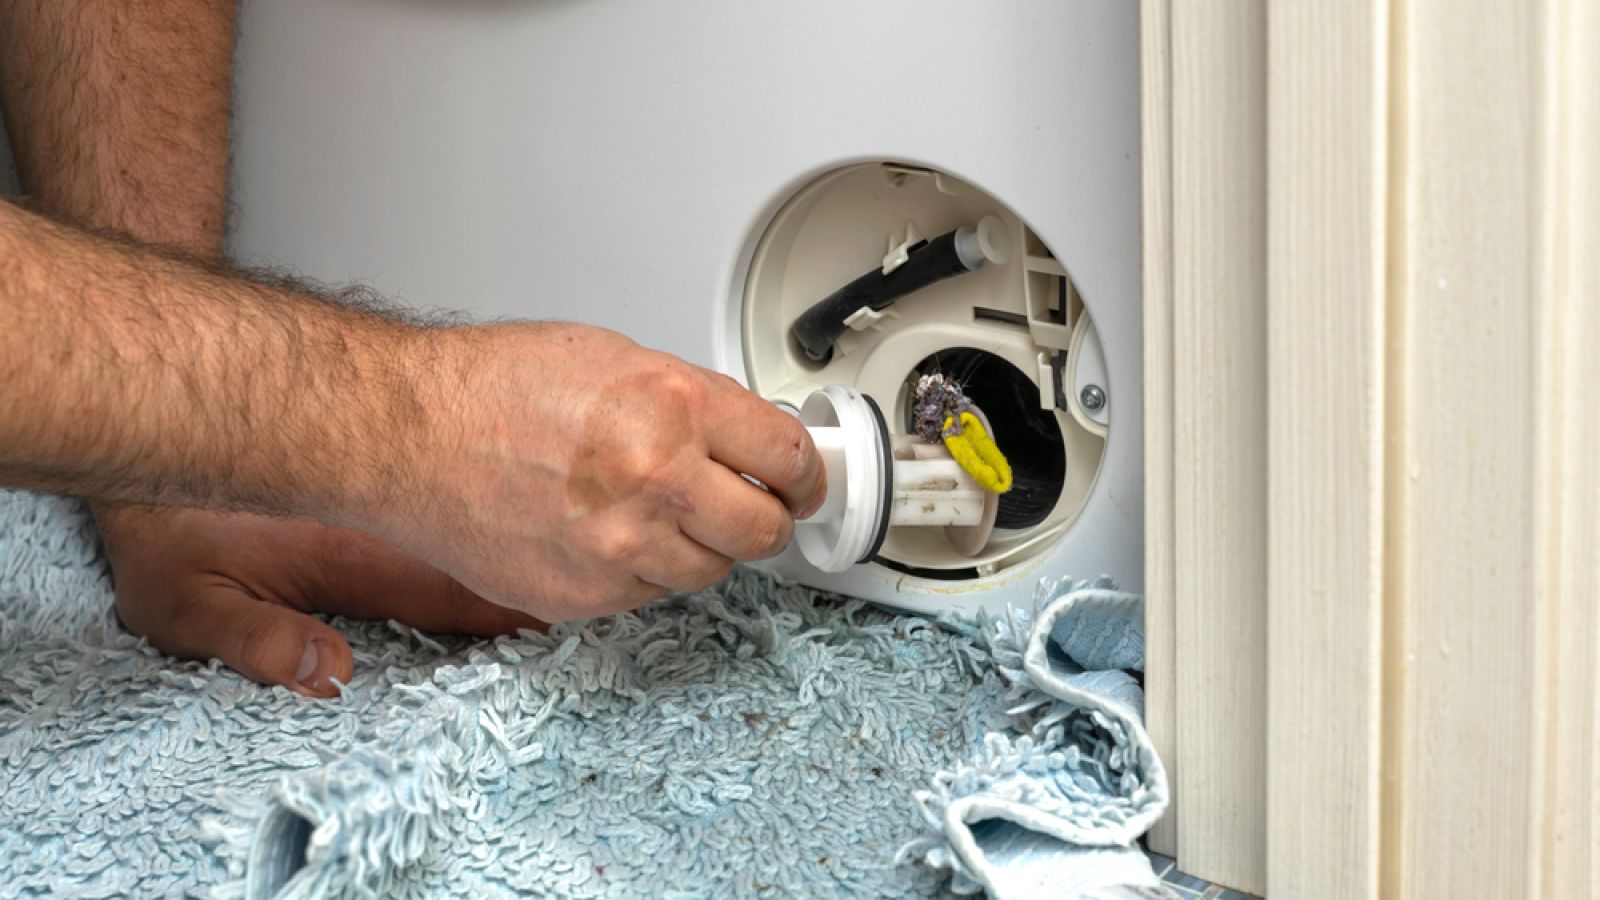
Step 3: Alternative Drain Port (If Available)
Some washing machines have a dedicated drain port located near the bottom front of the machine, often behind a small access panel. This is a designed-in feature for manual draining. Consult your washing machine's user manual to see if this port exists on your model. If so, the manual will provide specific instructions on how to use it. This typically involves attaching a short hose (sometimes provided with the washer) to the port and directing it into a bucket.
The advantage of using this port is that it often has a built-in filter to catch lint and debris, preventing them from clogging the drain hose or your plumbing. However, be prepared for a potentially slower drain rate compared to using the main drain hose, as the port is typically smaller.
Step 4: Dealing with Stubborn Water
Even after lowering the drain hose or using the drain port, some water might remain in the tub. This is common, especially if the washing machine is not perfectly level or if there's a small amount of residual water trapped in the sump (the lowest point of the tub). To remove this remaining water, you can try the following:
- Tilting the Machine (Carefully): With assistance, carefully tilt the washing machine back or to the side, allowing the remaining water to flow towards the drain hose or port. Use caution and ensure the machine is stable to prevent it from tipping over completely. Only do this if you're confident you can manage the weight safely.
- Using a Wet/Dry Vacuum: A wet/dry vacuum cleaner is an excellent tool for removing the last bits of water from the tub. Use the hose attachment to suck up the remaining water, being careful not to damage the tub's surface.
- Sponging and Toweling: For small amounts of water, you can use sponges and towels to soak up the remaining moisture. This is a more time-consuming approach but effective for getting the tub completely dry.
Step 5: Post-Drainage Inspection and Troubleshooting
Once the washing machine is completely drained, take the opportunity to inspect the drain hose and drain pump for any signs of damage or blockage. Check the drain hose for kinks, cracks, or clogs. Remove the drain pump (refer to your washing machine's service manual for specific instructions) and inspect it for debris such as lint, small objects, or clothing fibers. These are common causes of drain pump failure.
Clean the drain pump thoroughly and reassemble it. If the drain pump is visibly damaged (e.g., cracked housing, broken impeller), it will need to be replaced. Replacement drain pumps are readily available online or at appliance parts stores.
Reassembly and Testing
After manually draining the washer and addressing any obvious issues, it's time to reassemble everything and test the machine:
- Reconnect the drain hose to the drain standpipe (or sink), ensuring it's securely fastened.
- Turn the water supply valves back on.
- Plug the washing machine back into the electrical outlet.
- Run a short test cycle to verify that the machine is draining properly. Observe the drain pump's operation and check for any leaks.
If the washing machine still fails to drain, even after manual draining and troubleshooting, it's likely that there's a more serious problem, such as a faulty drain pump motor, a control board issue, or a blockage in the internal plumbing. In these cases, it's best to consult a qualified appliance repair technician.
Preventative Maintenance: Keeping Your Washer Draining Smoothly
Preventative maintenance is key to avoiding future drainage problems. Here are some tips to keep your washing machine draining smoothly:
- Clean the Lint Filter Regularly: Most washing machines have a lint filter designed to trap lint and debris. Clean this filter regularly (typically after every few loads) to prevent it from becoming clogged and restricting water flow.
- Use the Correct Amount of Detergent: Overuse of detergent can lead to excessive suds buildup, which can clog the drain pump and hoses. Follow the detergent manufacturer's instructions and use the recommended amount. Consider using HE (High Efficiency) detergent, which produces less suds.
- Inspect the Drain Hose Periodically: Check the drain hose for kinks, cracks, or clogs. Replace the hose if it shows signs of damage.
- Run a Washer Cleaner Cycle: Periodically run a washer cleaner cycle with a washing machine cleaner product. This helps to remove buildup of detergent, dirt, and grime from the tub and internal components.
- Avoid Overloading the Washer: Overloading the washer can put extra strain on the drain pump and other components. Follow the manufacturer's recommendations for load size.
By understanding the washing machine's drainage system, following the manual drain procedure carefully, and implementing preventative maintenance practices, you can keep your washing machine running smoothly and avoid costly repairs.