How To Rebuild An Alternator
The alternator is a vital component of your vehicle's electrical system, responsible for charging the battery and powering electrical accessories while the engine is running. A failing alternator can leave you stranded, so understanding how to troubleshoot and potentially rebuild one can save you time and money. This guide provides a practical overview of alternator maintenance, troubleshooting, and rebuilding, suitable for both car owners and experienced mechanics.
Understanding Alternator Basics
An alternator works by using electromagnetic induction. A rotor (containing a coil of wire) spins inside a stator (a stationary coil of wire). This rotation is driven by the engine via a belt and pulley system. As the rotor spins, it creates a magnetic field that induces an alternating current (AC) in the stator. This AC current is then converted to direct current (DC) by a rectifier (diode bridge) before being used to charge the battery and power the car's electrical system. Key components include:
- Rotor: The rotating part with a coil of wire.
- Stator: The stationary part with coils of wire where electricity is generated.
- Regulator: Controls the voltage output.
- Rectifier (Diode Bridge): Converts AC to DC.
- Brushes: Conduct electricity to the rotor.
- Bearings: Allow the rotor to spin smoothly.
Common Alternator Problems & Troubleshooting
Recognizing the symptoms of a failing alternator is the first step in addressing the issue. Here are some common signs:
Symptom 1: Dim or Flickering Headlights
Problem: Low voltage output from the alternator can cause headlights to dim, especially at idle. Flickering can indicate a fluctuating voltage, often due to a failing regulator.
Possible Causes:
- Worn brushes: Reduces the electrical contact to the rotor.
- Faulty voltage regulator: Fails to maintain consistent voltage.
- Loose or corroded wiring: Creates resistance and voltage drop.
- Failing diode bridge: Reduces the efficiency of AC to DC conversion.
Solution:
- Inspect wiring for corrosion and loose connections. Clean and tighten as needed.
- Check the alternator's output voltage with a multimeter. It should be between 13.5 and 14.5 volts with the engine running. A voltage below this range indicates a potential problem.
- If the voltage is unstable, the regulator is likely the culprit. On some models, the regulator can be replaced separately.
- If the voltage is still low after checking these, the alternator likely needs a rebuild or replacement.
Symptom 2: Battery Warning Light On
Problem: The battery warning light on the dashboard indicates that the battery is not being charged properly. While this *could* be a battery issue, it frequently points to the alternator.
Possible Causes:
- Completely failed alternator: No voltage output.
- Broken alternator belt: The alternator isn't spinning.
- Faulty voltage regulator: Undercharging or overcharging the battery.
Solution:
- Check the alternator belt for damage or looseness. Replace or tighten as needed. A slipping belt can prevent the alternator from spinning at the correct speed.
- Use a multimeter to check the voltage at the battery terminals with the engine running. If it's significantly below 13.5 volts, the alternator is likely not charging.
- If the belt is intact and the voltage is low, the alternator may be completely failed or have a faulty regulator.
Symptom 3: Unusual Noises
Problem: Grinding, whining, or squealing noises coming from the alternator area can indicate mechanical problems.
Possible Causes:
- Worn bearings: Cause grinding or whining noises.
- Loose or damaged pulley: Causes squealing noises, especially when accessories are turned on.
- Internal component failure: Fragments rubbing together can create strange noises.
Solution:
- Visually inspect the alternator pulley for damage or looseness. Tighten or replace as needed.
- Use a stethoscope or a long screwdriver to pinpoint the source of the noise. If it's coming from inside the alternator, it likely needs a rebuild or replacement.
- Worn bearings usually necessitate a full rebuild.
Symptom 4: Difficulty Starting or a Dead Battery
Problem: While the battery provides the initial power to start the car, the alternator is responsible for recharging the battery while the engine is running. A failing alternator can lead to a discharged battery, making it difficult or impossible to start the car.
Possible Causes:
- Alternator not charging the battery: Drains the battery over time.
- Excessive electrical load: Draining the battery faster than the alternator can charge it.
Solution:
- Have the battery load tested to ensure it's holding a charge.
- Check the alternator's output voltage while the engine is running. If it's low, the alternator is not charging the battery effectively.
- Investigate any excessive electrical loads, such as aftermarket accessories that may be drawing too much power.
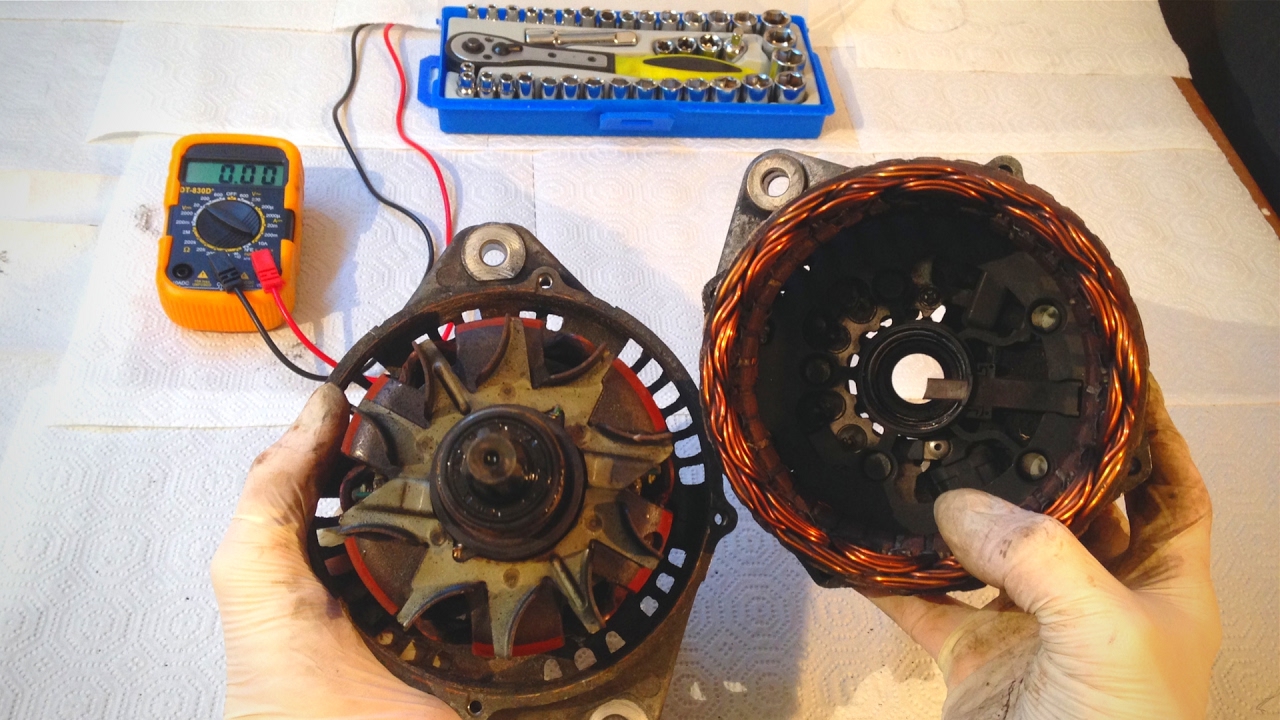
Alternator Rebuild Process
Rebuilding an alternator can be a cost-effective alternative to buying a new one, especially for older vehicles. However, it requires some mechanical skill and specialized tools. Always disconnect the battery before working on any electrical components.
- Disassembly: Carefully disassemble the alternator, noting the position of each component. Take pictures as you go to aid in reassembly.
- Cleaning: Clean all components thoroughly with a parts cleaner.
- Inspection: Inspect each component for wear or damage:
- Rotor: Check the slip rings for wear. These are the contact points for the brushes. Test the rotor winding for continuity.
- Stator: Check the stator windings for shorts or opens using a multimeter.
- Rectifier (Diode Bridge): Test each diode with a multimeter. They should conduct in one direction only.
- Regulator: Test the regulator according to its specifications.
- Brushes: Replace the brushes if they are worn down.
- Bearings: Replace the bearings if they are noisy or feel rough.
- Replacement: Replace any worn or damaged components. Rebuild kits are often available that include common replacement parts like bearings, brushes, and voltage regulators.
- Reassembly: Reassemble the alternator in the reverse order of disassembly. Ensure all connections are secure.
- Testing: After reassembly, test the alternator using an alternator tester to ensure it's functioning correctly.
Example: A 1998 Honda Civic often suffers from worn brushes. Replacing the brushes and cleaning the slip rings can often restore the alternator to full functionality. Rebuild kits for these models are readily available and relatively inexpensive.
Example: A 2005 Ford F-150 is prone to voltage regulator failure. Replacing the regulator is usually a straightforward process and can be done without completely disassembling the alternator. However, consider checking the other components while you're in there.
Tools and Materials
You'll need the following tools and materials to rebuild an alternator:
- Socket set and wrenches
- Screwdrivers (Phillips and flathead)
- Multimeter
- Parts cleaner
- Bearing puller (optional, but helpful)
- Soldering iron (for replacing diodes)
- Alternator rebuild kit (if available)
- Safety glasses and gloves
Safety Precautions
Safety is paramount when working on electrical components.
- Disconnect the battery: Always disconnect the negative battery cable before working on the electrical system.
- Wear safety glasses: Protect your eyes from debris.
- Wear gloves: Protect your hands from chemicals and sharp edges.
- Work in a well-ventilated area: Parts cleaner can be harmful if inhaled.
- Be careful with electrical connections: Ensure all connections are secure and properly insulated.
When to Replace vs. Rebuild
While rebuilding can save money, sometimes replacement is the better option. Consider the following factors:
- Cost: Compare the cost of a rebuild kit and your time to the cost of a new or remanufactured alternator.
- Availability of parts: Parts for older or less common alternators may be difficult to find.
- Condition of the alternator: If the rotor or stator is severely damaged, rebuilding may not be feasible.
- Your Skill Level: Rebuilding requires mechanical aptitude and patience. If you're not comfortable with electrical systems, replacement may be a safer option.
Keeping Your Car in Top Condition
Preventative maintenance is key to extending the life of your alternator and other car components.
- Regularly inspect the alternator belt: Check for cracks, wear, and proper tension.
- Keep the battery terminals clean: Corrosion can reduce the alternator's ability to charge the battery.
- Avoid excessive electrical loads: Overloading the electrical system can strain the alternator.
- Have your charging system tested periodically: This can identify potential problems before they lead to failure.
By understanding the principles of alternator operation, recognizing the symptoms of failure, and performing basic maintenance, you can keep your car's electrical system running smoothly and avoid costly breakdowns. Whether you choose to rebuild or replace, knowing how to diagnose alternator problems will save you time, money, and the frustration of being stranded on the side of the road.