How To Remove A Camshaft Position Sensor
Alright, so you're tackling a camshaft position sensor (CMP) replacement. Good on you! It's a relatively straightforward job that can save you a chunk of change if you're comfortable wrenching on your own car. This guide assumes you have some experience and a basic understanding of automotive components. We'll walk through the process step-by-step, covering safety precautions and some potential pitfalls.
Understanding the Camshaft Position Sensor
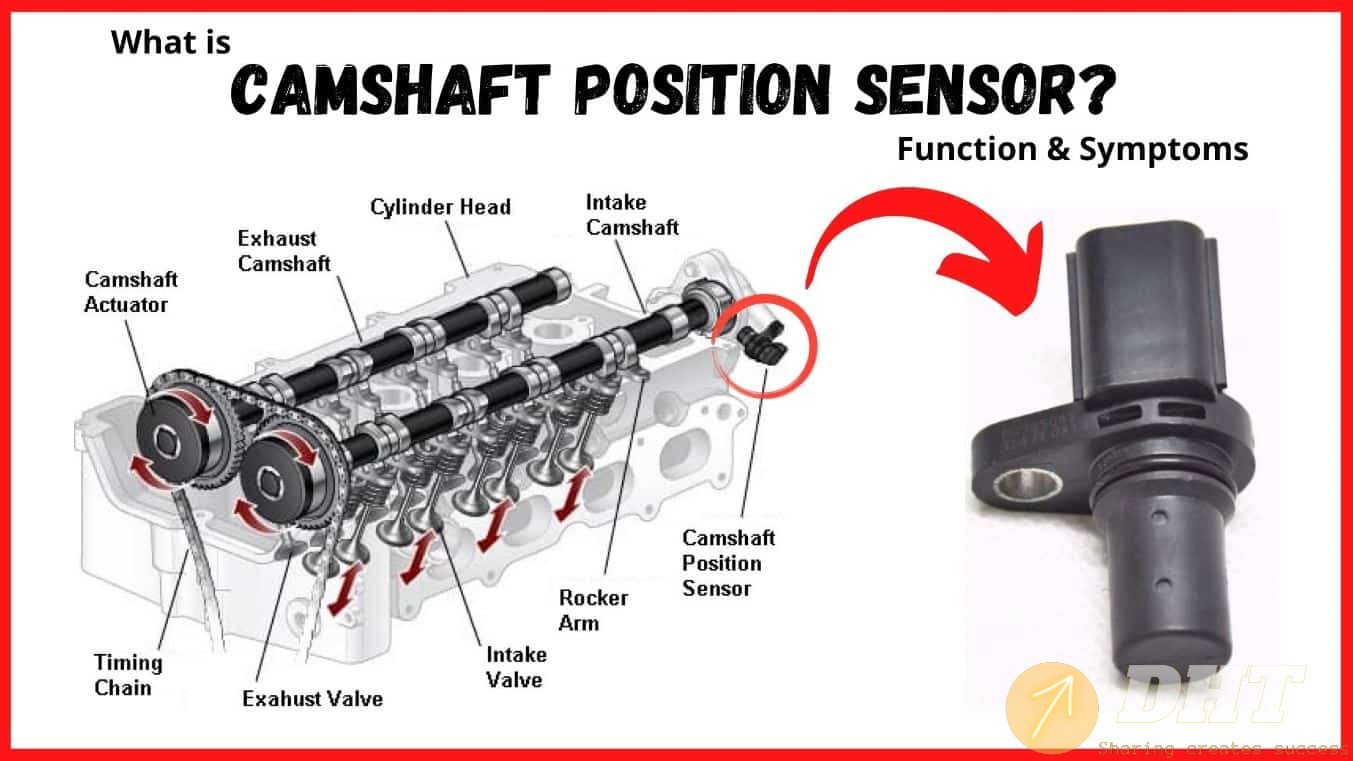
Before we get started, let's quickly recap what the CMP sensor does. The CMP sensor plays a crucial role in your engine's operation. It monitors the position of the camshaft, relaying this information to the engine control unit (ECU). The ECU, the brain of your engine, uses this data in conjunction with the crankshaft position sensor (CKP) signal to determine the optimal timing for fuel injection and ignition. A faulty CMP sensor can lead to a host of issues, including:
- Hard starting or no start
- Rough idling
- Reduced fuel economy
- Check engine light (CEL) with codes related to the CMP sensor or timing
- Engine misfires
Often, the diagnostic trouble code (DTC) associated with a faulty CMP sensor will be something like P0340, P0341, or similar, depending on your vehicle's make and model. Always confirm the code with a scan tool before proceeding.
Safety First!
No matter how simple the job, safety is paramount. Before you even think about touching a wrench, adhere to these guidelines:
- Disconnect the negative battery cable: This prevents accidental electrical shorts and protects you and the car's electronics. Use a wrench to loosen the nut on the negative terminal (usually marked with a "-" symbol) and carefully remove the cable. Tuck it away from the battery terminal to ensure it doesn't accidentally reconnect.
- Wear safety glasses: Protecting your eyes is crucial. Small debris can easily dislodge during this process.
- Use jack stands: If you need to jack up the vehicle for better access (which is sometimes necessary), always use jack stands for support. Never rely solely on the jack. Place the jack stands on designated jacking points.
- Allow the engine to cool: Working on a hot engine is a recipe for burns. Let the engine cool down completely before starting.
Tools You'll Need
Having the right tools makes the job much easier. Here’s a list of what you'll likely need:
- Socket set and wrenches: Metric or SAE, depending on your vehicle. Common sizes are 10mm, 12mm, and 13mm.
- Screwdrivers: Both flathead and Phillips head may be necessary.
- Scan tool (OBDII scanner): To read and clear trouble codes.
- Multimeter (optional): For testing the new sensor if needed.
- Penetrating oil: Helpful for loosening stubborn bolts.
- Rags or shop towels: For wiping up spills and keeping things clean.
- Flashlight or work light: To illuminate the work area.
- New CMP sensor: Make sure it's the correct part for your vehicle! Double-check the part number.
Step-by-Step Removal and Installation
Now for the meat of the matter. The exact location of the CMP sensor varies depending on the vehicle, but it's typically located near the cylinder head, valve cover, or timing cover. Consult your vehicle's service manual for the exact location. The following is a general guide:
- Locate the CMP sensor: Use your vehicle's service manual or an online resource to pinpoint its location. It usually has a wiring harness connected to it.
- Disconnect the electrical connector: Gently unplug the wiring harness connector from the CMP sensor. There might be a clip or locking mechanism that needs to be released first. Be careful not to break the connector. If it's stuck, try using a small screwdriver to gently pry it loose.
- Remove any obstructions: You might need to remove air intake components, hoses, or other parts to gain access to the sensor. Take pictures as you go so you remember how everything goes back together.
- Remove the CMP sensor mounting bolt(s): The sensor is usually held in place by one or two bolts. Use the appropriate socket or wrench to loosen and remove the bolts. Apply penetrating oil if the bolts are rusted or seized.
- Carefully remove the old sensor: Once the bolts are removed, gently pull the old CMP sensor out of its mounting hole. It might be a tight fit due to dirt or corrosion. Avoid using excessive force. If it’s really stuck, try gently twisting the sensor while pulling.
- Inspect the sensor and surrounding area: Examine the old sensor for any signs of damage or wear. Check the mounting hole for any debris or corrosion. Clean the area with a clean rag.
- Install the new CMP sensor: Lubricate the O-ring (if equipped) on the new sensor with a small amount of clean engine oil. This will help it seal properly.
- Insert the new sensor into the mounting hole: Carefully insert the new CMP sensor into the mounting hole. Make sure it's properly seated.
- Install the mounting bolt(s): Tighten the mounting bolts to the manufacturer's specified torque. If you don't have the torque specification, tighten them snugly but don't overtighten them. Overtightening can damage the sensor or the mounting threads.
- Reconnect the electrical connector: Plug the wiring harness connector back into the CMP sensor. Make sure it clicks into place and is securely connected.
- Reinstall any removed components: Reinstall any air intake components, hoses, or other parts that you removed to access the sensor. Refer to the pictures you took earlier to ensure everything is put back correctly.
- Reconnect the negative battery cable: Reconnect the negative battery cable to the battery terminal. Tighten the nut securely.
- Clear the trouble codes: Use your scan tool to clear any trouble codes that were stored in the ECU. This will turn off the check engine light.
- Start the engine and check for proper operation: Start the engine and let it idle for a few minutes. Listen for any unusual noises or vibrations. Check for any leaks.
- Test drive the vehicle: Take the vehicle for a test drive to ensure that the new CMP sensor is functioning properly.
Troubleshooting Tips
Even with careful attention to detail, you might encounter some snags. Here are a few troubleshooting tips:
- Sensor won't come out: If the old sensor is stuck, use penetrating oil and gently twist and pull. Avoid using excessive force, which could damage the sensor or the mounting location.
- Connector won't disconnect: Check for any locking mechanisms or clips. Use a small screwdriver to gently release them.
- New sensor doesn't fix the problem: Double-check that you installed the correct sensor. Also, consider other potential causes of the problem, such as wiring issues, a faulty CKP sensor, or a timing issue. A multimeter can be used to test the sensor's output signal if you suspect a wiring problem. You'll need to consult your vehicle's service manual for the correct testing procedure.
- Check engine light comes back on: Rescan the vehicle for trouble codes. The new code may provide more specific information about the problem.
- Sensor breaks during removal: If the sensor breaks, carefully remove any remaining pieces from the mounting location. You may need to use a pick or small screwdriver to dislodge them. Be extremely careful not to drop any debris into the engine.
Important Considerations
- OEM vs. Aftermarket: While aftermarket CMP sensors can be tempting due to their lower price, it's generally recommended to use an original equipment manufacturer (OEM) sensor. OEM sensors are typically more reliable and compatible with your vehicle's ECU.
- Sensor Calibration: Some CMP sensors require calibration after installation. Check your vehicle's service manual for specific instructions.
- Wiring Harness Inspection: Always inspect the wiring harness and connector for any signs of damage, such as frayed wires or corroded terminals. Repair or replace any damaged wiring before installing the new sensor.
Replacing a CMP sensor is a manageable task for the experienced DIYer. By following these steps, taking your time, and prioritizing safety, you can save yourself money and gain a better understanding of your vehicle's engine management system. Remember, if you're ever unsure about any part of the process, consult a qualified mechanic. Good luck!