How To Remove Cd Stuck In Car Cd Player
The dreaded "CD stuck" scenario. A common frustration for any car owner who still relies on the compact disc for their auditory entertainment. While streaming services and digital music have largely taken over, there are still countless vehicles equipped with CD players, and those players, despite their apparent simplicity, are complex electromechanical devices prone to failure. Understanding how they work, and more importantly, how they can fail, is the first step in successfully retrieving your cherished disc.
Understanding the Anatomy of a Car CD Player
Before attempting any extraction, it's crucial to understand the basic components and operation of a typical car CD player. Think of it as a miniaturized, ruggedized version of a home CD player, engineered to withstand the vibrations and temperature fluctuations inherent in an automotive environment. Key components include:
- The Laser Assembly (Optical Pickup Unit - OPU): This is the heart of the CD player. It consists of a laser diode, lenses, and photodiodes. The laser beam is focused onto the CD surface, and the reflected light is read by the photodiodes to decode the digital information encoded on the disc.
- The Spindle Motor: This motor spins the CD at a variable speed. The speed is adjusted so that the linear velocity of the CD surface passing under the laser remains constant. This is crucial for consistent data reading.
- The Sled Motor and Gear Mechanism: This assembly moves the laser assembly radially across the CD, allowing it to read the entire disc. A small motor drives a series of gears that precisely position the laser.
- The Loading Mechanism: This is responsible for inserting and ejecting the CD. It typically involves a motor, gears, and a tray or slot that accepts the disc. This is often the source of the problem.
- The Control Circuitry: This is the "brain" of the CD player. It controls all the other components, processes the data read from the CD, and sends the audio signal to the car's audio system.
- The Front Panel Controls: These are the buttons and display on the front of the CD player that allow you to control its functions.
Common Causes of Stuck CDs
Several factors can contribute to a CD becoming lodged in your car's player. Identifying the likely cause can help you choose the most appropriate retrieval method:
- Mechanical Failure of the Loading Mechanism: This is the most common culprit. Gears can strip, motors can burn out, or the tray mechanism can become jammed. This often manifests as the CD player making unusual noises, struggling to eject, or simply doing nothing at all. Dust and debris accumulation can exacerbate these issues.
- CD Damage: Warped, scratched, or otherwise damaged CDs can get stuck in the player. The laser might be unable to read the disc properly, causing the player to attempt repeated read attempts and potentially jamming the mechanism. Similarly, CDs with paper labels that are peeling off can snag in the mechanism.
- Power Issues: A sudden power loss or voltage fluctuation can disrupt the CD player's operation, causing it to freeze with the CD inside. A faulty ground connection can also cause erratic behavior.
- Sensor Malfunctions: CD players use various sensors to detect the presence of a CD, the position of the tray, and other parameters. If these sensors fail, the player might not be able to eject the CD.
- Environmental Factors: Extreme temperatures can affect the CD player's components, potentially causing the mechanism to stick. Humidity can also contribute to corrosion and malfunction.
Troubleshooting and Extraction Techniques
Before resorting to more drastic measures, try these basic troubleshooting steps:
- Try Ejecting Again: This may sound obvious, but sometimes the CD player is simply being temperamental. Press the eject button repeatedly, waiting a few seconds between each press.
- Reset the Car's Electrical System: Turn off the car, remove the key from the ignition, and wait a few minutes. This will allow the CD player's control circuitry to reset. In some cases, disconnecting the car battery (carefully!) for a few minutes can achieve a more thorough reset. Remember to consult your car's owner's manual before disconnecting the battery, as this can erase certain settings.
- Check the Car's Fuse Box: Locate the fuse for the car's audio system (refer to your owner's manual for the location) and check if it's blown. Replace it with a fuse of the correct amperage if necessary. A blown fuse could indicate a more serious electrical problem, so if the fuse blows again immediately, consult a qualified mechanic.
- Use a Credit Card or Similar Tool (Proceed with Extreme Caution): This method carries a risk of damaging the CD player, so proceed with extreme caution. Cut a strip from an old credit card or similar plastic card. Insert the strip into the CD slot alongside the CD, trying to gently nudge the CD towards the ejection position. Do not force anything! The goal is to help the CD player's mechanism overcome any slight obstructions.
If the above methods fail, more invasive techniques may be required. Disclaimer: The following methods involve potentially disassembling the CD player and should only be attempted if you are comfortable with basic electronics repair. If you are not, it's best to consult a qualified technician.
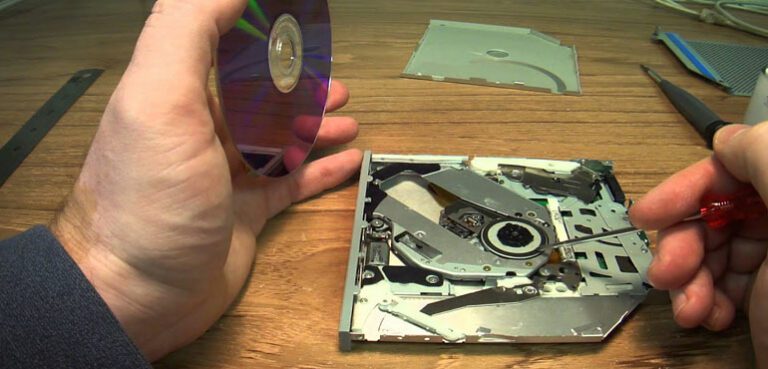
- Partial Disassembly and Manual Ejection (Advanced): This involves removing the CD player from the dashboard (refer to your car's service manual for instructions on removing the radio). Once removed, you can carefully open the CD player's casing. Look for the loading mechanism and attempt to manually move the tray or gears to eject the CD. Be gentle and methodical, and take pictures or notes to help you reassemble the unit correctly. Often, a small access hole exists on the bottom or side of the unit where a straightened paperclip or similar tool can be inserted to manually release the CD. Consult the CD player's service manual if available, as it may contain specific instructions for manual ejection.
- Using Compressed Air (Risk of Internal Damage): This method carries a significant risk of pushing dust and debris further into the mechanism, potentially causing more damage. Use compressed air in short bursts directed into the CD slot, aiming to dislodge any obstructions. Exercise extreme caution to avoid damaging the laser assembly or other sensitive components.
- Professional Repair: If all else fails, the best option is to take your car to a qualified audio repair shop or dealership. They have the tools and expertise to diagnose and repair the problem without causing further damage. This is particularly advisable if the CD player is an integral part of the car's infotainment system, as replacing the entire unit can be expensive.
Preventive Measures
Once you've successfully retrieved your CD, take steps to prevent future occurrences:
- Use CDs in Good Condition: Avoid using warped, scratched, or damaged CDs.
- Clean Your CDs Regularly: Use a soft, lint-free cloth to clean your CDs from the center outwards.
- Avoid Using CDs with Paper Labels: Paper labels can peel off and get stuck in the mechanism. Use CDs with printed labels or write directly on the CD with a permanent marker.
- Regular Maintenance: Periodically clean the CD slot with a vacuum cleaner attachment to remove dust and debris.
- Consider Digital Alternatives: While not a solution for those who prefer physical media, consider using USB drives, Bluetooth streaming, or auxiliary inputs to play music in your car. This eliminates the risk of CDs getting stuck altogether.
A Final Word
Retrieving a stuck CD from your car's CD player can be a frustrating experience, but by understanding the underlying mechanisms and following these steps, you can often resolve the problem yourself. Remember to proceed with caution, prioritize safety, and consult a professional if you are uncomfortable with any of the more advanced techniques. Good luck, and happy listening!