How To Remove Rear Brake Drum
Removing a rear brake drum can seem like a daunting task, but with the right knowledge and tools, it’s a manageable job for both car owners tackling DIY maintenance and professional mechanics. This article will guide you through the process, focusing on practical troubleshooting and real-world issues you might encounter along the way.
Understanding Rear Drum Brakes
Before diving in, let's understand the basics. Drum brakes are a type of braking system where brake shoes press against the inside surface of a rotating drum. They're commonly found on the rear wheels of older vehicles and some newer, smaller cars. While disc brakes are generally preferred for their superior stopping power, drum brakes are simpler and often more cost-effective.
Symptoms Indicating Brake Drum Removal is Necessary
Several symptoms suggest your rear brake drums need attention:
- Grinding or squealing noises when braking: This often indicates worn brake shoes or foreign objects lodged inside the drum.
- Reduced braking performance: If your car takes longer to stop, the brake shoes may be worn, contaminated with brake fluid or grease, or the drum surface might be glazed.
- Pulling to one side when braking: Uneven wear or contamination on one side can cause the vehicle to pull.
- Parking brake issues: A weak or ineffective parking brake can be related to problems within the drum brake system.
- Rear wheel lockup: A seized brake cylinder or severely worn components can cause the rear wheels to lock up.
- ABS light illumination: While an ABS light can indicate many issues, it can also be triggered by problems within the rear drum brake system that affect wheel speed sensor readings.
Tools You'll Need
Gather these tools before you start:
- Jack and jack stands
- Wheel chocks
- Lug wrench
- Brake cleaner
- Penetrating oil
- Hammer (preferably a rubber mallet)
- Screwdrivers (flathead and Phillips head)
- Brake adjusting tool (for adjusting the star wheel)
- Brake spring tool (helpful for removing and installing brake shoe springs)
- Brake drum removal tool (optional, but highly recommended if the drum is stuck)
- Safety glasses and gloves
- Torque wrench
Step-by-Step Removal Process
- Safety First: Chock the front wheels and engage the parking brake (if possible). Loosen the lug nuts on the wheel you're removing.
- Raise the Vehicle: Use a jack to lift the vehicle and securely place it on jack stands. Never work under a vehicle supported only by a jack.
- Remove the Wheel: Finish removing the lug nuts and take off the wheel.
- Inspect the Drum: Examine the brake drum for any visible damage, such as cracks or excessive rust.
- Release the Parking Brake: Fully release the parking brake. This is crucial for allowing the brake shoes to retract.
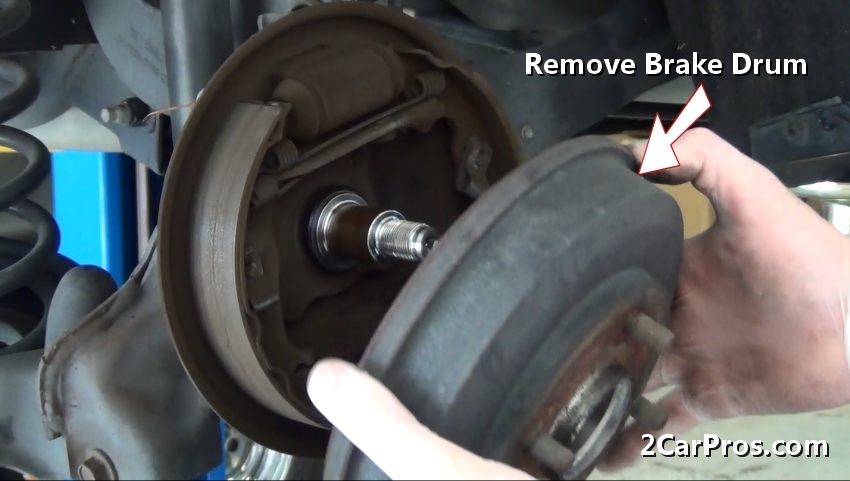
- Attempt to Remove the Drum: Try to gently pull the drum straight off the hub. If it comes off easily, great! Proceed to the next steps. If it’s stuck, move on to the troubleshooting section below.
- Inspect the Brake Components: Once the drum is off, inspect the brake shoes, springs, wheel cylinder, and other components for wear, damage, or leaks. Take pictures or make notes for reassembly.
Troubleshooting a Stuck Brake Drum
This is where things often get tricky. A stuck brake drum is a common problem, usually caused by rust, corrosion, or the brake shoes being expanded too far.
Problem 1: Rust and Corrosion
Symptom: The drum won't budge, even after releasing the parking brake. You may hear a dull thud when trying to pull it off.
Cause: Rust and corrosion have formed between the drum and the hub, effectively "gluing" them together.
Solution:
Penetrating Oil: Generously spray penetrating oil around the center hub and the edges of the drum where it meets the backing plate. Let it soak for at least 15-30 minutes, or even longer if possible.
Hammering: Use a rubber mallet to gently tap around the circumference of the drum. Avoid hitting it too hard in one spot, as this could damage the drum. The vibrations can help break the rust bond.
Heat (Use with caution): If penetrating oil and hammering don't work, you can try applying gentle heat with a heat gun or propane torch. *Be extremely cautious when using heat near flammable materials like brake fluid or grease.* Heat the drum evenly, and then try tapping it again.
Problem 2: Expanded Brake Shoes
Symptom: The drum feels like it’s catching on something inside, preventing it from sliding off. You might hear scraping noises.
Cause: The brake shoes are pressing against the inside of the drum, preventing it from being removed. This can happen if the self-adjuster mechanism is stuck or if the parking brake cable is not fully released.
Solution:
Adjust the Star Wheel: Locate the access hole on the backing plate (usually covered by a rubber plug). Use a brake adjusting tool (or a small screwdriver) to turn the star wheel, which retracts the brake shoes. You'll likely need to rotate the star wheel upwards. Turning it the wrong way will make the shoes expand further, making the problem worse. Spray brake cleaner through the access hole to help loosen the self-adjuster mechanism.
Brake Drum Removal Tool: This tool attaches to the hub and uses bolts to push the drum off evenly. It's a much safer and more effective method than hammering, especially if the drum is severely stuck. Using this will avoid damaging the shoes.
Parking Brake Cable: Ensure the parking brake cable is fully released and not binding. Sometimes, the cable itself can be seized, preventing the shoes from retracting. If this is the case, you might need to disconnect the cable at the brake drum or further up the line.
Problem 3: Ridge on the Drum
Symptom: The drum moves a little but gets stuck at a specific point, indicating an obstruction.
Cause: Over time, a ridge can form on the inside of the drum where the brake shoes don’t make contact. This ridge prevents the shoes from sliding over it when trying to remove the drum.
Solution:
Adjust the Star Wheel (Again): Even with adjustment, the ridge can still catch. Be patient and continue adjusting the star wheel as much as possible.
Careful Hammering: Gently tap the drum while simultaneously trying to pull it off. The vibrations, combined with the reduced shoe pressure, might be enough to overcome the ridge.
Brake Drum Removal Tool: The even pressure from the removal tool can often overcome the ridge more effectively than hammering.
Real-World Examples
Example 1: Honda Civic (Older Models)
Older Honda Civics are known for having particularly stubborn rear brake drums, especially in areas with harsh winters and road salt. The penetrating oil soak is often essential, and the brake adjusting tool is your best friend.
Example 2: Ford F-150 (with Rear Drum Brakes)
Even a robust truck like the F-150 can suffer from stuck drums. The sheer size and weight of the drums can make them difficult to handle. A brake drum removal tool is highly recommended for safety and efficiency.
Example 3: Toyota Corolla (Some Models)
Some Toyota Corollas use a self-adjusting mechanism that can be prone to seizing. Thoroughly cleaning and lubricating the self-adjuster during reassembly is crucial to prevent future problems.
After Removal: Inspection and Maintenance
Once the drum is off, carefully inspect all the components:
- Brake Shoes: Check for wear, cracks, and contamination. Replace them if they are worn down to the wear indicators or if they are contaminated with brake fluid or grease.
- Brake Springs: Look for signs of corrosion or weakening. Replace them if they are stretched or damaged.
- Wheel Cylinder: Inspect for leaks. If the wheel cylinder is leaking, it must be replaced.
- Hardware: Examine the pins, retainers, and other hardware for wear or damage. Replace any worn or damaged parts.
- Drum Surface: Check for scoring, cracks, or excessive wear. Minor scoring can sometimes be addressed by having the drums turned (resurfaced) by a professional. However, if the drums are too thin or cracked, they must be replaced.
- Self-Adjuster Mechanism: Clean and lubricate the self-adjuster mechanism to ensure it functions properly.
Reassembly
Reassembly is the reverse of removal. Use new hardware where appropriate, and ensure all components are properly installed. Adjust the brake shoes so that they are just slightly touching the drum. Torque the wheel lug nuts to the manufacturer's specifications. After reassembly, pump the brake pedal several times to seat the brake shoes.
Keeping Your Car in Top Condition
Regular maintenance is key to preventing brake problems and keeping your car running smoothly:
- Regular Brake Inspections: Have your brakes inspected at least once a year, or more frequently if you drive in harsh conditions.
- Brake Fluid Flushes: Brake fluid absorbs moisture over time, which can lead to corrosion and reduced braking performance. Flush your brake fluid every two to three years.
- Parking Brake Adjustment: Periodically check and adjust your parking brake to ensure it functions properly.
- Listen for Unusual Noises: Pay attention to any unusual noises coming from your brakes, such as grinding, squealing, or clicking. These noises could indicate a problem that needs to be addressed.
- Address Problems Promptly: Don't ignore brake problems. Addressing them promptly can prevent more serious and costly repairs down the road.
By following these tips and taking a proactive approach to maintenance, you can keep your car's rear drum brakes in top condition and ensure your safety on the road.