How To Use Fuel Pressure Test
So, your engine's running rough, maybe stalling, or just doesn't have the power it used to? One of the first things a good mechanic will check is the fuel system, and right at the heart of that system is the fuel pressure. Low or erratic fuel pressure can cause a whole host of problems, and a fuel pressure test is a relatively simple way to pinpoint whether that's your issue. This article will walk you through how to perform a basic fuel pressure test on most modern vehicles.
Why Test Fuel Pressure?
Before we dive into the how-to, let's talk about why you'd want to do this. As mentioned, fuel pressure problems can mimic a lot of other engine issues, leading you down the wrong path and costing you money on unnecessary repairs. Here are some common symptoms that might indicate a fuel pressure issue:
- Hard starting or no start: Insufficient fuel pressure means not enough fuel is getting to the injectors to start the engine.
- Rough idling: Fluctuations in fuel pressure can cause the engine to stumble and idle roughly.
- Stalling: Low fuel pressure can starve the engine of fuel, causing it to stall, especially under load or during acceleration.
- Poor acceleration: The engine needs more fuel when accelerating. If the fuel pressure is too low, it won't get enough, resulting in sluggish acceleration.
- Poor fuel economy: An improperly functioning fuel system can lead to inefficient fuel burning, resulting in lower MPG.
- Check Engine Light (CEL): Certain fuel pressure-related issues can trigger a CEL, often accompanied by codes related to lean conditions or fuel system malfunctions.
Testing the fuel pressure is a relatively inexpensive and straightforward diagnostic step that can save you time and money by quickly identifying a potential fuel system problem.
Tools & Materials Needed
Before you start, gather the necessary tools. Thankfully, you likely won't need to spend a fortune:
- Fuel Pressure Test Kit: This is the most important tool. You can find these at most auto parts stores or online. Make sure the kit includes adapters that fit your specific vehicle's fuel rail. Expect to pay anywhere from $30-$100 depending on the quality and features.
- Safety Glasses: Always protect your eyes when working on your car!
- Gloves: Gasoline can irritate the skin, so wear gloves.
- Rags: You'll want plenty of rags to clean up any spills.
- Wrench Set: You might need wrenches to remove any protective caps or covers on the fuel rail.
- Screwdrivers (various sizes): Similar to the wrenches, you might need these to access the fuel rail.
- Paper and Pen: To record your readings.
- Vehicle Repair Manual (optional, but recommended): Having a repair manual for your specific vehicle is always helpful, as it will provide specific instructions and fuel pressure specifications.
Important Safety Note: Gasoline is highly flammable. Work in a well-ventilated area away from any open flames or sources of ignition. Do not smoke while working on the fuel system. Disconnect the negative battery cable to prevent accidental sparking.
Step-by-Step Fuel Pressure Testing Procedure
Now let's get to the testing. Remember to consult your vehicle's repair manual for specific instructions and fuel pressure specifications.
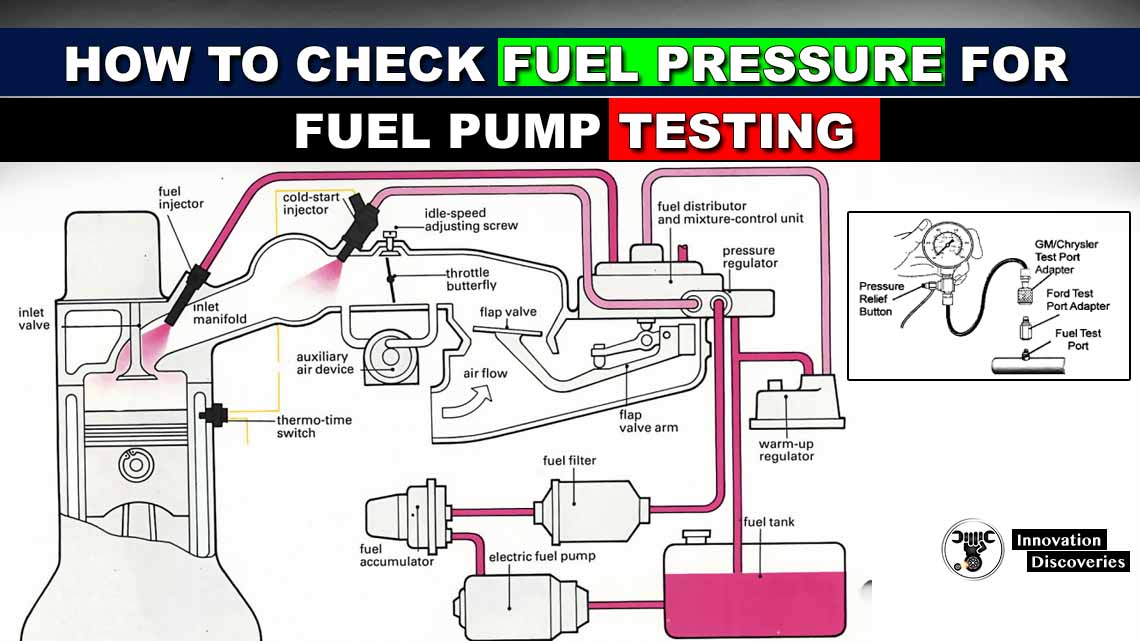
- Locate the Fuel Rail Test Port: The fuel rail is a metal tube that delivers fuel to the fuel injectors. The test port is usually located on the fuel rail and has a Schrader valve (similar to a tire valve). It might be covered by a protective cap. Consult your repair manual if you're having trouble finding it.
- Prepare the Test Port: Remove the protective cap from the test port. Clean the area around the port with a rag to remove any dirt or debris.
- Connect the Fuel Pressure Tester: Attach the appropriate adapter from your fuel pressure test kit to the test port. Make sure the connection is secure to prevent fuel leaks.
- Release Fuel Pressure (If Necessary): Some vehicles require you to relieve the fuel pressure before connecting the tester. This is typically done by disconnecting the fuel pump relay or fuse and starting the engine until it stalls. Consult your repair manual for the correct procedure for your vehicle. This step is crucial for safety.
- Connect the Tester Gauge: Attach the gauge to the adapter on the fuel rail. The gauge should have a pressure release valve and a hose for safe fuel disposal.
- Turn on the Ignition: Turn the ignition key to the "ON" position (but don't start the engine). This will activate the fuel pump, which will pressurize the fuel system.
- Observe the Pressure Reading: Watch the fuel pressure gauge. Note the reading. Compare this reading to the fuel pressure specification in your vehicle's repair manual.
Typical fuel pressure specifications range from 40 to 60 PSI, but this varies widely depending on the vehicle. Always refer to your vehicle's repair manual for the correct specification.
- Start the Engine: Start the engine and observe the fuel pressure reading again. The pressure should remain relatively stable at the specified pressure or slightly lower. Note any fluctuations or drops in pressure.
- Perform a Fuel Pressure Leak-Down Test: Turn off the engine and observe the fuel pressure gauge. The pressure should hold steady for a certain period (usually 15-20 minutes). A rapid drop in pressure indicates a fuel leak in the system. This could be a leaky fuel injector, a faulty fuel pressure regulator, or a leak in the fuel lines.
A slow leak-down is normal, but a rapid drop indicates a problem.
- Release Pressure and Disconnect: Use the pressure release valve on the fuel pressure tester to safely release the fuel pressure into a suitable container (a gas can). Disconnect the gauge and adapter from the fuel rail.
- Replace the Protective Cap: Reinstall the protective cap on the fuel rail test port.
- Reconnect the Negative Battery Cable: Reconnect the negative battery cable to the battery.
Interpreting the Results
Once you've completed the test, you need to understand what the readings mean:
- Low Fuel Pressure: If the fuel pressure is significantly lower than the specified pressure, it could indicate several problems:
- Faulty Fuel Pump: The fuel pump may be weak or failing.
- Clogged Fuel Filter: A clogged filter restricts fuel flow to the engine.
- Leaky Fuel Pressure Regulator: A leaky regulator can't maintain proper fuel pressure.
- Restricted Fuel Lines: Kinked or damaged fuel lines can restrict fuel flow.
- Low Fuel Level: Believe it or not, sometimes the problem is just a low fuel level in the tank!
- High Fuel Pressure: If the fuel pressure is significantly higher than the specified pressure, it usually indicates a faulty fuel pressure regulator.
- Fluctuating Fuel Pressure: Fluctuations in fuel pressure can indicate a problem with the fuel pump, fuel pressure regulator, or a vacuum leak affecting the fuel pressure regulator.
- Rapid Fuel Pressure Drop: A rapid drop in fuel pressure after the engine is turned off indicates a fuel leak in the system. This could be a leaky fuel injector, a faulty fuel pressure regulator, or a leak in the fuel lines.
Possible Solutions and Repair Costs
Here are some common problems and their approximate repair costs:
- Fuel Pump Replacement: This is a common repair. Expect to pay between $300 and $800, depending on the vehicle and the labor involved.
- Fuel Filter Replacement: A relatively inexpensive repair. The filter itself costs around $10-$50, and labor is typically around $50-$100.
- Fuel Pressure Regulator Replacement: The cost varies depending on the vehicle, but expect to pay between $100 and $300 for parts and labor.
- Fuel Injector Replacement: Replacing a single injector can cost between $100 and $300, depending on the vehicle and the injector type. Replacing all injectors can be significantly more expensive.
- Fuel Line Repair: Repairing or replacing damaged fuel lines can vary in cost depending on the extent of the damage. Expect to pay between $100 and $500.
Disclaimer: These are just estimated costs. Actual repair costs can vary depending on your location, the make and model of your vehicle, and the shop you choose.
When to Seek Professional Help
While performing a fuel pressure test is relatively straightforward, diagnosing the underlying cause of a fuel pressure problem can be more complex. If you're not comfortable working on your fuel system or if you're unable to pinpoint the cause of the problem, it's best to seek professional help from a qualified mechanic.
A mechanic has specialized tools and diagnostic equipment to further diagnose the fuel system and accurately pinpoint the problem. They can also perform more advanced tests, such as fuel injector flow testing and fuel pump amperage testing. Furthermore, they are trained to handle gasoline safely and can ensure that the repair is done correctly.
By understanding how to perform a basic fuel pressure test, you can quickly diagnose a potential fuel system problem and potentially save yourself time and money. However, remember to prioritize safety and don't hesitate to seek professional help when needed. Good luck!