Is Dot 3 And Dot 4 Compatible
So, you're wondering about DOT 3 and DOT 4 brake fluid compatibility? It's a common question, and getting it wrong can have serious consequences for your vehicle's braking system. Think of me as your friendly, experienced service advisor here to guide you through the ins and outs of brake fluid.
Understanding Brake Fluid Basics
Before diving into compatibility, let's quickly review what brake fluid actually does. Your brake system is hydraulic, meaning it uses fluid pressure to transmit force from the brake pedal to the brake calipers (or drums). When you press the pedal, you're pushing a piston in the master cylinder. This piston pressurizes the brake fluid, which then travels through brake lines to the wheels, forcing the brake pads against the rotors (or shoes against the drums), slowing you down.
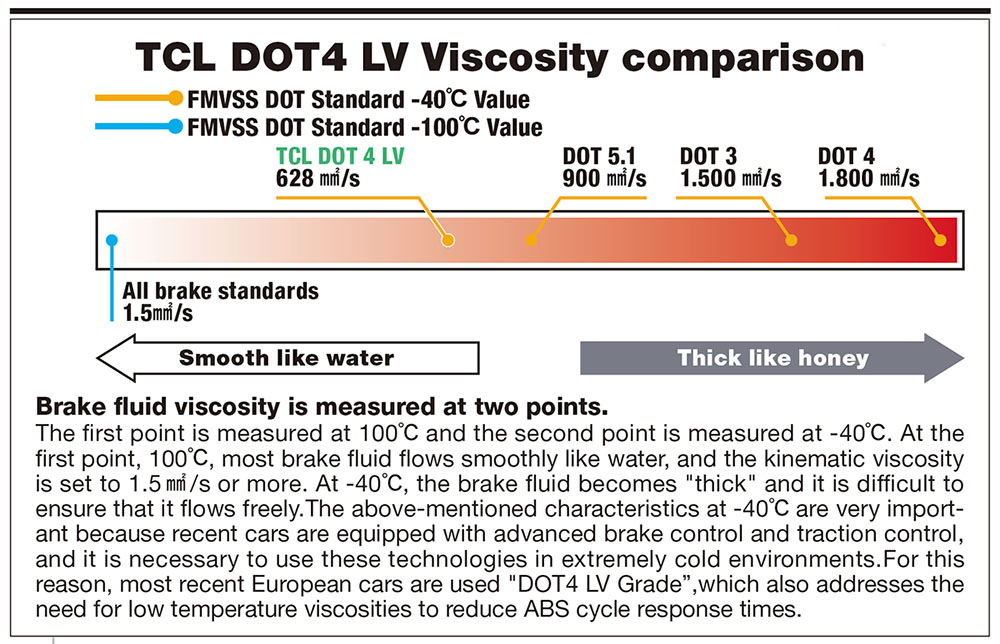
Now, all brake fluids aren't created equal. DOT (Department of Transportation) numbers indicate the fluid's minimum performance specifications, primarily its boiling point. This is crucial because boiling brake fluid creates vapor bubbles. Vapor is compressible, unlike liquid. If you have vapor in your lines, you'll experience a spongy brake pedal and reduced braking power – a potentially dangerous situation known as vapor lock.
Key Differences Between DOT 3 and DOT 4
The main difference lies in their boiling points:
- DOT 3: Has a lower boiling point (both dry and wet) compared to DOT 4. "Dry" boiling point refers to fresh, unused fluid. "Wet" boiling point refers to fluid that has absorbed moisture over time, which drastically lowers its boiling point. DOT 3 is typically glycol-ether based.
- DOT 4: Has a higher boiling point than DOT 3. It's also glycol-ether based, but often includes borate esters. These esters contribute to its higher boiling point and better performance under high temperatures.
Because DOT 4 has a higher boiling point, it's generally considered a better performer, especially in vehicles that experience heavy braking, such as those used for towing, performance driving, or hilly terrain.
The Million-Dollar Question: Are They Compatible?
The short answer: Yes, DOT 3 and DOT 4 brake fluids are generally compatible for mixing in most vehicles. Both are glycol-ether based and are designed to be compatible with the rubber components (seals, hoses, etc.) in your braking system. However, there are crucial caveats:
- Mixing degrades performance: While they can be mixed, doing so will lower the overall boiling point of the fluid in your system. You're essentially diluting the higher-performance DOT 4 with the lower-performance DOT 3. The resulting mixture will perform somewhere between the specifications of each fluid, but it will not meet the full specification of DOT 4.
- Never mix with DOT 5 (Silicone-based): Never mix DOT 3 or DOT 4 with DOT 5 brake fluid. DOT 5 is silicone-based and is not compatible with glycol-ether fluids. Mixing them will cause serious problems, including swelling and degradation of rubber components, leading to brake failure. DOT 5 is typically only used in specific classic cars or vehicles where moisture absorption is a major concern.
- DOT 5.1: DOT 5.1, despite the confusing name, *is* glycol-ether based and is generally compatible with DOT 3 and DOT 4. However, it is designed for ABS systems and high performance, so it's best to consult your vehicle's manual to confirm compatibility.
When Compatibility Matters Most
Here are some scenarios where brake fluid compatibility is extremely important:
- Topping off the reservoir: If you're simply topping off your brake fluid reservoir and you're unsure what's already in there, using DOT 4 is generally a safer bet, *assuming your vehicle's manual specifies that DOT 4 is acceptable*. However, the best practice is always to use the same type of fluid as originally specified by the manufacturer.
- Complete brake fluid flush: When performing a complete brake fluid flush (which is recommended every 2-3 years), you have the opportunity to choose the best fluid for your needs. If your vehicle originally used DOT 3 and you want to upgrade to DOT 4, a complete flush is the way to go. This removes all the old fluid and ensures you're operating with a system filled entirely with DOT 4.
- Brake system repairs: If you're replacing brake lines, calipers, or the master cylinder, you'll need to bleed the brakes. This presents another opportunity to ensure you have the correct fluid in the system.
Problem: Low Brake Fluid & Unknown Type
Let's say you notice your brake fluid reservoir is low and you don't know what type of fluid is currently in the system. What do you do?
Solution: The Cautious Approach
- Check your owner's manual: This is always the first step. Your manual will specify the correct type of brake fluid for your vehicle.
- If you can't determine the existing fluid: If the manual is missing or you can't definitively determine what's in the system, it's best to err on the side of caution and perform a complete brake fluid flush and refill with the recommended type.
- Avoid Mixing if Possible: While a small amount of DOT 4 to top off a DOT 3 system is unlikely to cause immediate catastrophic failure, it's not ideal. Don't make a habit of it.
The Flush and Refill Procedure
Here's a general overview of how to perform a brake fluid flush and refill. Note: If you're not comfortable working on your brakes, it's always best to take your vehicle to a qualified mechanic.
Tools & Materials Needed:
- New brake fluid (DOT 3 or DOT 4, as specified by your vehicle manufacturer) – 2-3 quarts is usually sufficient.
- Brake bleeder wrench (a wrench that fits the bleeder screws on your calipers/drums)
- Clear tubing (to attach to the bleeder screws)
- Collection jar or bottle
- Turkey baster or fluid extractor
- Jack and jack stands
- Wheel chocks
- Gloves and safety glasses
- Assistant (recommended)
Steps:
- Prepare the vehicle: Park on a level surface, engage the parking brake, and chock the rear wheels. Loosen the lug nuts on all four wheels. Jack up the vehicle and secure it with jack stands. Remove the wheels.
- Remove old fluid from the reservoir: Use a turkey baster or fluid extractor to remove as much of the old brake fluid as possible from the master cylinder reservoir.
- Fill the reservoir with new fluid: Fill the master cylinder reservoir with fresh brake fluid.
- Bleed the brakes (starting furthest from the master cylinder): Locate the bleeder screw on the first brake caliper/drum (usually the one furthest from the master cylinder – typically the right rear). Attach the clear tubing to the bleeder screw and run the other end into the collection jar. Have your assistant slowly press the brake pedal down and hold it. While the pedal is depressed, open the bleeder screw. You should see old fluid and possibly air bubbles flowing through the tubing. Close the bleeder screw before your assistant releases the brake pedal. Repeat this process until you see clean, bubble-free fluid flowing through the tubing.
- Repeat for each wheel: Repeat step 4 for each of the remaining wheels, working your way closer to the master cylinder.
- Maintain fluid level: Keep a close eye on the brake fluid level in the master cylinder reservoir throughout the bleeding process and refill it as needed to prevent it from running dry. Never let the reservoir run dry, as this will introduce air into the system.
- Final check: Once you've bled all four brakes, ensure the brake fluid level in the master cylinder reservoir is at the "max" line. Reinstall the wheels, tighten the lug nuts, lower the vehicle, and torque the lug nuts to the manufacturer's specifications.
- Test drive: Take the vehicle for a test drive to ensure the brakes are working properly. The brake pedal should feel firm and responsive.
Potential Problems & Solutions
- Stuck bleeder screws: If the bleeder screws are rusted or seized, penetrating oil can help loosen them. If they're completely stuck, you may need to replace the caliper or wheel cylinder.
- Air in the system: If you accidentally let the master cylinder reservoir run dry, or if you suspect air has entered the system, you may need to bleed the brakes multiple times to remove all the air. You might also consider a pressure bleeder to assist with this.
Cost Considerations
The cost of a brake fluid flush and refill can vary depending on whether you do it yourself or have it done by a professional. DIY costs are primarily the cost of the brake fluid (around $15-$30 per quart) and any tools you may need to purchase. Professional service typically costs between $100 and $200, depending on the shop and the type of fluid used.
The Bottom Line
While DOT 3 and DOT 4 brake fluids are generally compatible, it's always best to use the type of fluid recommended by your vehicle manufacturer. A complete brake fluid flush is the best way to ensure you have the correct fluid in your system and to maximize your braking performance and safety. And when in doubt, don't hesitate to consult with a qualified mechanic. Your brakes are too important to take chances with!