Ka24de Cam Cap Torque Specs
The Nissan KA24DE engine, found in popular vehicles like the 240SX (S13 & S14), Nissan D21 Hardbody pickup, and Nissan Altima (early models), is a workhorse. Known for its reliability and relative simplicity, it's a favorite among car enthusiasts and home mechanics alike. When working on the KA24DE, particularly when dealing with the cylinder head, understanding the cam cap torque specs is absolutely critical. Improper torque can lead to disastrous engine consequences. This article will demystify the KA24DE cam cap torque specs, providing you with the knowledge to properly assemble your engine and avoid costly mistakes.
What are Cam Caps and Why Do They Matter?
Before diving into the numbers, let's understand the role of cam caps. Imagine the camshaft as the brain of your engine's valve train. As it rotates, its lobes push on the valve lifters, which in turn open and close the intake and exhaust valves, allowing air and fuel to enter and exhaust gases to exit the cylinders. Now, imagine that brain without a skull – it's vulnerable and prone to damage. That's where cam caps come in.
Cam caps are essentially bearing caps that hold the camshaft(s) securely in place on the cylinder head. They provide a precise fit and ensure that the camshaft can rotate smoothly and accurately. They're typically made of aluminum or cast iron and are bolted to the cylinder head. The area where the camshaft rotates within the cam cap is a bearing surface, often lubricated by engine oil.
The critical nature of cam caps stems from their direct impact on camshaft alignment and bearing clearance. If the cam caps are not torqued correctly, several problems can arise:
- Excessive Bearing Wear: Overtightening can crush the bearing surface, restricting oil flow and causing rapid wear on the camshaft and cam caps.
- Camshaft Binding: Undertightening can allow the camshaft to move excessively, causing it to bind and potentially break.
- Oil Starvation: Improperly torqued caps can disrupt oil flow to the camshaft bearings, leading to oil starvation and catastrophic engine failure. Think of it like a blood clot in your heart – not good!
- Valve Timing Issues: In extreme cases, incorrect cam cap torque can affect valve timing, reducing engine performance and fuel economy.
Think of it like this: imagine building a Lego tower. If you don't press the bricks together firmly and evenly, the tower will be wobbly and unstable. Similarly, if you don't torque the cam caps properly, your engine will be unstable and prone to problems.
KA24DE Cam Cap Torque Specs: The Numbers You Need
Okay, let's get to the specifics. The factory-recommended torque specification for the KA24DE cam caps is typically around 14-19 ft-lbs (foot-pounds) or 19-26 Nm (Newton-meters). However, it's *crucial* to consult your specific engine's service manual for the exact figures. This is the most reliable source for the correct torque value.
Why the range? Manufacturing tolerances can vary slightly, and different model years may have minor variations in design. Always err on the side of caution and follow the factory specifications religiously.
Important Considerations:
- Torque Wrench is Essential: Do not attempt to torque cam caps by feel. A calibrated torque wrench is an absolute necessity. Using an incorrect torque can have severe consequences.
- Cleanliness is Key: Ensure that the cam caps and cylinder head surfaces are clean and free of debris before installation. Even a small piece of dirt can affect the torque reading.
- Lubrication: Apply a thin coat of engine assembly lube or clean engine oil to the threads of the cam cap bolts and the bearing surfaces. This reduces friction and ensures accurate torque readings.
- Bolt Condition: Inspect the cam cap bolts for any signs of damage, stretching, or corrosion. Replace any suspect bolts.
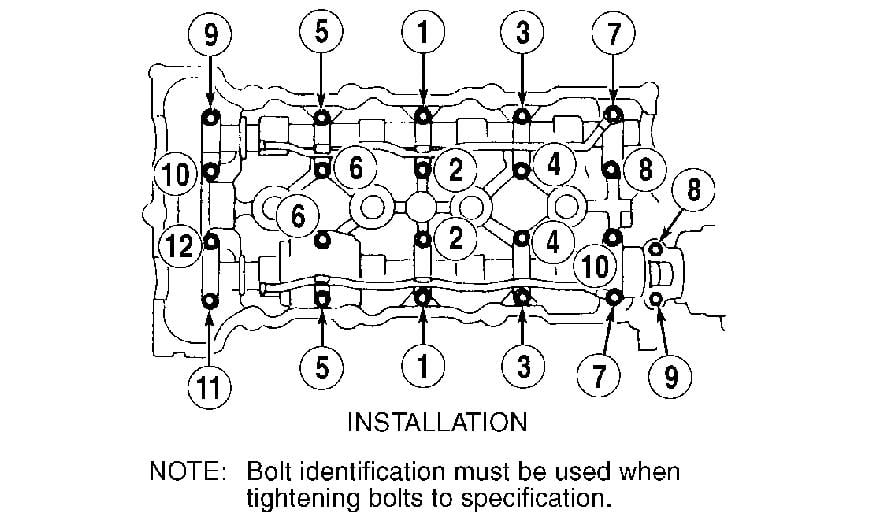
- Torque Sequence: The KA24DE usually follows a specific torque sequence. This sequence ensures even pressure distribution and prevents warping of the cam caps. Consult your service manual for the correct sequence.
Example of a Torque Sequence:
While your specific service manual should be followed, a common sequence is a progressive cross-pattern, tightening the bolts in stages. For example:
- Torque all bolts to 5 ft-lbs (initial pass) in the correct sequence (e.g., from the center outwards in a cross pattern).
- Torque all bolts to the final torque spec (14-19 ft-lbs) in the same sequence.
This gradual tightening process helps to seat the cam caps evenly and prevents distortion.
Why is Proper Torque So Critical? A Deeper Dive
To truly appreciate the importance of proper torque, consider the mechanics involved. When you tighten a bolt, you're essentially stretching it. This stretch creates a clamping force that holds the two surfaces together. The goal is to achieve the optimal clamping force without exceeding the bolt's yield strength (the point at which it permanently deforms).
Overtorquing stretches the bolt beyond its yield strength, potentially weakening it or even causing it to break. It also puts excessive stress on the cam caps and cylinder head, which can lead to distortion and damage. Think of trying to stretch a rubber band too far – it will eventually snap.
Undertorquing doesn't provide sufficient clamping force, allowing the cam caps to loosen over time. This can lead to vibration, noise, and ultimately, catastrophic engine failure. Imagine trying to hold a heavy object with a loose grip – you're much more likely to drop it.
The consequences of incorrect torque are not limited to the cam caps themselves. They can also affect other engine components, such as the valve train, timing chain, and even the crankshaft. A properly torqued engine is a happy and reliable engine.
Practical Takeaways: Ensuring a Successful Cam Cap Installation
Here's a checklist to help you properly torque your KA24DE cam caps:
- Consult the Service Manual: Find the correct torque specification and tightening sequence for your specific KA24DE engine.
- Use a Calibrated Torque Wrench: Invest in a quality torque wrench and ensure it's properly calibrated. Regularly check its calibration to maintain accuracy.
- Cleanliness is Paramount: Thoroughly clean the cam caps, cylinder head surfaces, and bolt threads.
- Lubricate Properly: Apply a thin coat of engine assembly lube or clean engine oil to the bolt threads and bearing surfaces.
- Inspect Bolt Condition: Replace any damaged or suspect bolts.
- Follow the Torque Sequence: Tighten the bolts in the specified sequence, using a progressive tightening method.
- Double-Check Your Work: After completing the torque sequence, double-check each bolt to ensure it's properly torqued.
- Document Your Work: Keep a record of the date, torque values, and any other relevant information for future reference.
By following these steps, you can ensure a successful cam cap installation and avoid costly engine repairs. Remember, attention to detail and adherence to factory specifications are key to a long-lasting and reliable engine. Think of it as performing surgery on your engine – precision is paramount!
Working on your car can be incredibly rewarding, but it's important to approach each task with the right knowledge and tools. Understanding and properly applying the KA24DE cam cap torque specs is one crucial step in keeping your Nissan running smoothly for years to come. Happy wrenching!