Knock Sensor Nissan Xterra 2002 Location
Locating the knock sensor on a 2002 Nissan Xterra is a common task for owners tackling engine performance issues, mechanics diagnosing codes, and enthusiasts diving into the nitty-gritty of their vehicle's operation. This article provides a comprehensive guide to finding the knock sensor, understanding its function, and related diagnostic procedures for the 2002 Nissan Xterra, specifically.
Understanding the Knock Sensor's Role
Before we pinpoint the location, it’s important to grasp the role of the knock sensor. Officially called a piezoelectric accelerometer, the knock sensor is designed to detect engine knock or detonation. Knock occurs when the air-fuel mixture in the cylinder ignites abnormally, creating pressure waves that can damage engine components over time. The knock sensor picks up these vibrations and sends a signal to the Engine Control Unit (ECU), which then retards the ignition timing to prevent further knock and protect the engine. It is directly related to the efficiency of the engine and the engine longevity. For example, using a lower octane fuel than recommended can often cause engine knock.
The 2002 Nissan Xterra typically uses the VG33E 3.3L V6 engine. The information below will be relevant to the location and diagnosis of the knock sensor within that engine.
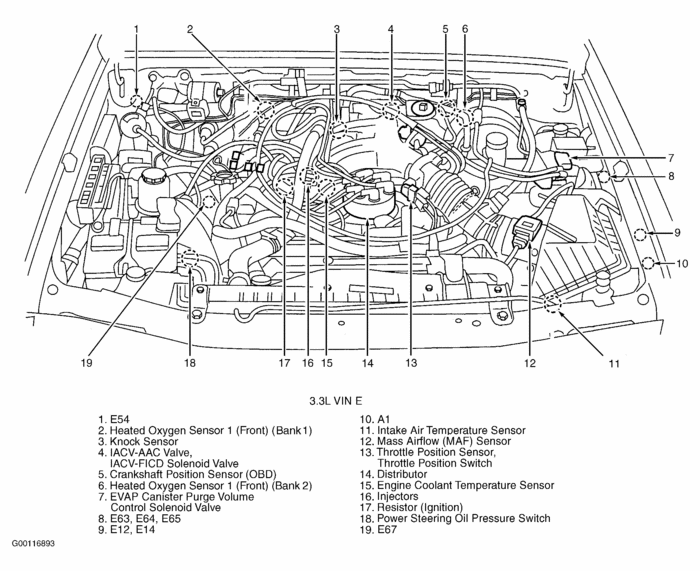
Precise Location: 2002 Nissan Xterra Knock Sensor
The knock sensor on a 2002 Nissan Xterra with the VG33E engine is located in the engine block valley, underneath the intake manifold. This means accessing the sensor requires removing the intake manifold. This location is a common placement for many V-type engines where the space between the cylinder banks offers a strategic position to detect vibrations across multiple cylinders. This placement often subjects the knock sensor to high temperatures and makes it more prone to failure over time.
Step-by-Step Accessing the Knock Sensor
Given the sensor's location, accessing it requires some disassembly. Here's a breakdown of the process:
- Safety First: Disconnect the negative battery terminal. This prevents electrical shorts and potential damage during the repair.
- Remove Engine Cover and Accessories: Remove any engine covers or accessories that might obstruct access to the intake manifold. This could include air intake components, vacuum lines, and wiring harnesses.
- Disconnect Fuel Lines: Carefully disconnect the fuel lines from the fuel rail. Depressurize the fuel system before disconnecting any lines to avoid fuel spillage and potential hazards. Use proper fuel line disconnect tools.
- Disconnect Wiring Harnesses: Disconnect all wiring harnesses connected to the intake manifold and related components. Label the harnesses to ensure correct reassembly. Pay close attention to the Throttle Position Sensor (TPS) and Idle Air Control (IAC) valve connectors.
- Remove the Intake Manifold: Unbolt the intake manifold from the engine block. Note the position of any gaskets or seals. Some bolts may be difficult to reach, so use appropriate extensions and universal joints. Be extremely careful not to drop anything inside the intake ports once the intake manifold is removed.
- Locate the Knock Sensor: With the intake manifold removed, you will see the knock sensor screwed into the engine block, usually near the center of the engine valley. It has a single wire connected to it.
Visual Aid
While this is a text based document, you can find resources on sites like YouTube with videos on "Nissan VG33E knock sensor replacement" to see the intake manifold removal and sensor location.
Knock Sensor Diagnosis and Testing
If you suspect a faulty knock sensor, several diagnostic steps can help confirm the issue. A common symptom of a failing knock sensor is a check engine light with codes such as P0325 (Knock Sensor 1 Circuit) or similar. However, other issues can trigger similar codes, so thorough testing is crucial.
Diagnostic Steps
- Check for Diagnostic Trouble Codes (DTCs): Use an OBD-II scanner to read any stored DTCs. Note all codes and research them thoroughly. While a knock sensor code is a strong indicator, it's important to consider other potential causes.
- Visual Inspection: Once the intake manifold is removed, carefully inspect the knock sensor and its wiring for any signs of damage, such as cracks, corrosion, or frayed wires.
- Continuity Test: Use a multimeter to check the continuity of the sensor's wiring. Disconnect the sensor and test the wire back to the ECU. Any breaks or shorts in the wiring can cause issues.
- Resistance Test: Use a multimeter to measure the resistance of the knock sensor itself. Consult the factory service manual for the specific resistance range for your 2002 Nissan Xterra. An out-of-range reading indicates a faulty sensor. Typically, the resistance value should be between 500k ohms and 700k ohms. However, you must consult the specific documentation for the VG33E engine.
- Voltage Test (Advanced): With the engine running, use a multimeter to measure the voltage output of the knock sensor. Gently tap on the engine block near the sensor. You should see a small voltage fluctuation on the multimeter. If there is no voltage change when tapping, it usually signifies that the knock sensor is not functioning correctly. This test can be tricky and requires careful attention to avoid electrical shorts or damage.
Real-World Use Case: Intermittent Knock Sensor Code
Consider a scenario where a 2002 Nissan Xterra owner experiences an intermittent check engine light with a P0325 code. The code appears sporadically, and the engine seems to run fine most of the time. Initially, the owner suspects a wiring issue due to the code's intermittent nature. After visual inspection reveals no obvious damage, they perform a resistance test. The sensor's resistance is within the specified range. The owner then checks the wiring for continuity. They find an area where the wire is damaged due to rubbing against the engine block. Repairing the damaged wire resolves the issue and the code is no longer present. This example illustrates the importance of methodical troubleshooting to identify the root cause.
Replacement Considerations
If the knock sensor is confirmed to be faulty, replacement is the appropriate course of action. Here are some important considerations:
- OEM vs. Aftermarket: While aftermarket options are available, it is generally recommended to use an Original Equipment Manufacturer (OEM) knock sensor. OEM sensors are designed to meet the specific requirements of the vehicle's ECU and provide the most reliable performance. Aftermarket sensors may have varying levels of quality and accuracy.
- Gasket and Torque: Replace the intake manifold gaskets whenever you remove the manifold. Use a torque wrench to tighten the knock sensor to the factory-specified torque. Over-tightening can damage the sensor, while under-tightening can lead to inaccurate readings.
- Reassembly: Carefully reassemble the intake manifold and all related components, ensuring that all wiring harnesses and vacuum lines are properly connected. Double-check your work before starting the engine.
- ECU Reset: After replacing the knock sensor, it may be necessary to reset the ECU to clear any stored codes and allow the ECU to relearn the new sensor's characteristics. This can be done using an OBD-II scanner or by disconnecting the negative battery terminal for a specified period.
Preventive Maintenance
While knock sensor failure is not always preventable, some measures can extend its lifespan and maintain engine health:
- Use Recommended Fuel: Always use the fuel octane rating recommended by Nissan for your 2002 Xterra. Using lower octane fuel can increase the likelihood of engine knock and place extra strain on the knock sensor.
- Regular Maintenance: Perform regular engine maintenance, including oil changes, spark plug replacements, and air filter replacements. A well-maintained engine is less likely to experience knock.
- Address Engine Issues Promptly: Address any engine issues promptly, such as misfires, vacuum leaks, or cooling system problems. These issues can contribute to engine knock and place additional stress on the knock sensor.
Conclusion
Locating and diagnosing the knock sensor on a 2002 Nissan Xterra requires a systematic approach and a solid understanding of its function. By following the steps outlined in this guide, owners, mechanics, and enthusiasts can effectively troubleshoot and resolve knock sensor-related issues, ensuring optimal engine performance and longevity. Remembering the sensor's location, coupled with careful diagnostic procedures, will lead to efficient repairs and a well-maintained vehicle. Always refer to the factory service manual for specific torque specifications, resistance values, and other detailed information related to your 2002 Nissan Xterra.