Lights Not Working On Trailer
So, your trailer lights are on the fritz, huh? Don't worry, you're not alone. Trailer lighting issues are a common headache for anyone hauling cargo. While it can seem daunting, systematically troubleshooting the problem is key. This article will walk you through the process, assuming you have a basic understanding of automotive electrical systems and the tools to perform some testing.
Understanding the Trailer Lighting System
Before we dive into troubleshooting, let's quickly review how a typical trailer lighting system works. Your tow vehicle provides the power for the trailer lights, usually through a 4-pin or 7-pin connector. The most common wiring configurations are as follows:
4-Pin Connector
The 4-pin connector is the most basic and provides the essentials:
- Ground (White): This is the return path for all circuits. A solid, clean ground is absolutely critical for proper operation.
- Tail Lights (Brown): Powers the tail lights and side marker lights.
- Left Turn/Stop (Yellow): Activates the left turn signal and brake light on the trailer.
- Right Turn/Stop (Green): Activates the right turn signal and brake light on the trailer.
7-Pin Connector
The 7-pin connector adds functionality for more advanced trailers, like those with electric brakes or auxiliary power. Here are the additional pins:
- Electric Brakes (Blue): Sends a variable voltage signal to the trailer's electric brake controller, activating the brakes proportionally to the tow vehicle's braking force.
- Auxiliary Power (Black): Provides a 12V DC power source for trailer accessories like interior lights or a battery charger. This is often fused separately.
- Reverse Lights (Purple): Activates the trailer's reverse lights when the tow vehicle is in reverse.
Understanding these pin assignments is fundamental for diagnosing problems. We'll be referring to these colors and functions throughout this guide.
Troubleshooting Steps
Now, let's get down to the nitty-gritty. Here's a systematic approach to diagnosing trailer lighting issues. We'll start with the simplest checks and move towards more complex ones.
1. Visual Inspection
Begin with a thorough visual inspection. Look for the obvious:
- Corrosion: Check the connectors on both the tow vehicle and the trailer. Green or white deposits indicate corrosion, which can impede electrical flow. Clean corroded contacts with a wire brush or electrical contact cleaner.
- Loose Connections: Wiggle the connectors and wiring. Are any wires loose or detached? Ensure all connections are tight and secure. Especially check the ground connection; a loose ground is a common culprit.
- Damaged Wiring: Inspect the wiring harness for cuts, abrasions, or melted insulation. Rodents love to chew on wires, so look closely! Replace any damaged sections of wiring.
- Bulb Condition: Even if a bulb looks okay, it might be burned out. Check the filament for breaks. It's always a good idea to have spare bulbs on hand.
2. Testing the Tow Vehicle Connector
Next, we need to verify that the tow vehicle is sending the correct signals. You'll need a test light or a multimeter for this. A test light is simpler for basic checks, while a multimeter allows for more precise voltage measurements.
Using a Test Light:
- Connect the test light's clip to a known good ground on the tow vehicle (e.g., the trailer hitch).
- With the tow vehicle's ignition ON (engine doesn't need to be running), probe each pin on the trailer connector, one at a time.
- Have a helper activate the corresponding function (tail lights, left turn signal, right turn signal, brakes, etc.).
- The test light should illuminate when the correct function is activated.
Using a Multimeter:
- Set the multimeter to measure DC voltage.
- Connect the black lead to a known good ground.
- Probe each pin with the red lead, one at a time.
- Have a helper activate the corresponding function.
- You should see approximately 12V DC when the correct function is activated.
If any of the pins fail to light the test light or show voltage on the multimeter, the problem lies within the tow vehicle's wiring, fuse box, or lighting control module. Check the relevant fuses first. Refer to your tow vehicle's owner's manual for fuse locations and wiring diagrams. If the fuses are good, you may need to consult a qualified mechanic to diagnose issues within the vehicle's electrical system.
3. Testing the Trailer Wiring Harness
If the tow vehicle connector is working correctly, the problem is likely somewhere in the trailer's wiring. The first step is to disconnect the trailer connector from the tow vehicle.
Continuity Testing: Using a multimeter set to the continuity setting (often indicated by a diode symbol or a speaker icon), we can check the integrity of each wire in the trailer harness. Disconnect the trailer connector from the tow vehicle *before* performing any continuity tests.
- Disconnect all bulbs from the trailer lights.
- Identify the ground wire (usually white). Connect one multimeter lead to the ground pin on the trailer connector.
- Connect the other multimeter lead to the metal housing of each light fixture on the trailer. The multimeter should beep (or display a low resistance reading) indicating continuity. If not, there's a break in the ground wire.
- Repeat this process for each wire in the harness. For example, to test the left turn/stop wire (usually yellow), connect one multimeter lead to the yellow pin on the trailer connector and the other lead to the terminal on the left turn/stop light fixture. Again, you should hear a beep or see a low resistance reading.
Continuity means that there's an unbroken electrical path. If you don't have continuity, it indicates a break or short circuit in the wire. Track down the break and repair it (splice the wire with butt connectors or replace the entire section of wiring).
Bypass Testing: If you suspect a problem with a specific light fixture, you can bypass the trailer wiring by running a temporary jumper wire directly from the trailer connector to the light. For example, to test the right turn signal light, connect a jumper wire from the green pin on the trailer connector to the positive terminal of the right turn signal light. Connect another jumper wire from the ground pin on the trailer connector to the metal housing of the light fixture (ground). If the light works with the jumper wires, the problem is definitely in the trailer's wiring harness. If it still doesn't work, the problem is with the light fixture itself.
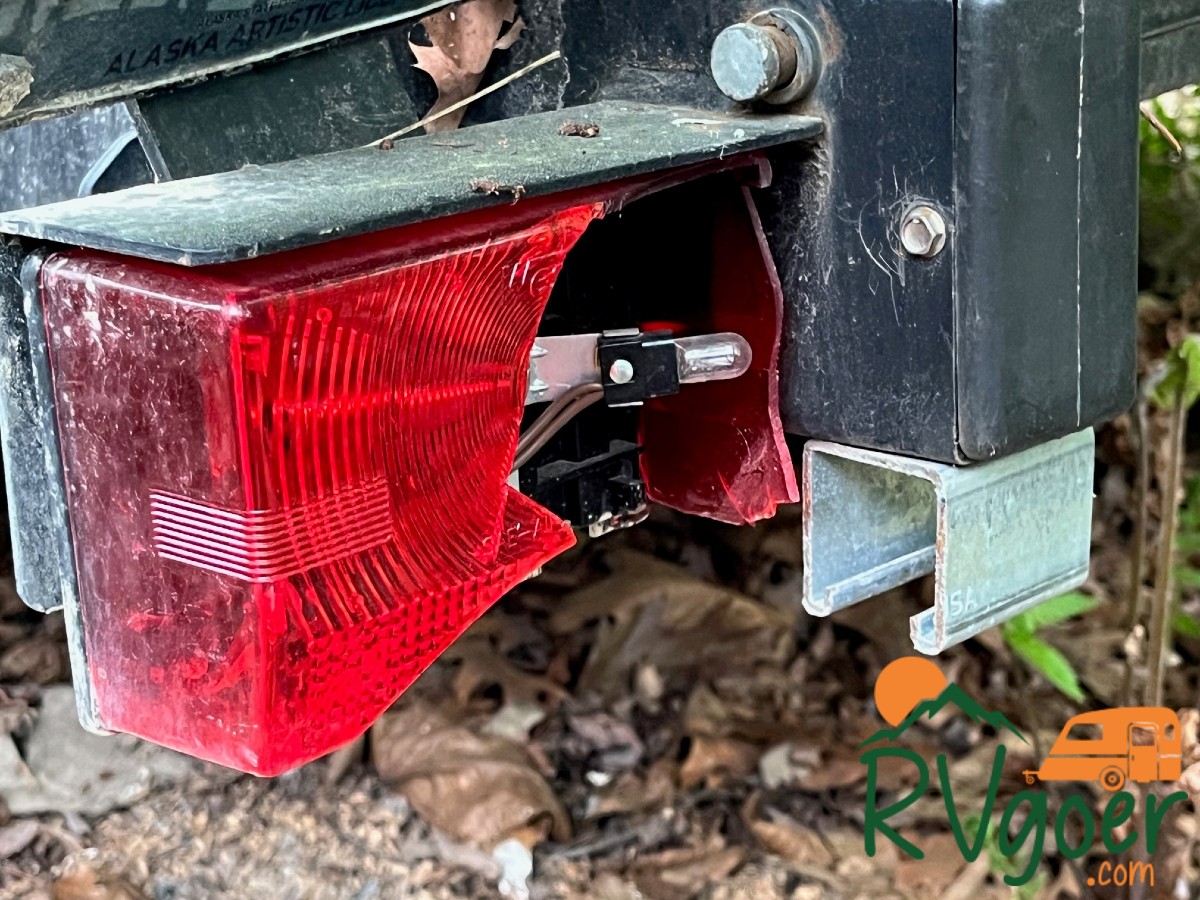
4. Inspecting and Replacing Light Fixtures
If you've narrowed the problem down to a specific light fixture, inspect it carefully. Look for:
- Corrosion: Check the bulb socket and the terminals for corrosion. Clean with a wire brush or electrical contact cleaner.
- Loose Terminals: Ensure the wires are securely connected to the light fixture terminals.
- Cracked Housings: Cracks in the housing can allow water to enter, causing corrosion and shorts.
If the light fixture is damaged or corroded beyond repair, it's best to replace it. Replacement light fixtures are relatively inexpensive and easy to install. When installing a new fixture, be sure to use dielectric grease on the terminals to prevent corrosion.
Common Problem Areas
Here are some common areas where trailer lighting problems tend to occur:
- Ground Connection: As mentioned earlier, a poor ground is a frequent cause of lighting issues. Make sure the ground connection is clean, tight, and securely attached to the trailer frame.
- Connectors: The trailer connector and the tow vehicle connector are exposed to the elements and can corrode easily. Regularly clean and protect these connectors with dielectric grease.
- Wiring Splices: Over time, wiring splices can corrode and fail. Use waterproof butt connectors or solder and heat shrink the splices for a more reliable connection.
- Inside Frame Rails: Wires run along the trailer frame may rub against the metal and eventually wear through the insulation, causing a short circuit. Secure the wiring harness to the frame with cable ties to prevent this.
- LED Lights: While generally reliable, LED lights can sometimes fail. If an LED light is not working, test it directly with a 12V power source. If it doesn't light up, replace the entire LED fixture.
Preventative Maintenance
The best way to avoid trailer lighting problems is to perform regular preventative maintenance. Here are a few tips:
- Clean and Inspect Connectors: Regularly clean the trailer and tow vehicle connectors with electrical contact cleaner and inspect them for corrosion. Apply dielectric grease to protect the contacts.
- Check Wiring: Periodically inspect the trailer wiring for damage, loose connections, and corrosion.
- Test Lights: Before each trip, test all of the trailer lights to ensure they are working properly.
- Use Waterproof Connectors: When making wiring repairs, use waterproof butt connectors or solder and heat shrink the splices to prevent corrosion.
- Store Trailer Properly: When storing the trailer, protect the connector from the elements. Consider using a connector cover to prevent corrosion.
By following these troubleshooting steps and performing regular maintenance, you can keep your trailer lights working properly and avoid the frustration of being stranded on the side of the road.