Nissan Altima 2003 Light Bulb
Alright, let's talk light bulbs on your 2003 Nissan Altima. Whether you're dealing with a burnt-out headlight, a flickering taillight, or you're just looking to upgrade to brighter bulbs, understanding the specifics of your car's lighting system is key. This article will break down the common bulb types, replacement procedures, and some troubleshooting tips specifically for the 2003 Altima.
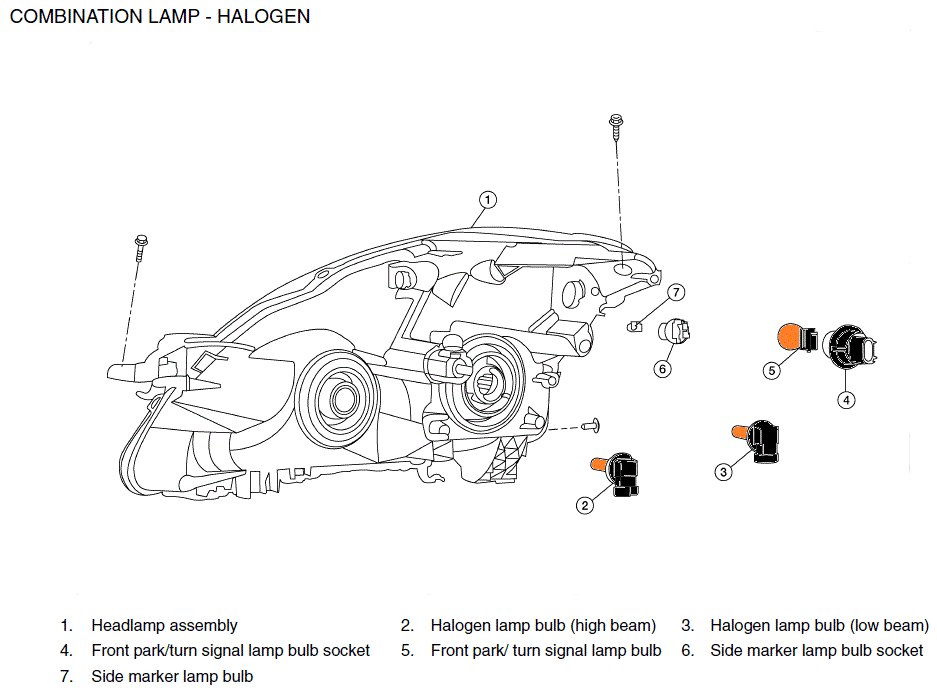
Headlight Bulbs: A Closer Look
The 2003 Altima typically uses 9007 bulbs for its headlights. This is a dual-filament bulb, meaning it contains two separate filaments within the same bulb: one for the high beam and one for the low beam. Knowing this is important when diagnosing issues. If only one beam is working, it doesn't necessarily mean the entire bulb is dead; it could just be one of the filaments that's failed.
Technical Detail: The 9007 bulb is a standardized bulb type adhering to SAE (Society of Automotive Engineers) standards. This means that any 9007 bulb, regardless of manufacturer, should physically fit and function in your Altima's headlight housing.
Replacement Procedure:
- Safety First: Disconnect the negative terminal of your battery. This is crucial to prevent electrical shocks and potential damage to your car's electrical system.
- Accessing the Bulb: Open the hood and locate the back of the headlight housing. There will be a plastic or rubber dust cover. Remove this cover. It might be a tight fit, so gently twist and pull.
- Disconnecting the Electrical Connector: The 9007 bulb is connected to a wiring harness via an electrical connector. Gently press down on the release tab on the connector and pull it straight off the bulb. Do not pull on the wires themselves!
- Removing the Old Bulb: The 9007 bulb is typically held in place by a retaining clip or a twist-lock mechanism. Depending on the exact design, you might need to press in on the clip and release it, or twist the bulb counter-clockwise to unlock it. Refer to your owner's manual for a precise illustration.
- Installing the New Bulb: Align the new 9007 bulb with the headlight housing. There's usually a keyed slot that ensures the bulb is oriented correctly. Secure the bulb with the retaining clip or twist-lock mechanism.
- Connecting the Electrical Connector: Reconnect the electrical connector to the bulb. Make sure it clicks into place securely.
- Replacing the Dust Cover: Reinstall the dust cover. Ensure it's properly sealed to prevent moisture and debris from entering the headlight housing.
- Testing: Reconnect the negative battery terminal and test both the high and low beams.
Troubleshooting: If the new bulb doesn't work, double-check the following:
- Bulb Compatibility: Confirm you have the correct 9007 bulb.
- Connector: Ensure the electrical connector is securely attached to the bulb.
- Fuse: Check the headlight fuse in the fuse box. The location will be indicated in your owner's manual. A blown fuse is a common culprit.
- Ground: A poor ground connection can cause lighting issues. Check the ground wire for the headlight assembly to ensure it's clean and securely attached to the chassis.
Upgrading Headlight Bulbs: HID and LED Considerations
Many Altima owners consider upgrading to HID (High-Intensity Discharge) or LED (Light-Emitting Diode) headlight bulbs for improved brightness and aesthetics. While these upgrades can offer significant advantages, it's crucial to understand the potential drawbacks and legal considerations.
HID Conversion Kits: HID bulbs produce light by creating an arc between two electrodes in a gas-filled tube. They require a ballast to regulate the high voltage needed to ignite and maintain the arc. While significantly brighter than halogen bulbs, HID kits can cause glare if not properly installed and aligned. Furthermore, retrofitting HID bulbs into housings designed for halogen bulbs is often illegal and can pose a safety hazard. Look for projector headlights designed specifically for HID bulbs for a safer and more effective upgrade. Check local laws regarding headlight modifications.
LED Bulbs: LED bulbs are becoming increasingly popular due to their long lifespan, low power consumption, and instant-on capabilities. LED bulbs designed as replacements for 9007 bulbs are available, but their performance can vary widely. Some LED bulbs may not produce a focused beam pattern, leading to reduced visibility and potential glare. Look for LED bulbs with integrated cooling systems (heat sinks or fans) to prevent overheating and ensure long-term reliability. As with HID kits, proper beam alignment is crucial for optimal performance and safety. Furthermore, some older vehicles may experience errors due to the lower resistance of LEDs causing the car's computer to think a bulb is out. This can often be solved with resistors.
Taillight Bulbs and Other Exterior Lights
The 2003 Altima uses a variety of bulbs for its taillights, brake lights, turn signals, and other exterior lighting. These bulbs are generally smaller and easier to replace than headlight bulbs.
Common Taillight Bulb Types:
- Brake Lights/Taillights: Typically uses a dual-filament bulb, often a 1157. Similar to the headlight, one filament handles the taillight function while the other handles the brighter brake light function when you press the brake pedal.
- Turn Signals: Usually an amber-colored 1156 bulb.
- Side Marker Lights: Often a smaller wedge-base bulb, like a 194.
- License Plate Light: Another common application for the 194 bulb.
Replacement Procedure (General):
- Accessing the Bulb: Depending on the specific light, you'll typically need to access the bulb from inside the trunk or behind the light housing. Some taillight assemblies have removable panels or access doors.
- Removing the Bulb: Most taillight bulbs are either twist-lock or push-and-twist types. For twist-lock bulbs, rotate the bulb socket counter-clockwise to release it. For push-and-twist bulbs, push the bulb in slightly and then rotate it counter-clockwise.
- Installing the New Bulb: Align the new bulb with the socket and insert it. Rotate clockwise to lock it in place.
- Testing: Test the light to ensure it's working correctly.
Troubleshooting:
- Fuse: Check the appropriate fuse in the fuse box.
- Bulb Socket: Inspect the bulb socket for corrosion or damage. Clean the contacts with a wire brush or electrical contact cleaner. If the socket is severely damaged, it may need to be replaced.
- Ground: Check the ground wire for the taillight assembly.
Interior Lights
The 2003 Altima also has interior lights, such as dome lights, map lights, and trunk lights. These typically use smaller wedge-base bulbs or festoon bulbs (also known as tubular bulbs).
Bulb Types:
- Dome Lights: Often a festoon bulb (31mm or 36mm).
- Map Lights: Wedge base bulbs such as 194 or 168.
- Trunk Lights: Wedge base bulbs such as 194.
Replacement: Replacing interior lights is usually straightforward. Refer to your owner's manual for the specific location of the bulbs and the recommended replacement procedure. You may need a small flathead screwdriver to pry open the light fixture.
Final Thoughts
Replacing light bulbs on your 2003 Nissan Altima is a relatively simple DIY task that can save you money and keep you safe on the road. By understanding the different bulb types, replacement procedures, and potential troubleshooting steps, you can confidently maintain your car's lighting system. Remember to always prioritize safety by disconnecting the battery before working on electrical components and consult your owner's manual for specific instructions and diagrams.
Disclaimer: This article provides general information and should not be considered a substitute for professional automotive advice. Always consult with a qualified mechanic if you have any doubts or concerns about working on your car.