Nissan Altima 2005 Light Bulb
The 2005 Nissan Altima, a popular mid-size sedan, relies on a network of lights for safety and visibility. A malfunctioning light bulb not only compromises your safety but can also lead to traffic stops and potential fines. This article will provide practical guidance for both car owners and mechanics on diagnosing, troubleshooting, and replacing light bulbs in a 2005 Nissan Altima. We will cover common issues, causes, solutions, and preventative maintenance tips.
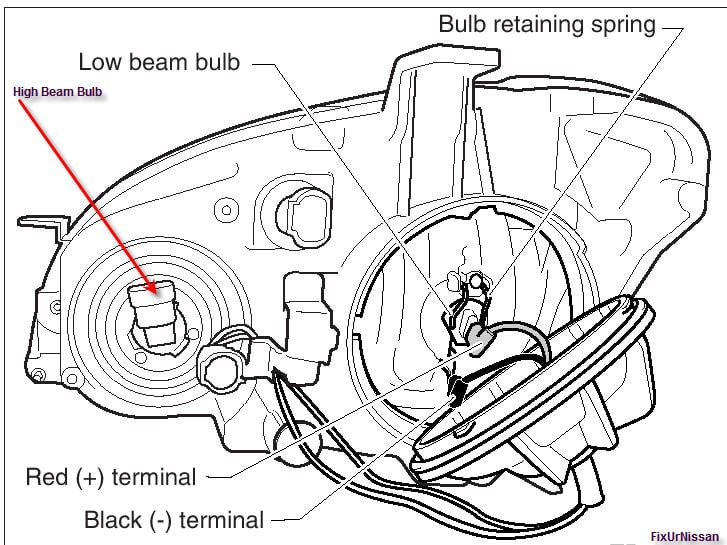
Understanding the Lighting System of Your 2005 Altima
Before diving into specific problems, it's essential to understand the different types of bulbs used in a 2005 Nissan Altima. These typically include:
- Headlights: Provide primary illumination for nighttime driving. Usually use halogen bulbs (e.g., H4).
- Taillights: Indicate braking and presence to vehicles behind. Often use dual-filament bulbs.
- Brake Lights: Illuminate when the brake pedal is pressed.
- Turn Signals: Signal intentions to turn or change lanes.
- Parking Lights: Provide visibility when parked.
- Side Marker Lights: Enhance visibility from the side.
- License Plate Lights: Illuminate the license plate for legal compliance.
- Interior Lights: Illuminate the cabin.
Knowing the specific bulb type for each location is crucial for purchasing the correct replacement.
Common Symptoms and Troubleshooting
Headlights: Dim or Not Working
Symptoms:
- One or both headlights are dim.
- One or both headlights are not working at all.
- Headlights flicker intermittently.
Possible Causes:
- Burned-out bulb: The most common cause.
- Loose connection: A loose connector at the bulb socket.
- Corroded connector: Corrosion on the bulb socket or connector pins.
- Faulty headlight relay: A defective relay preventing power from reaching the bulb.
- Blown fuse: A blown fuse in the headlight circuit.
- Wiring issue: Damaged or shorted wiring.
- Faulty headlight switch: Less common, but the headlight switch itself could be defective.
Troubleshooting and Solutions:
- Visual Inspection: Check the bulb filament for breakage. A broken filament indicates a burned-out bulb.
- Fuse Check: Locate the headlight fuse in the fuse box (usually under the hood or in the cabin). Use a fuse tester or visually inspect the fuse for a broken filament. Replace the fuse with the correct amperage rating if blown.
- Bulb Replacement: Replace the bulb with a new one of the correct type. Refer to your owner's manual for the correct bulb specification.
- Connector Check: Ensure the connector is securely attached to the bulb socket. Clean any corrosion with a wire brush or electrical contact cleaner.
- Relay Check: Locate the headlight relay (consult your owner's manual). Swap it with a known good relay (of the same type) from another circuit (e.g., the horn relay) to see if the problem is resolved. If so, replace the faulty relay.
- Wiring Check: Inspect the wiring harness for any damage, such as cuts, abrasions, or melted insulation. Use a multimeter to check for continuity and voltage. This step is best left to a qualified mechanic if you are not comfortable working with electrical systems.
Example: A similar headlight issue in a Toyota Camry might involve checking the DRL (Daytime Running Light) relay as well, since some Camrys use DRLs in conjunction with the headlights.
Taillights and Brake Lights: Dim or Not Working
Symptoms:
- One or both taillights are dim.
- One or both taillights are not working at all.
- Brake lights do not illuminate when the brake pedal is pressed.
Possible Causes:
- Burned-out bulb: Common, especially for dual-filament bulbs (one filament for taillight, one for brake light).
- Loose connection: A loose connector at the bulb socket.
- Corroded connector: Corrosion on the bulb socket or connector pins.
- Faulty brake light switch: The switch located at the brake pedal that activates the brake lights.
- Blown fuse: A blown fuse in the taillight or brake light circuit.
- Grounding issue: A poor ground connection can cause dim or erratic lighting.
Troubleshooting and Solutions:
- Visual Inspection: Check the bulb filament(s) for breakage.
- Fuse Check: Locate the taillight and brake light fuses in the fuse box. Replace any blown fuses.
- Bulb Replacement: Replace the bulb with a new one of the correct type (often a dual-filament bulb).
- Connector Check: Ensure the connector is securely attached to the bulb socket. Clean any corrosion.
- Brake Light Switch Check: Locate the brake light switch at the brake pedal. Use a multimeter to check for continuity when the brake pedal is pressed. If there is no continuity, the switch is likely faulty and needs replacement. You can often adjust the switch; sometimes it becomes misaligned.
- Grounding Check: Check the ground connection for the taillights. It is usually a wire attached to the chassis near the taillight assembly. Ensure the connection is clean and tight. Clean any corrosion.
Example: A common issue in Honda Civics is a faulty brake light switch, which often requires adjustment or replacement. The symptoms are similar to the Altima: brake lights not illuminating.
Turn Signals: Rapid Blinking or Not Working
Symptoms:
- One or both turn signals blink rapidly.
- One or both turn signals do not work at all.
Possible Causes:
- Burned-out bulb: The most frequent reason for rapid blinking.
- Loose connection: A loose connector at the bulb socket.
- Corroded connector: Corrosion on the bulb socket or connector pins.
- Faulty flasher relay: The flasher relay controls the blinking of the turn signals.
- Grounding issue: A poor ground connection.
Troubleshooting and Solutions:
- Visual Inspection: Check the bulb filament for breakage.
- Bulb Replacement: Replace the bulb with a new one of the correct type.
- Connector Check: Ensure the connector is securely attached to the bulb socket. Clean any corrosion.
- Flasher Relay Check: Locate the flasher relay (consult your owner's manual). Replace the relay if it is faulty. Some Altimas may have a single multi-function relay.
- Grounding Check: Check the ground connection for the turn signal lights. Ensure the connection is clean and tight.
Note: Rapid blinking is usually indicative of a burned-out bulb on that side of the vehicle.
Example: In many Ford F-150 trucks, a trailer wiring issue can cause turn signal problems, including rapid blinking. While not directly related to the Altima, it highlights the importance of checking the entire lighting circuit.
Interior Lights: Not Working
Symptoms:
- Interior lights do not illuminate when doors are opened or when switched on manually.
Possible Causes:
- Burned-out bulb: A simple but common cause.
- Blown fuse: A blown fuse in the interior light circuit.
- Faulty door switch: The switch that activates the interior lights when the door is opened.
- Faulty light switch: The manual switch for the interior lights.
Troubleshooting and Solutions:
- Visual Inspection: Check the bulb filament for breakage.
- Fuse Check: Locate the interior light fuse in the fuse box. Replace any blown fuses.
- Bulb Replacement: Replace the bulb with a new one of the correct type.
- Door Switch Check: Test the door switch with a multimeter to check for continuity when the door is opened. Clean the switch contacts or replace the switch if necessary.
- Light Switch Check: Inspect the light switch for proper functionality. Use a multimeter to check for voltage.
Replacing a Light Bulb: A Step-by-Step Guide
While the specific procedure may vary slightly depending on the bulb location, here's a general guide for replacing a light bulb on a 2005 Nissan Altima:
- Gather Supplies: You'll need a new bulb of the correct type, a screwdriver (Phillips or flathead, depending on the bulb housing), and gloves (optional).
- Access the Bulb: This usually involves removing a plastic cover or accessing the bulb housing from the trunk or engine compartment. Refer to your owner's manual for specific instructions.
- Remove the Old Bulb: Depending on the bulb type, you may need to twist it, push and turn it, or release a clip to remove it from the socket.
- Install the New Bulb: Insert the new bulb into the socket, ensuring it is properly seated and secured.
- Test the Bulb: Turn on the lights to ensure the new bulb is working correctly.
- Reassemble the Housing: Reinstall any covers or components that were removed to access the bulb.
Important: Always handle halogen bulbs with care. Avoid touching the glass with your bare hands, as the oil from your skin can shorten the bulb's lifespan. If you do touch the bulb, clean it with rubbing alcohol before installation.
Preventative Maintenance Tips
Regular maintenance can help prevent light bulb failures and keep your 2005 Nissan Altima's lighting system in top condition:
- Regular Inspections: Periodically check all lights (headlights, taillights, brake lights, turn signals, etc.) to ensure they are working correctly.
- Clean Connections: Keep bulb sockets and connectors clean and free of corrosion. Use electrical contact cleaner as needed.
- Proper Bulb Handling: Handle halogen bulbs with care to avoid contamination.
- Voltage Check: Periodically check the voltage at the battery and alternator to ensure they are within the proper range. Overvoltage can shorten bulb life.
- Replace Bulbs in Pairs: When one headlight bulb burns out, consider replacing both bulbs at the same time. This ensures even lighting and prevents the other bulb from failing shortly after.
Real-World Issues and Solutions
Problem: Foggy Headlights. Over time, the plastic headlight lenses on the 2005 Altima can become cloudy or yellowed, reducing light output.
Solution: Use a headlight restoration kit to polish the lenses and remove the oxidation. There are many DIY kits available, or you can have a professional detailer restore the lenses.
Problem: Repeated Bulb Failures. If you are frequently replacing the same bulb, there may be an underlying electrical problem, such as overvoltage or a loose connection.
Solution: Have a qualified mechanic diagnose the electrical system to identify and correct the root cause of the problem.
Problem: Aftermarket HID/LED Conversions. Installing aftermarket HID or LED headlight bulbs without proper modifications can cause problems, such as glare, flickering, and premature bulb failure.
Solution: If you choose to install aftermarket HID or LED headlights, ensure they are properly designed for your vehicle and installed correctly. Consider using projector housings for better light control and avoid blinding other drivers.
By following these troubleshooting steps, maintenance tips, and addressing potential real-world issues, you can keep the lighting system of your 2005 Nissan Altima functioning safely and reliably.
Keeping Your Car in Top Condition
Maintaining your car's lighting is just one piece of the puzzle when it comes to overall vehicle health. Regularly scheduled maintenance, including oil changes, fluid checks, tire rotations, and brake inspections, are essential for extending the life of your car and ensuring its safety. Consult your owner's manual for the recommended maintenance schedule and be proactive in addressing any issues that arise. A well-maintained car is a safe and reliable car.