Nissan Armada Fuel Tank Size
Alright, let's dive into the fuel tank specifics of the Nissan Armada. Knowing the fuel tank capacity isn't just about avoiding that low-fuel anxiety; it's crucial for planning trips, estimating fuel costs, and even understanding the overall range and capabilities of your SUV. Plus, for those of you planning modifications, like auxiliary fuel tanks or performance upgrades that affect fuel consumption, this information is absolutely essential.
Armada Fuel Tank Capacity Over the Years
The Nissan Armada has seen some changes over its production lifespan, and the fuel tank capacity has remained relatively consistent, but there are a few nuances to be aware of depending on the specific model year. Understanding these differences is key for accurate calculations and modifications.
First Generation (2004-2015)
The first-generation Armada, produced from 2004 to 2015, features a 28-gallon (106-liter) fuel tank. This applies across all trim levels (SE, LE, Platinum) within those model years. This consistent capacity makes it simpler to estimate range and fuel economy for these vehicles.
It's important to note that the 28-gallon figure is the nominal or stated capacity. In reality, manufacturers often leave a small buffer, meaning the actual usable capacity might be slightly less. This buffer is there to prevent fuel spillage due to expansion with temperature changes and to accommodate variations in fuel pump calibration.
Second Generation (2017-Present)
With the redesign for the 2017 model year, the Armada retained the same approximate fuel tank capacity as the first generation. You're still looking at a 26-gallon (98-liter) fuel tank. Again, this is the standard across all trim levels (SV, SL, Platinum, and newer variations like Midnight Edition) in this generation. Some sources may list slightly different numbers, so always refer to your owner's manual for the most accurate specification for your specific vehicle.
The fuel tank capacity reduction from 28 gallons (106 liters) to 26 gallons (98 liters) is the biggest change. Though, it is important to factor in your current average miles per gallon (MPG), and overall fuel costs.
Factors Affecting Real-World Range
Knowing the fuel tank size is just one piece of the puzzle. To get a realistic estimate of how far you can actually drive on a full tank, you need to consider several other factors:
- Fuel Economy (MPG): This is the most obvious one. Your Armada's MPG will vary depending on driving conditions, terrain, speed, and the weight you're carrying. City driving generally yields lower MPG than highway driving.
- Driving Habits: Aggressive acceleration, hard braking, and high speeds all decrease fuel economy. Maintaining a consistent speed and anticipating traffic flow can significantly improve your MPG.
- Tire Pressure: Under-inflated tires increase rolling resistance, which reduces fuel economy. Make sure your tires are inflated to the recommended pressure listed on the sticker inside your driver's side door jamb.
- Vehicle Maintenance: Regular maintenance, such as oil changes, air filter replacements, and spark plug replacements, is crucial for maintaining optimal fuel economy. A neglected engine will burn fuel less efficiently.
- Load and Towing: Carrying heavy loads or towing a trailer significantly reduces fuel economy. The heavier the load, the more fuel your Armada will consume.
- Environmental Conditions: Extreme temperatures (both hot and cold) can affect fuel economy. Cold weather, in particular, can reduce MPG as the engine takes longer to warm up and the air is denser.
To calculate your estimated range, multiply your average MPG by the fuel tank capacity. For example, if you're getting 16 MPG in a first-generation Armada with a 28-gallon tank, your estimated range would be 448 miles (16 MPG x 28 gallons). Keep in mind that this is just an estimate, and your actual range may vary.
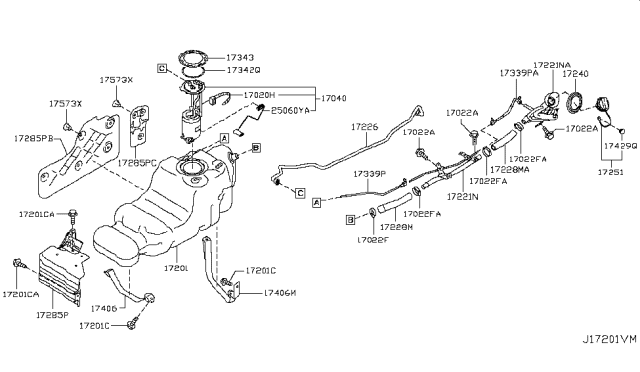
Locating Your Armada's Fuel Tank
The fuel tank location is fairly consistent across all Armada models. It's situated underneath the vehicle, ahead of the rear axle. The fuel filler neck is located on the driver's side, towards the rear of the vehicle. This placement helps protect the tank from damage in the event of a collision and provides relatively easy access for refueling.
If you're working on the fuel system, it's crucial to identify the fuel tank properly. Never drill or cut into the vehicle's underbody without positively identifying the location of the fuel tank and other critical components. Doing so could result in serious injury or damage to the vehicle.
Modifications and Fuel System Considerations
For those of you considering modifications to your Armada, such as installing an auxiliary fuel tank for extended range or upgrading the fuel pump for performance enhancements, here are a few critical considerations:
- Auxiliary Fuel Tanks: Adding an auxiliary fuel tank can significantly increase your Armada's range, which is particularly useful for overlanding or long-distance travel. However, these installations require careful planning and execution. You'll need to consider the tank's size, location, plumbing, and legal requirements (check local regulations regarding fuel tank modifications). Properly integrating the auxiliary tank with the existing fuel system is crucial to ensure reliable fuel delivery.
- Fuel Pump Upgrades: If you're planning engine modifications that increase horsepower and fuel consumption, you may need to upgrade the fuel pump to ensure adequate fuel delivery. Select a fuel pump that is appropriately sized for your engine's power output and fuel demand. Installing a fuel pump with insufficient capacity can lead to fuel starvation, which can damage the engine.
- Fuel Lines and Fittings: When modifying the fuel system, use high-quality fuel lines and fittings that are compatible with gasoline. Avoid using rubber hoses that are not specifically designed for fuel, as they can degrade over time and leak. Use appropriate fittings (AN fittings are a common choice for performance applications) and ensure they are properly tightened to prevent leaks.
- Fuel Pressure Regulator: A fuel pressure regulator maintains a constant fuel pressure in the fuel rail, ensuring consistent fuel delivery to the injectors. If you're upgrading the fuel pump, you may also need to upgrade the fuel pressure regulator to match the pump's output.
- Safety Precautions: Working with fuel systems is inherently dangerous. Always disconnect the negative battery terminal before working on the fuel system to prevent sparks. Work in a well-ventilated area, wear eye protection and gloves, and have a fire extinguisher readily available. Properly dispose of any spilled fuel.
Accessing and Inspecting the Fuel Tank
While you hopefully won't need to drop your fuel tank regularly, there might be times when you need to access it for repairs, inspections, or modifications. Here's a general overview of the process. Always consult your Armada's service manual for detailed instructions specific to your model year.
- Preparation: Disconnect the negative battery terminal. Empty the fuel tank as much as possible. This will reduce the weight and risk of fuel spillage.
- Support: Use a floor jack and jack stands to safely support the vehicle.
- Disconnect Fuel Lines and Electrical Connectors: Carefully disconnect the fuel lines and electrical connectors from the fuel pump module. Be prepared for some fuel spillage. Use appropriate tools to avoid damaging the connectors.
- Remove Straps: Remove the straps that secure the fuel tank to the vehicle. These straps are typically held in place by bolts or nuts.
- Lower the Tank: Slowly lower the fuel tank using the floor jack. Be careful not to damage any fuel lines or other components.
- Inspection: Once the tank is lowered, inspect it for any signs of damage, such as leaks, dents, or corrosion.
When reinstalling the fuel tank, follow the reverse procedure. Ensure that all fuel lines and electrical connectors are properly connected and that the straps are securely tightened. After reinstalling the tank, check for any fuel leaks before starting the engine.
Understanding your Nissan Armada's fuel tank capacity and related systems is key to responsible vehicle ownership, effective trip planning, and informed modification choices. Remember, safety first, and always consult your service manual for specific procedures and torque specifications.