Nissan Frontier Fuel Pump Location
The Nissan Frontier, a stalwart in the mid-size truck segment, has earned a reputation for reliability and capability. A critical component contributing to this performance is the fuel pump, responsible for delivering a consistent supply of fuel to the engine. Understanding its location is paramount for maintenance, troubleshooting, and repair. This article provides a detailed overview of the Nissan Frontier fuel pump location, covering various model years and engine configurations, along with essential information for diagnosis and replacement.
General Location Overview
In most Nissan Frontier models, the fuel pump is located inside the fuel tank. This design, common in modern vehicles, integrates the fuel pump with the fuel level sending unit and sometimes a fuel filter. This integrated module is typically accessed through an access panel located under the rear seat or, in some cases, by dropping the fuel tank.
Why In-Tank Fuel Pumps?
Submerging the fuel pump in the fuel tank offers several advantages:
- Cooling: The surrounding fuel helps to dissipate heat generated by the pump's electric motor, improving its lifespan and efficiency.
- Noise Reduction: The fuel dampens the pump's operational noise.
- Reduced Vapor Lock: Immersion minimizes the risk of vapor lock, a condition where fuel vaporizes in the fuel line, preventing proper fuel delivery.
Specific Model Year and Engine Variations
While the general location remains consistent (in-tank), the specific access method and module configuration can vary depending on the model year and engine of your Nissan Frontier. Here's a breakdown:
1998-2004 Nissan Frontier (D22)
The first-generation Nissan Frontier (D22) generally features a fuel pump assembly accessed by removing the fuel tank. This generation often requires disconnecting fuel lines, electrical connectors, and the tank straps before carefully lowering the tank. While some models might have a small access panel under the bed, it's usually not large enough for complete fuel pump removal.
Engine Note: Whether equipped with the 2.4L KA24DE inline-4 or the 3.3L VG33E V6, the fuel pump location remains consistent within the fuel tank.
2005-2021 Nissan Frontier (D40)
The second-generation Frontier (D40) offers a slightly more accessible configuration in some model years. For many D40 Frontiers, an access panel is located under the rear seats. Removing the rear seat cushions typically reveals a metal access plate secured by screws or bolts. Removing this plate grants access to the fuel pump assembly.
However, some models, particularly those with extended cabs or specific trim levels, may still require dropping the fuel tank for complete access. Always consult your vehicle's repair manual for the correct procedure.
Engine Note: The 2.5L QR25DE inline-4 and the 4.0L VQ40DE V6 engines in the D40 Frontier utilize the same basic fuel pump location within the fuel tank, though the pump assemblies themselves may differ slightly.
2022-Present Nissan Frontier (D41)
The current generation (D41) Nissan Frontier generally maintains the in-tank fuel pump location with access likely through an access panel under the rear seat. While specific procedures may vary, the overall principle remains the same: an access panel allows you to reach the fuel pump assembly without necessarily needing to drop the entire fuel tank.
Engine Note: The 3.8L VQ38DD V6 engine utilized in the D41 Frontier still relies on an in-tank fuel pump system.
Accessing the Fuel Pump: Step-by-Step Guide (General)
Disclaimer: Working with fuel systems can be dangerous. Always exercise extreme caution, disconnect the negative battery terminal, and work in a well-ventilated area. Consult your vehicle's repair manual for specific instructions and safety precautions.
- Safety First: Disconnect the negative battery terminal to prevent electrical sparks.
- Locate Access Panel: Determine if your Frontier has an access panel under the rear seat. If not, you'll need to prepare to drop the fuel tank.
- Remove Rear Seat (if applicable): If an access panel is present, remove the rear seat cushions to expose the access panel.
- Remove Access Panel: Unscrew or unbolt the metal access panel to reveal the top of the fuel pump assembly.
- Disconnect Electrical Connectors: Carefully disconnect the electrical connectors attached to the fuel pump module.
- Disconnect Fuel Lines: Use appropriate tools to disconnect the fuel lines from the fuel pump module. Some fuel lines use quick-disconnect fittings; be careful not to damage them. Have a container ready to catch any spilled fuel.
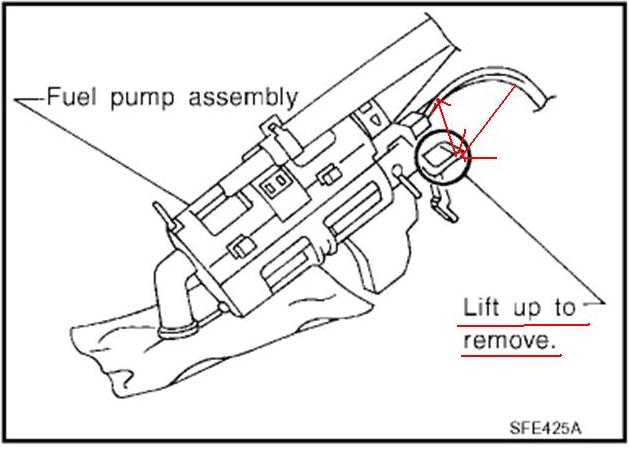
- Remove Retaining Ring/Lock Ring: Most fuel pump assemblies are secured with a retaining ring or lock ring. Use a fuel pump retaining ring tool to carefully loosen and remove the ring.
- Remove Fuel Pump Module: Gently lift the fuel pump module out of the fuel tank. Be careful not to bend or damage the fuel level sending unit float arm.
Note: If you need to drop the fuel tank, ensure the tank is as empty as possible. Use a floor jack to support the tank while you disconnect the straps. Lower the tank carefully, ensuring you don't strain or damage any fuel lines or wiring.
Diagnosing Fuel Pump Issues
Several symptoms can indicate a failing fuel pump:
- Difficulty Starting: The engine may crank but fail to start, especially after sitting for a while.
- Engine Stalling: The engine may stall intermittently, particularly under load or during acceleration.
- Loss of Power: The engine may lack power, especially at higher speeds or when climbing hills.
- Rough Idling: The engine may idle roughly or unevenly.
- Fuel Pressure Issues: A fuel pressure test will reveal low or fluctuating fuel pressure.
- Whining Noise from Fuel Tank: A failing fuel pump may produce a noticeable whining or buzzing noise from the fuel tank area.
Tools for Diagnosis
To diagnose fuel pump issues effectively, you'll need the following tools:
- Fuel Pressure Gauge: To measure fuel pressure at the fuel rail.
- Multimeter: To check voltage and continuity in the fuel pump circuit.
- OBD-II Scanner: To check for diagnostic trouble codes (DTCs) related to the fuel system.
- Fuel Pump Retaining Ring Tool: Specifically designed to remove and install the fuel pump retaining ring.
Fuel Pump Replacement: Key Considerations
When replacing the fuel pump, consider the following:
- Quality of Replacement Part: Choose a reputable brand and ensure the replacement pump is compatible with your specific vehicle. OEM (Original Equipment Manufacturer) parts are generally recommended for optimal performance and reliability.
- Fuel Filter Replacement: If your Frontier has a separate fuel filter, replace it at the same time as the fuel pump. A clogged fuel filter can strain the new fuel pump and shorten its lifespan. Some fuel pumps come with a strainer that should also be replaced.
- O-Rings and Seals: Replace all O-rings and seals associated with the fuel pump module to prevent fuel leaks.
- Proper Installation: Follow the manufacturer's instructions carefully when installing the new fuel pump. Ensure all connections are secure and properly torqued.
- Prime the Fuel System: Before starting the engine, prime the fuel system by turning the ignition key to the "on" position (without starting the engine) several times. This allows the fuel pump to build pressure in the fuel lines.
Real-World Example: A 2012 Nissan Frontier with the 4.0L V6 engine experienced intermittent stalling. After diagnosing low fuel pressure, the mechanic accessed the fuel pump through the access panel under the rear seat. Upon removal, the old fuel pump showed signs of corrosion and wear. A new fuel pump and fuel filter were installed, resolving the stalling issue.
Common Problems and Solutions
Several common problems can affect the Nissan Frontier fuel pump:
- Contaminated Fuel: Debris and contaminants in the fuel can clog the fuel pump and fuel filter, reducing fuel flow. Solution: Use high-quality fuel and replace the fuel filter regularly.
- Electrical Issues: Corrosion or loose connections in the fuel pump circuit can cause intermittent or complete fuel pump failure. Solution: Inspect and clean all electrical connections and replace any damaged wiring.
- Overheating: Running the fuel tank consistently low can cause the fuel pump to overheat and fail prematurely. Solution: Keep the fuel tank at least one-quarter full to help cool the fuel pump.
- Old Age: Over time, the fuel pump's internal components can wear out, reducing its performance. Solution: Replace the fuel pump as part of routine maintenance, typically every 100,000 miles or as recommended by the manufacturer.
Preventative Maintenance: Regular fuel filter replacement, using high-quality fuel, and keeping the fuel tank at least one-quarter full can significantly extend the life of your Nissan Frontier's fuel pump.
Understanding the Nissan Frontier fuel pump location and related maintenance is crucial for ensuring the reliable operation of your vehicle. Whether you are a seasoned mechanic or a DIY enthusiast, this information provides a solid foundation for troubleshooting and repair.