Nissan Maxima Cabin Air Filter Location
The Nissan Maxima, a name synonymous with "four-door sports car" for decades, offers a blend of performance and comfort. Maintaining its interior air quality is crucial, and that starts with a clean cabin air filter. Knowing its location and replacement procedure is essential for both DIY enthusiasts and professional mechanics.
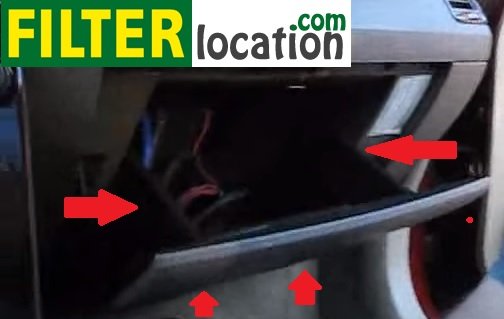
Unmasking the Maxima's Breathing Point: Locating the Cabin Air Filter
Unlike some vehicles that bury the cabin air filter in obscure locations, the Nissan Maxima, across several generations, generally keeps it relatively accessible. However, slight variations exist between model years, so pinpointing the exact spot is the first step. The vast majority of Maximas (from the late 2000s onwards, including the 7th-generation A35 and 8th-generation A36 models) house the cabin air filter behind the glove box.
Here's a more detailed breakdown:
- 7th Generation (A35, 2009-2014): This is the most common location. The filter is situated directly behind the glove box.
- 8th Generation (A36, 2016-2023): Similar to the A35, the filter remains behind the glove box, though the specific removal process might involve slightly different clips or fasteners.
While the glove box location is nearly universal for recent models, it's always a good practice to consult your owner's manual for the definitive location for your specific Maxima's year and trim.
Step-by-Step: Accessing the Cabin Air Filter
Once you've confirmed the location, you'll need a few basic tools: typically, a flathead screwdriver or a plastic trim removal tool (to avoid scratching the dashboard). The procedure is straightforward:
- Empty the Glove Box: This is a crucial step. Remove all items from the glove box to prevent them from falling out during the removal process.
- Detach the Glove Box Damper (if equipped): Many Maximas have a damper on the right side of the glove box to control its opening speed. Gently detach the damper arm from the glove box. It usually clips in and can be removed by pressing or sliding it off.
- Release the Glove Box Stopper Arms: On either side of the glove box, you'll find stopper arms that prevent the glove box from swinging down too far. These arms are usually held in place by tabs or clips. Gently push or squeeze these tabs inward to release the arms. The glove box should now swing down further than usual.
- Locate the Filter Housing Cover: Behind the dropped-down glove box, you'll see a rectangular plastic cover. This is the cabin air filter housing cover.
- Remove the Housing Cover: The cover is usually held in place by clips or tabs. Use a flathead screwdriver or trim removal tool to gently pry the clips open. Be careful not to break the plastic.
- Extract the Cabin Air Filter: With the cover removed, you can now see the cabin air filter. Gently pull the filter straight out. Note the orientation of the filter (the direction of airflow) before removing it, as you'll need to install the new filter in the same direction.
Inspection and Replacement: Breathing New Life into Your Maxima
Once the old filter is out, inspect it thoroughly. A clogged or dirty filter will be visibly laden with dust, pollen, leaves, and other debris. This is a clear indicator that it needs replacing. A severely clogged filter can restrict airflow, reducing the efficiency of your air conditioning and heating systems, and potentially leading to unpleasant odors.
Choosing the Right Replacement Filter:
When selecting a replacement filter, opt for a high-quality filter that meets or exceeds the original equipment manufacturer (OEM) specifications. You have several options:
- Standard Particle Filters: These are the most common and affordable type, effectively trapping dust, pollen, and other particulate matter.
- Activated Carbon Filters: These filters contain activated carbon, which helps to absorb odors and pollutants, providing even cleaner air. They are particularly beneficial for drivers who frequently encounter heavy traffic or live in areas with poor air quality.
- HEPA Filters: High-Efficiency Particulate Air (HEPA) filters offer the highest level of filtration, removing even the smallest particles. However, they can also be more restrictive to airflow and may require more frequent replacement.
Consult your owner's manual or a reputable parts retailer to determine the correct filter size and type for your specific Maxima model. Brands like Bosch, Fram, and Wix offer quality replacement filters.
Installation: Reversing the Process:
Installing the new filter is essentially the reverse of the removal process:
- Insert the New Filter: Carefully insert the new filter into the housing, ensuring that it's oriented in the correct direction (matching the airflow direction of the old filter).
- Reinstall the Housing Cover: Align the housing cover and snap it back into place, ensuring that all clips are securely fastened.
- Reattach the Glove Box Stopper Arms: Push or slide the stopper arms back into their respective slots on either side of the glove box.
- Reattach the Glove Box Damper (if equipped): Reconnect the damper arm to the glove box.
- Close the Glove Box: Gently close the glove box, ensuring that it latches properly.
- Verify Operation: Turn on your vehicle's air conditioning and heating systems to ensure that air is flowing properly and that there are no unusual noises.
Maintenance Schedule: Keeping Your Maxima Breathing Easy
Nissan typically recommends replacing the cabin air filter every 12,000 to 15,000 miles, or once a year. However, this interval can vary depending on your driving conditions. If you frequently drive in dusty or polluted environments, you may need to replace the filter more often. Similarly, if you notice reduced airflow or unpleasant odors coming from your vents, it's a sign that the filter needs to be checked and potentially replaced. It is a small investment compared to the wear that the HVAC unit will suffer from constantly working harder than necessary.
The Cost Factor:
The cost of a cabin air filter replacement is relatively low. A replacement filter typically costs between $10 and $30, depending on the type and brand. If you choose to have a mechanic perform the replacement, labor costs will add to the total, typically ranging from $30 to $60. However, given the ease of the procedure, most DIY enthusiasts can easily handle this task themselves, saving on labor costs.
Troubleshooting: Common Problems and Solutions
While the cabin air filter replacement is generally straightforward, some common problems can arise:
- Broken Clips: The plastic clips that hold the housing cover in place can become brittle and break, especially on older vehicles. If this happens, you may need to purchase a new housing cover.
- Incorrect Filter Size: Using the wrong size filter can prevent it from sealing properly, allowing unfiltered air to bypass the filter. Always verify that you're using the correct filter size for your Maxima model.
- Difficulty Removing the Damper: The glove box damper can be tricky to remove. If you're having trouble, try using a small flathead screwdriver to gently pry it off.
Beyond the Filter: Maintaining a Fresh Cabin
While the cabin air filter plays a crucial role in maintaining interior air quality, it's not the only factor. Regularly cleaning the interior of your Maxima, including vacuuming the carpets and upholstery, can also help to reduce dust and allergens. You can also use an automotive air freshener to help eliminate odors. A dirty evaporator core can also contribute to unpleasant smells. Consider having your HVAC system professionally cleaned periodically to remove mold and mildew buildup.
By understanding the location, replacement procedure, and maintenance schedule for your Nissan Maxima's cabin air filter, you can ensure that you and your passengers enjoy clean and fresh air while driving. This simple task not only improves comfort but also helps to protect your health and prolong the life of your vehicle's HVAC system. Remember to consult your owner's manual for specific instructions related to your model year.