Nissan Maxima Cabin Filter Location
Maintaining optimal air quality within your Nissan Maxima's cabin is crucial for driver and passenger comfort. A clean cabin filter plays a vital role in filtering out dust, pollen, pollutants, and other airborne particles. Locating and accessing this filter is a straightforward process, making it a manageable DIY task for most owners and a quick procedure for professional mechanics.
Identifying Your Maxima's Generation for Accurate Filter Location
The precise location of the cabin filter can vary slightly depending on the model year of your Nissan Maxima. To ensure accuracy, it's essential to identify your vehicle's generation. Generally, we can categorize the Maxima into the following generations for cabin filter location purposes:
- 5th Generation (2000-2003): Often referred to as the A33 chassis.
- 6th Generation (2004-2008): Designated as the A34 chassis.
- 7th Generation (2009-2014): Known as the A35 chassis.
- 8th Generation (2016-2023): The A36 chassis.
While there might be minor variations within each generation, the general location of the cabin filter remains consistent. Consulting your owner's manual is always the best practice for confirmation.
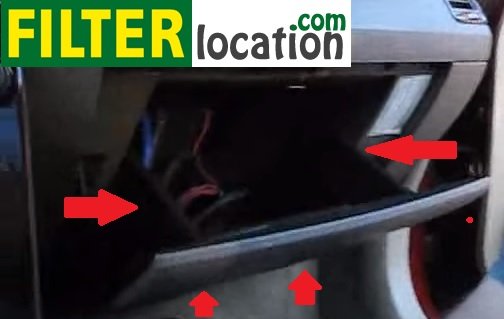
Location and Access: 5th and 6th Generation Maxima (2000-2008)
For 5th and 6th generation Maxima models, the cabin filter is typically located behind the glove compartment. The procedure for accessing it involves the following steps:
- Empty the Glove Compartment: Remove all items from the glove compartment to provide ample workspace.
- Detach the Glove Compartment Damper (if equipped): Some models feature a damper on the right side of the glove compartment to control its opening speed. Gently detach this damper by compressing its end and sliding it off its mounting pin.
- Release the Glove Compartment Stops: On either side of the glove compartment, you'll find stops that prevent it from opening too far. These stops are usually small tabs or clips that need to be pushed inward. Apply gentle pressure to both sides simultaneously while tilting the glove compartment inwards and downwards. This will allow the glove compartment to swing fully open and reveal the filter housing.
- Locate the Filter Housing: Behind the now-open glove compartment, you'll see a rectangular plastic housing. This is the cabin filter housing.
- Remove the Filter Housing Cover: The housing cover is typically secured by clips or tabs. Carefully detach these clips or tabs to remove the cover. You may need a small screwdriver or plastic trim tool to gently pry them open.
- Extract the Old Filter: Once the cover is removed, you'll see the cabin filter. Gently slide the old filter out of the housing. Note the direction of airflow, usually indicated by an arrow on the filter, for proper installation of the new filter.
Pro Tip: Before installing the new filter, use a vacuum cleaner with a brush attachment to clean out any debris accumulated inside the filter housing. This will help ensure optimal air quality.
Location and Access: 7th and 8th Generation Maxima (2009-2023)
The procedure for accessing the cabin filter in 7th and 8th generation Maxima models is very similar to the previous generations. The primary difference lies in the glove compartment design and potentially the type of clips used to secure the filter housing cover. Here's a breakdown:
- Clear the Glove Box: As with earlier models, begin by emptying the glove compartment.
- Disconnect the Damper (if present): If your Maxima has a glove compartment damper, detach it by compressing its end and removing it from its mounting point.
- Release the Glove Compartment Stops: Locate the glove compartment stops on each side. These might be clips that need to be pushed inwards or tabs that need to be rotated. Apply gentle pressure while tilting the glove compartment downwards to release it completely.
- Identify the Filter Housing: Behind the open glove compartment, you'll find the rectangular cabin filter housing.
- Detach the Housing Cover: The housing cover is typically held in place by clips or a latch. Use a small screwdriver or trim tool if needed to carefully release the clips or open the latch. Avoid using excessive force to prevent damage.
- Remove the Old Filter: Gently slide the old cabin filter out of the housing. Pay attention to the airflow direction indicator on the filter for correct orientation during replacement.
Important Note: Some 8th generation Maxima models (2016+) might have a slightly different glove compartment design. Refer to your owner's manual for specific instructions related to your model year.
Replacing the Cabin Filter: A Universal Procedure
Once you've accessed the cabin filter, the replacement process is the same regardless of the Maxima's generation:
- Inspect the New Filter: Before installing the new filter, visually inspect it for any damage. Make sure it's the correct size and type for your vehicle.
- Install the New Filter: Carefully slide the new cabin filter into the housing, ensuring the airflow arrow on the filter points in the correct direction (matching the direction indicated on the old filter or the housing itself).
- Reinstall the Filter Housing Cover: Securely reattach the filter housing cover, making sure all clips or latches are properly engaged.
- Reassemble the Glove Compartment: Carefully swing the glove compartment back into its original position. Reattach the glove compartment stops, ensuring they are properly engaged.
- Reconnect the Damper (if equipped): Reattach the glove compartment damper to its mounting pin.
- Test the Glove Compartment: Open and close the glove compartment to ensure it operates smoothly and securely.
Real-World Example: A customer brought in their 2012 Maxima complaining of a musty odor from the air vents. Upon inspection, the cabin filter was heavily clogged with leaves and debris. Replacing the filter immediately eliminated the odor and improved airflow.
Tools Required
The tools required for replacing a Nissan Maxima cabin filter are minimal:
- New Cabin Filter: Ensure it's the correct part number for your Maxima model year.
- Small Flathead Screwdriver or Plastic Trim Tool: For releasing clips or tabs on the filter housing cover.
- Vacuum Cleaner with Brush Attachment: For cleaning the filter housing.
- Gloves (Optional): To keep your hands clean.
Maintenance and Replacement Intervals
Nissan recommends replacing the cabin filter every 12 months or 12,000 miles, whichever comes first. However, if you frequently drive in dusty or polluted environments, you may need to replace it more often. Signs that your cabin filter needs replacement include:
- Reduced airflow from the vents.
- Musty or unpleasant odors from the vents.
- Increased dust accumulation inside the vehicle.
- Allergies or respiratory issues worsening while driving.
Technical Tip: Consider using a high-efficiency particulate air (HEPA) cabin filter for improved filtration, especially if you or your passengers have allergies or sensitivities to airborne particles.
Choosing the Right Cabin Filter
When selecting a new cabin filter for your Maxima, you have several options:
- Standard Particle Filter: This is the most common type of cabin filter, designed to trap dust, pollen, and other larger particles.
- Activated Carbon Filter: These filters contain a layer of activated carbon, which helps to absorb odors, gases, and volatile organic compounds (VOCs).
- HEPA Filter: HEPA filters offer the highest level of filtration, capturing even the smallest particles, including bacteria and viruses.
The best choice depends on your individual needs and preferences. Activated carbon filters are a good option if you're concerned about odors, while HEPA filters are ideal for those with allergies or respiratory issues. Always verify the filter's compatibility with your specific Maxima model year.
Troubleshooting Common Issues
While replacing the cabin filter is generally a simple procedure, here are some common issues you might encounter:
- Difficulty Releasing the Glove Compartment Stops: Ensure you're applying pressure to the correct points and tilting the glove compartment downwards simultaneously.
- Broken Clips or Tabs: If you accidentally break a clip or tab on the filter housing cover, you may be able to purchase a replacement cover separately.
- Incorrect Filter Size: Double-check the part number to ensure you have the correct filter for your vehicle.
- Airflow Arrow Direction Confusion: Refer to the old filter or the housing for the correct airflow direction. Incorrect installation can reduce the filter's effectiveness.
Workshop Insight: We often see customers struggle with releasing the glove compartment stops. A little patience and careful observation are key. Forcing the mechanism can lead to damage.
By following these detailed instructions and tips, you can easily locate and replace the cabin filter in your Nissan Maxima, ensuring a cleaner and more comfortable driving experience. Regular cabin filter replacement is an important part of vehicle maintenance, contributing to both air quality and overall vehicle health.