Nissan Versa Headlight Bulb Replacement
Replacing a headlight bulb on your Nissan Versa might seem daunting, but with a little patience and the right guidance, it's a task most car enthusiasts and DIYers can handle. This article will walk you through the process, explaining the technical aspects in a way that's easy to understand, regardless of your mechanical experience.
Understanding Your Versa's Headlight System
Before we dive into the replacement procedure, let's briefly touch upon the Versa's headlight system. Most Versa models, depending on the year, utilize halogen bulbs. Some newer models might come equipped with LED headlights, but for the scope of this article, we will focus on halogen bulb replacement, as it's the most common scenario. Halogen bulbs work by passing electricity through a tungsten filament, which heats up and glows, producing light. This is a similar principle to how older incandescent home light bulbs work. Think of it like a tiny, very bright lightbulb.
Unlike older sealed beam headlights (remember those rectangular units on classic cars like the early Mustangs or Chevy Camaros?), the Versa uses a modular system. This means the bulb itself is a separate, replaceable component within the headlight assembly. This design is more cost-effective and environmentally friendly, as you only replace the bulb when it fails, not the entire headlight unit.
Identifying the Correct Bulb Type
The first and perhaps most crucial step is identifying the correct bulb type for your specific Versa model year. The owner's manual is your best friend here! It will list the exact bulb specification for both the low beam and high beam headlights. Common halogen bulb types include H4, H7, and H11. Using the wrong bulb can lead to poor light output, damage to the headlight assembly, or even electrical problems. Imagine trying to fit a square peg into a round hole – it simply won't work properly, and you risk damaging something.
You can also use online bulb finders offered by major auto parts retailers like AutoZone, Advance Auto Parts, or O'Reilly Auto Parts. These tools typically allow you to enter your vehicle's year, make, and model to identify compatible bulbs. Always double-check the information against your owner's manual or the bulb markings themselves.
Gathering Your Tools and Materials
Now that you know the correct bulb type, let's gather the necessary tools and materials. Fortunately, this is a relatively simple job, and you likely already have most of what you need:
- Replacement Headlight Bulb(s): Of course! Consider replacing both bulbs at the same time, even if only one has burned out. This ensures consistent light output and avoids having to repeat the process soon after.
- Gloves: Wearing gloves (nitrile or latex) is essential to prevent oil from your skin from contaminating the bulb. Oil can create hot spots on the bulb, significantly reducing its lifespan. This is a crucial point! Think of it like fingerprints on a glass surface that's exposed to intense heat – the oil will burn and weaken the glass.
- Screwdriver (possibly): Depending on the Versa model year, you might need a screwdriver (usually a Phillips head) to remove a retaining clip or access panel.
- Pliers (optional): Pliers can be helpful for gripping and manipulating stubborn clips or connectors.
- Clean Rags: For wiping down any spills or cleaning the headlight assembly.
- Work Light (optional): If you're working in a dimly lit area, a work light will make the job much easier.
Step-by-Step Headlight Bulb Replacement
Okay, let's get down to business. Follow these steps to safely and effectively replace the headlight bulb on your Nissan Versa:
- Park the Vehicle and Turn Off the Ignition: Safety first! Park on a level surface, engage the parking brake, and turn off the engine. Allow the engine to cool down, especially if you've been driving recently.
- Open the Hood: Locate the hood release lever inside the cabin (usually near the steering wheel) and open the hood. Secure the hood prop rod to keep the hood open.
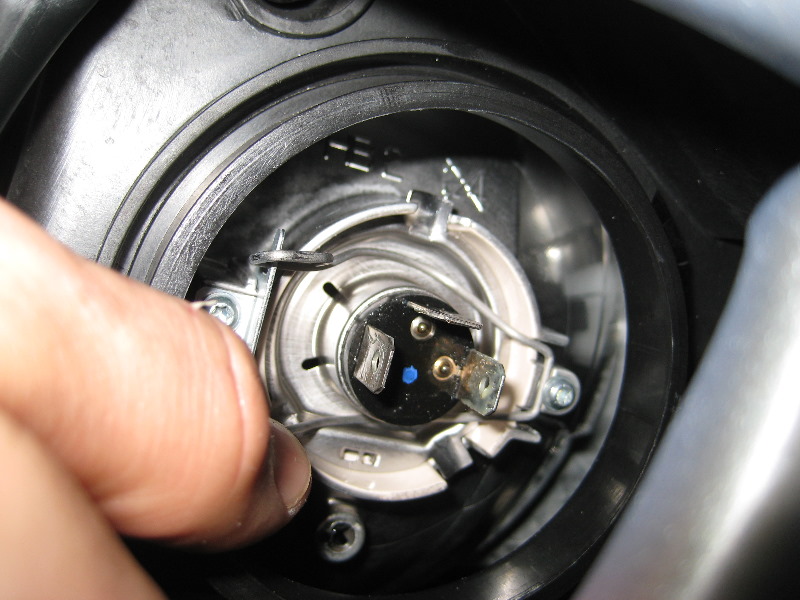
- Locate the Headlight Assembly: Identify the headlight assembly on the side of the car where the bulb needs to be replaced. You'll typically find a plastic cover or access panel behind the headlight assembly in the engine compartment.
- Disconnect the Electrical Connector: This is a crucial step. Disconnect the electrical connector from the back of the headlight bulb. The connector usually has a locking tab that you need to press or squeeze to release it. Gently wiggle the connector while pulling it straight back. Never yank on the wires! Think of it like unplugging a sensitive electronic device – you want to be careful and avoid damaging the connection.
- Remove the Old Bulb: Depending on the Versa model, the bulb might be held in place by a retaining clip, a locking ring, or a bayonet-style mount.
- Retaining Clip: If there's a retaining clip, carefully unclip it. These clips can be fiddly, so take your time and observe how it's attached before trying to remove it.
- Locking Ring: If there's a locking ring, rotate it counterclockwise to release the bulb.
- Bayonet Mount: For bayonet-style mounts, press the bulb inwards and twist it counterclockwise to release it.
Once the bulb is released, carefully pull it straight out of the headlight assembly. Avoid touching the glass portion of the bulb with your bare hands!
- Install the New Bulb: Align the new bulb with the opening in the headlight assembly and insert it. Ensure it's properly seated and oriented correctly. The bulb will usually have tabs or notches that align with corresponding slots in the assembly.
- Secure the Bulb: Re-engage the retaining clip, locking ring, or bayonet mount to secure the new bulb in place. Make sure it's firmly attached and won't move around.
- Reconnect the Electrical Connector: Reattach the electrical connector to the back of the bulb. You should hear a click or feel a snap as the connector locks into place. Give it a gentle tug to ensure it's securely connected.
- Test the Headlight: Turn on the headlights to verify that the new bulb is working correctly. Check both the low beam and high beam functions.
- Repeat for the Other Side (if necessary): If you're replacing both bulbs, repeat the process for the other headlight assembly.
- Close the Hood: Carefully lower the hood and ensure it latches securely.
Troubleshooting Common Issues
Sometimes, things don't go according to plan. Here are a few common issues you might encounter and how to address them:
- Bulb Doesn't Light Up: Double-check the electrical connector to ensure it's securely attached. Also, verify that the new bulb is the correct type and is not defective. You can test the bulb by connecting it to a 12V power source (be careful!). If the bulb still doesn't light up, there might be a problem with the wiring or a blown fuse. Check the fuse box (usually located under the dashboard or in the engine compartment) for a blown headlight fuse and replace it if necessary.
- Difficult to Remove the Electrical Connector: If the connector is stuck, try wiggling it gently while applying pressure to the locking tab. You can also use a small amount of silicone lubricant to help loosen it. Avoid using excessive force, as you could damage the connector.
- Retaining Clip is Difficult to Reattach: Take your time and carefully observe how the clip is designed to attach. Use pliers if necessary to help manipulate the clip into position. If the clip is damaged, you might need to purchase a replacement.
- Bulb Keeps Burning Out: Repeated bulb failures could indicate a problem with the vehicle's electrical system, such as voltage fluctuations. Have the charging system checked by a qualified mechanic. Also, make sure you're not touching the glass portion of the bulb during installation.
Safety Precautions
Always prioritize safety when working on your vehicle. Here are a few key safety precautions to keep in mind:
- Disconnect the Battery: While not always necessary for a simple bulb replacement, disconnecting the negative terminal of the battery can provide an extra layer of safety, especially if you're working on the electrical system.
- Wear Eye Protection: Safety glasses can protect your eyes from debris or accidental splashes.
- Work in a Well-Ventilated Area: If you're using any chemicals or solvents, work in a well-ventilated area to avoid inhaling fumes.
- Use Proper Lighting: Ensure you have adequate lighting to see what you're doing and avoid accidents.
- Consult the Owner's Manual: The owner's manual is your best resource for information specific to your vehicle.
Practical Takeaways
Here are some practical takeaways to help you confidently tackle your Nissan Versa headlight bulb replacement:
- Know Your Bulb Type: Always identify the correct bulb type for your specific Versa model year.
- Wear Gloves: Protect the new bulb from oil contamination.
- Be Gentle: Avoid using excessive force when removing connectors or clips.
- Test Before Closing Up: Verify that the new bulb is working correctly before reassembling everything.
- Consider Replacing Both: Replacing both bulbs at the same time ensures consistent light output and avoids future inconvenience.
By following these steps and taking the necessary precautions, you can successfully replace the headlight bulb on your Nissan Versa and save yourself a trip to the mechanic. Remember to consult your owner's manual for specific instructions and always prioritize safety!