Pickup Bed Bike Rack Homemade
The allure of throwing your bike in the truck bed and heading to the trailhead is undeniable. However, without proper securing, your prized possession is at risk of damage, or worse, ending up tumbling down the highway. While commercial bike racks offer a convenient solution, the DIY route can be significantly cheaper and allows for customization to perfectly fit your specific needs. This guide will delve into the technical aspects of designing and building a homemade pickup bed bike rack, focusing on principles of structural integrity, materials selection, and practical construction techniques.
Understanding the Requirements
Before diving into the build, it's crucial to analyze the forces and stresses the rack will endure. A bike rack, even a simple one, is a load-bearing structure. It must withstand:
- Static Load: The weight of the bicycle(s) while stationary. This includes accounting for different bike weights if you intend to carry multiple bikes.
- Dynamic Load: Forces generated during acceleration, braking, and cornering. These forces can be significantly higher than the static weight, potentially exceeding several G's (multiples of gravitational acceleration).
- Vibrational Load: Constant vibrations from road imperfections can cause fatigue in materials and loosen fasteners over time.
- Environmental Factors: Exposure to sun, rain, and temperature fluctuations can degrade certain materials, particularly wood and some plastics.
Understanding these loads is paramount for selecting appropriate materials and designing a robust structure.
Material Selection: Strength, Weight, and Cost
The choice of materials significantly impacts the rack's performance, longevity, and cost. Here's a breakdown of common options:
Wood: The Economical and Accessible Choice
Wood, particularly pressure-treated lumber, is readily available and relatively inexpensive. It's easy to work with using common tools, making it a popular choice for DIY projects. However, wood suffers from several drawbacks:
- Lower Strength-to-Weight Ratio: Wood is significantly heavier than steel or aluminum for the same level of strength.
- Susceptibility to Moisture: Even pressure-treated wood can warp, rot, or crack over time due to moisture exposure. Proper sealing and regular maintenance are crucial.
- Lower Fatigue Resistance: Repeated vibrations can weaken wood structures, leading to eventual failure.
When using wood, opt for hardwoods like oak or maple if durability is a priority. Ensure all joints are properly glued and screwed, and consider using metal reinforcement plates in high-stress areas.
Steel: The Strong and Durable Option
Steel offers excellent strength and durability, making it ideal for handling heavy loads and withstanding harsh conditions. However, it also presents challenges:
- Higher Weight: Steel is significantly heavier than aluminum, impacting fuel economy and ease of handling.
- Corrosion Susceptibility: Steel is prone to rust if not properly protected with paint or powder coating.
- Requires Welding: While bolting is possible, welding provides the strongest and most reliable joints for steel structures. This requires specialized equipment and skills.
If you have welding experience or access to a welding shop, steel is an excellent choice for a robust and long-lasting bike rack. Choose a suitable steel grade (e.g., mild steel) and ensure all welds are clean and strong. Pay close attention to corrosion protection.
Aluminum: The Lightweight and Corrosion-Resistant Option
Aluminum offers a good balance of strength, weight, and corrosion resistance. It's lighter than steel but still significantly stronger than wood. Other benefits include:
- Excellent Corrosion Resistance: Aluminum forms a natural oxide layer that protects it from rust.
- Good Strength-to-Weight Ratio: Aluminum is lighter than steel for comparable strength.
- Can be Welded or Bolted: Aluminum welding is more challenging than steel welding but can be done with proper equipment and techniques. Bolting is also a viable option.
The main disadvantage of aluminum is its higher cost compared to steel. Aluminum welding also requires specialized equipment (e.g., a TIG welder) and filler metals. Despite the added cost, the weight savings and corrosion resistance can make aluminum a worthwhile investment.
Design Considerations: Maximizing Stability and Security
The design of your bike rack should prioritize stability and security. Key considerations include:
Wheel Mounting vs. Frame Mounting
Bike racks typically secure bikes by either the wheels or the frame. Wheel mounting is generally simpler to implement, involving slots or supports that hold the wheels in place. Frame mounting, on the other hand, requires clamps or straps that attach to the bike's frame.
Wheel mounting is suitable for most bikes and is generally less likely to damage the frame. Frame mounting can be more secure, especially for heavier bikes, but it's crucial to ensure the clamps don't damage the paint or frame tubing. Bikes with carbon frames need to be handled with extra care because overtightening clamps can cause irreversible damage.
Anchor Points and Bed Attachment
The rack must be securely attached to the truck bed to prevent movement during transit. Common attachment methods include:
- Bolting to Existing Bed Rails: Many trucks have factory-installed bed rails that can be used as anchor points.
- Clamping to the Bed Sides: Clamps can be used to secure the rack to the bed sides, but it's important to use strong clamps that won't slip.
- Creating Custom Anchor Points: If necessary, you can create custom anchor points by drilling holes in the bed (if acceptable) and using bolts and backing plates.
Regardless of the method, ensure the attachment points are strong enough to withstand the dynamic loads generated during driving.
Bike Spacing and Orientation
When designing a rack for multiple bikes, consider the spacing between bikes to prevent them from rubbing against each other. Staggering the bikes or orienting them in opposite directions can help maximize space. Also consider the orientation of the bikes. Facing the bikes forward is easier for access. Alternating direction is useful for saving space.
Anti-Theft Measures
Consider incorporating anti-theft features into your design, such as lockable clamps or cable loops that can be used to secure the bikes to the rack. No anti-theft solution is foolproof, but even a simple deterrent can discourage opportunistic theft.
Construction Techniques: Ensuring Structural Integrity
The construction process is just as important as the design. Follow these guidelines to ensure your rack is strong and reliable:
Accurate Measurements and Cutting
Precise measurements and accurate cuts are essential for a well-fitting and structurally sound rack. Use a tape measure, square, and level to ensure all components are aligned properly. Use power tools, such as circular saws and miter saws, to make accurate cuts, or alternatively, ask your lumber or steel yard to do the job.
Strong Joints and Fasteners
The strength of the joints is critical for the overall integrity of the rack. Use appropriate fasteners (e.g., bolts, screws, or welds) for the materials you're working with. When bolting or screwing, use washers to distribute the load and prevent the fasteners from pulling through the material. When welding, ensure the welds are clean, strong, and properly penetrated. Consider using nuts with nylon inserts so they do not loosen.
Reinforcement in High-Stress Areas
Reinforce areas that are subject to high stress, such as the attachment points and the joints between the vertical supports and the base. Use metal plates, gussets, or additional bracing to strengthen these areas.
Surface Protection
Protect the rack from the elements by applying a suitable finish. For wood, use a sealant or paint. For steel, use a primer and paint or powder coating. For aluminum, consider anodizing or powder coating.
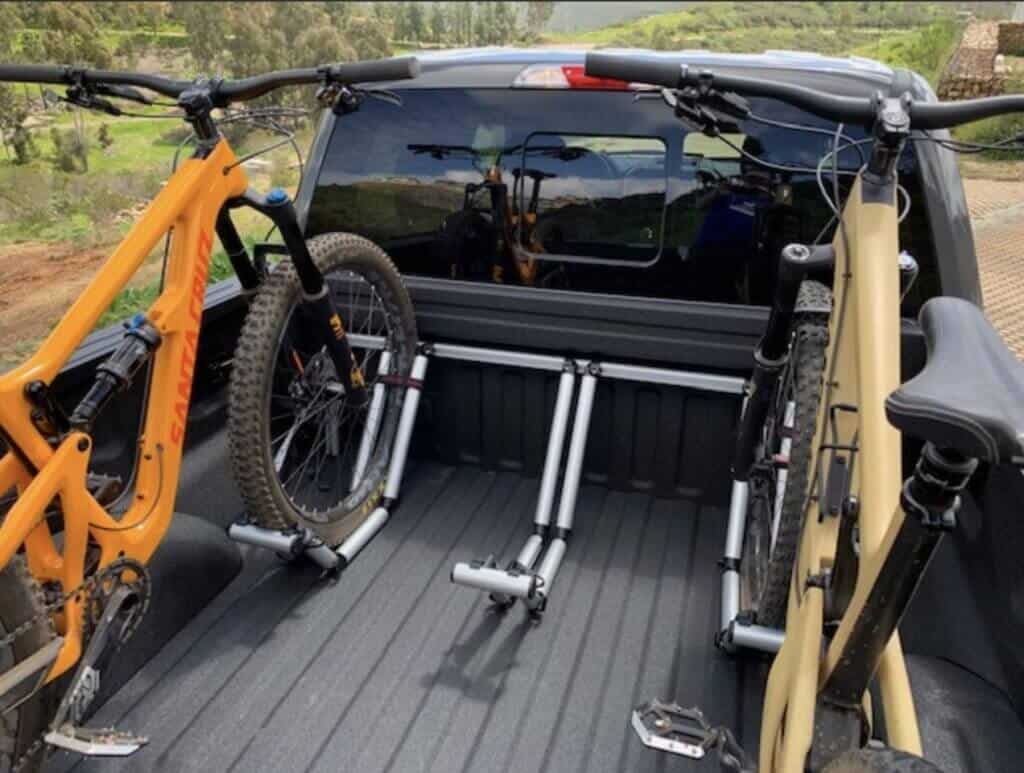
A Simple DIY Fork Mount Rack: A Practical Example
One of the simplest and most effective designs involves securing the bikes by their front forks. This requires removing the front wheel and attaching the fork to a mounting block that is bolted to the rack. The rear wheel is then secured with a strap or bungee cord.
Materials:
- Pressure-treated lumber (2x4 or 4x4 for the base, 2x4 for the uprights)
- Fork mounting blocks (available online or at bike shops)
- Bolts, screws, washers
- Straps or bungee cords
Construction Steps:
- Cut the lumber to the desired lengths to create the base and uprights. The base should be long enough to accommodate the number of bikes you want to carry.
- Attach the uprights to the base using screws and glue. Reinforce the joints with metal plates if desired.
- Mount the fork mounting blocks to the uprights at the appropriate height.
- Secure the rack to the truck bed using bolts, clamps, or straps.
- Use straps or bungee cords to secure the rear wheels of the bikes.
This simple design provides a secure and stable platform for transporting bikes. It can be easily customized to fit different truck beds and bike sizes.
Conclusion
Building a homemade pickup bed bike rack is a rewarding project that can save you money and allow you to create a customized solution that perfectly meets your needs. By understanding the principles of structural integrity, materials selection, and construction techniques, you can build a rack that is strong, reliable, and safe. Remember to prioritize safety and always double-check your work before hitting the road.