Plastic Bumper Scrape Repair
Plastic bumpers. They're ubiquitous, lightweight, and designed to absorb impacts. But they're also prone to scrapes, scratches, and even cracks, especially in the daily grind of parking lots, narrow streets, and the occasional unexpected encounter with a rogue shopping cart. Whether you're a DIY enthusiast or a seasoned mechanic, understanding how to effectively repair plastic bumper scrapes is a valuable skill.
Understanding the Problem: Symptoms, Causes, and Assessment
Before diving into repairs, accurately diagnosing the damage is crucial. Different types of damage require different approaches.
Common Symptoms:
- Minor Scratches and Scuffs: These are superficial damages that only affect the top layer of the plastic or paint. They often appear as light, hazy marks.
- Deeper Scratches: These penetrate the paint layer and may expose the underlying plastic. You can often feel these with your fingernail.
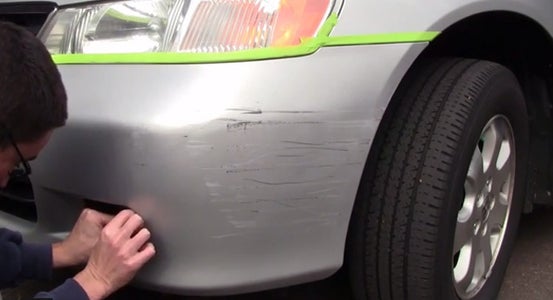
- Gouges and Scrapes: These are more significant, removing material from the bumper and leaving a noticeable indentation.
- Cracks: These are structural damages that compromise the integrity of the bumper. They can range from hairline fractures to large, gaping splits.
- Dents: While plastic can flex, impacts can sometimes leave dents in the bumper.
- Paint Transfer: This occurs when your bumper rubs against another object, leaving behind paint from that object.
Common Causes:
- Parking Lot Mishaps: Low-speed collisions with parking bollards, shopping carts, or other vehicles. Think backing up too close to a concrete pillar in your Honda Civic.
- Road Debris: Rocks, gravel, and other road debris can chip and scratch the bumper, especially at highway speeds.
- Curbs: Misjudging distances when parking can lead to scraping the bumper against the curb. This is a common issue with lower-riding vehicles like certain Mazda models.
- Weathering: Prolonged exposure to sunlight and harsh weather can weaken the plastic and make it more susceptible to damage.
- Accidents: More serious accidents can cause significant damage, including cracks and dents.
Assessing the Damage: A Critical First Step
A thorough assessment is vital. Ask yourself these questions:
- How deep are the scratches? Can you feel them with your fingernail?
- Is the plastic cracked? If so, how extensive is the cracking?
- Is the bumper deformed (dented)?
- Is the paint damaged? Is it just a surface scratch, or has the paint chipped away?
- Is the bumper detached or misaligned?
For example, a small scratch on a Toyota Camry's bumper might only require a touch-up paint pen. However, a cracked bumper on a Ford F-150 might necessitate a more involved repair or even a replacement.
Repair Techniques: From Simple to Complex
The appropriate repair technique depends on the severity of the damage.
1. Minor Scratches and Scuffs: The Touch-Up Approach
Problem: Superficial scratches that haven't penetrated the paint.
Solution:
- Cleaning: Thoroughly clean the area with soap and water, then degrease it with wax and grease remover.
- Polishing: Use a rubbing compound and a polishing pad to buff out the scratches. Work in small sections and apply moderate pressure.
- Polishing (Refining): Follow up with a polishing compound to refine the finish and remove any swirl marks left by the rubbing compound.
- Waxing: Apply a coat of wax to protect the repaired area and restore the shine.
Real-World Example: This method works well for removing minor scuffs from brushing against bushes or light scrapes from parking incidents. On a dark-colored Subaru, these scratches can be quite noticeable, but a good polishing compound can often make them disappear.
2. Deeper Scratches: Filling and Painting
Problem: Scratches that have penetrated the paint and exposed the plastic.
Solution:
- Cleaning and Sanding: Clean the area and sand around the scratch with fine-grit sandpaper (e.g., 320 grit) to create a smooth surface and provide adhesion. Feather the edges of the scratch.
- Filler Application: Apply a thin layer of plastic filler (body filler designed for plastic) to fill the scratch. Avoid applying too much filler.
- Sanding (Filler): Once the filler is dry, sand it down with progressively finer grits of sandpaper (e.g., 320, 400, 600 grit) until it is flush with the surrounding surface.
- Priming: Apply a thin coat of automotive primer to the repaired area. This will provide a smooth surface for the paint to adhere to.
- Sanding (Primer): Lightly sand the primer with fine-grit sandpaper (e.g., 600 grit) to remove any imperfections.
- Painting: Apply several thin coats of automotive paint that matches your car's color code. Allow each coat to dry completely before applying the next.
- Clear Coat: Apply several thin coats of clear coat to protect the paint and provide a glossy finish.
- Polishing: Once the clear coat is dry, you may need to polish it to remove any imperfections or orange peel.
Real-World Example: If someone keys your BMW, this is the process you'd need to follow. Matching the paint color is critical, so use your car's paint code (usually found on a sticker in the doorjamb or under the hood).
3. Gouges and Scrapes: More Extensive Filler Work
Problem: Significant damage with material removed from the bumper.
Solution: This is similar to the deeper scratch repair, but requires more filler and careful shaping. You might need to use multiple layers of filler to build up the damaged area. Shaping the filler to match the original contour of the bumper is crucial. Sanding will also take longer and require more skill.
Real-World Example: Suppose you backed into a post with your truck. This type of damage will often require using a plastic spreader to apply the filler smoothly and evenly.
4. Cracks: Welding or Reinforcement
Problem: Structural damage that compromises the bumper's integrity.
Solution: Cracks require more specialized techniques.
- Plastic Welding: Using a plastic welder to melt and fuse the plastic back together. This requires practice and specialized equipment.
- Reinforcement Mesh: Embedding a reinforcing mesh (metal or plastic) into the filler to add strength to the repaired area. This is especially useful for larger cracks.
- Adhesive Bonding: Using a specialized plastic adhesive to bond the cracked pieces together. This is often used in conjunction with reinforcement.
Real-World Example: A crack in the bumper of a minivan after a minor fender-bender might be repaired using plastic welding followed by reinforcement with mesh. This ensures the repair is strong and durable.
5. Dents: Heat and Manipulation
Problem: The plastic has been deformed.
Solution:
- Heat Application: Gently heating the plastic with a heat gun (being careful not to overheat and melt it) can make it more pliable.
- Pushing/Pulling: Using tools to push or pull the dent back into its original shape.
- Cooling: Quickly cooling the plastic after reshaping it will help it retain its new form.
Real-World Example: A minor dent caused by a shopping cart can often be removed using heat and gentle manipulation, especially on bumpers made of flexible plastic. On a Jeep Wrangler, for instance, this might be preferable to replacing the entire bumper.
Troubleshooting and Real-World Issues
Even with careful planning, problems can arise.
- Paint Matching: Getting an exact paint match can be challenging. Use your car's paint code and consider having a professional mix the paint for you. Even then, slight variations can occur due to fading and aging. Blending the paint into the surrounding area can help minimize the visibility of the repair.
- Filler Cracking: This can happen if the filler is applied too thickly, not properly mixed, or the surface is not adequately prepared. Remove the cracked filler and start over, paying close attention to the manufacturer's instructions.
- Paint Peeling: This is usually caused by poor surface preparation or applying paint over an incompatible primer. Ensure the surface is clean, sanded, and properly primed before painting.
- Uneven Finish: This can result from improper sanding or uneven application of paint or clear coat. Sand the area and reapply the paint or clear coat, taking care to apply it evenly.
Example: You might find that the touch-up paint pen you bought for your Nissan Altima, even with the correct paint code, is slightly off. This is where blending becomes important.
Maintenance and Prevention: Keeping Your Bumper in Top Condition
Preventing damage is always better than repairing it.
- Careful Parking: Take your time when parking and be mindful of your surroundings. Use parking sensors or cameras if your car is equipped with them.
- Protective Films: Consider applying a clear bra or paint protection film to the bumper. This will help protect it from scratches and chips.
- Regular Cleaning: Regularly wash and wax your car to protect the paint and prevent damage from UV rays and road debris.
- Prompt Repairs: Address minor scratches and scuffs promptly to prevent them from worsening.
Conclusion: A Proactive Approach
Repairing plastic bumper scrapes is a manageable task for both car owners and mechanics. By understanding the types of damage, employing the appropriate repair techniques, and addressing potential issues, you can keep your car looking its best. Remember that patience and attention to detail are key to achieving professional-looking results. Furthermore, taking proactive steps to prevent damage in the first place will save you time, money, and hassle in the long run. From your daily driver like a Honda CRV to a sports car, maintaining your bumper is an integral part of vehicle ownership.