Plastic Bumper Scuff Repair
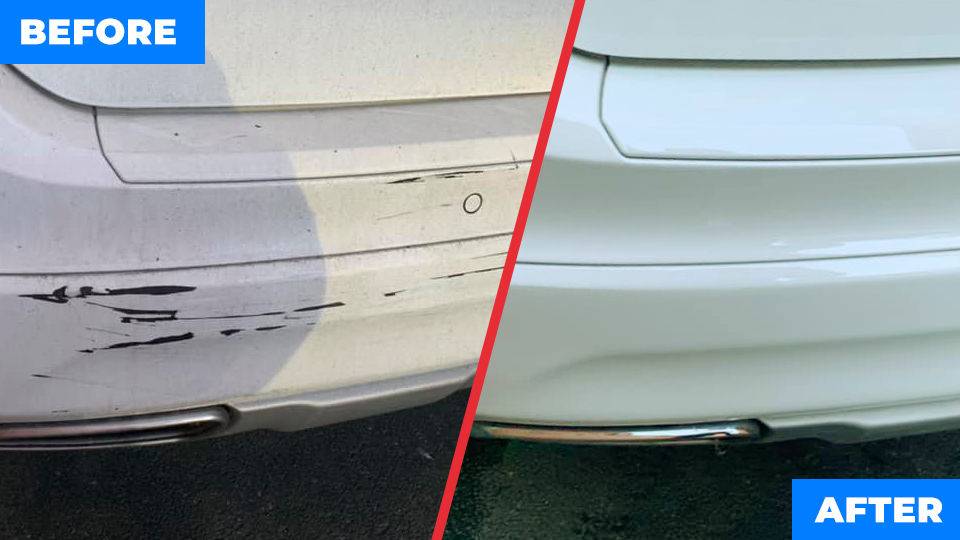
Plastic bumpers, while designed to absorb impacts and protect your car's vital components, are notoriously susceptible to scuffs, scratches, and minor damage. These blemishes, often the result of parking mishaps, road debris, or even just brushing against obstacles, can detract from your car's appearance and potentially reduce its resale value. This article provides a practical guide for both car owners and mechanics on how to tackle plastic bumper scuff repair, covering maintenance, troubleshooting, and real-world issues.
Understanding the Problem: Symptoms, Causes, and Effects
Before diving into repair techniques, it's crucial to understand the nature of the damage. Here's a breakdown:
Common Symptoms
- Surface Scratches: These are shallow marks that only affect the top layer of the bumper's plastic or paint. They often appear as hazy or dull areas. Example: Minor scratches on a Toyota Camry bumper from parking too close to a bush.
- Deep Scratches: These penetrate through the paint and into the plastic itself. You might see the color of the plastic underneath the paint. Example: A deep scratch on a Honda Civic bumper caused by a shopping cart.
- Gouges: These are more substantial than deep scratches, removing a significant amount of plastic. They often have rough edges. Example: A gouge on a Ford F-150 bumper from a truck bed loading incident.
- Paint Transfer: Sometimes, a scuff might simply be paint from another vehicle transferred onto your bumper. Example: A white scuff on a black BMW 3 Series bumper after a minor parking lot tap.
- Cracks: In more severe cases, impacts can cause cracks in the plastic bumper. These require more extensive repair. Example: A crack on a Jeep Grand Cherokee bumper after hitting a low wall.
Common Causes
- Parking Mishaps: Bumping into poles, walls, or other vehicles while parking is a major culprit.
- Road Debris: Rocks, gravel, and other debris kicked up by tires can cause scratches and chips.
- Shopping Carts: Uncontrolled shopping carts are notorious for causing damage in parking lots.
- Low-Speed Collisions: Even minor fender-benders can result in bumper scuffs and scratches.
- Weathering: Over time, exposure to sunlight and the elements can degrade the bumper's paint and make it more susceptible to damage.
Effects of Neglecting Scuffs
Ignoring bumper scuffs can lead to several issues:
- Aesthetic Concerns: Scuffs detract from the car's overall appearance, making it look older and less well-maintained.
- Reduced Resale Value: Potential buyers often scrutinize cosmetic damage, which can lower the car's perceived value.
- Corrosion (in some cases): If the scratch penetrates the paint and exposes the underlying metal (though less common with plastic bumpers), it can lead to rust. This is more relevant if the bumper has metal components or supports.
- Further Damage: Neglecting minor damage can allow it to worsen over time, potentially leading to more costly repairs down the line.
Repair Techniques: A Step-by-Step Guide
The best repair technique depends on the severity of the damage. Here's a breakdown of methods, from simple to more complex:
1. Cleaning and Inspection
Problem: Difficulty assessing the damage due to dirt and grime.
Solution: Thoroughly clean the affected area with soap and water. Use a soft cloth or sponge to avoid further scratching. After cleaning, dry the area completely and inspect the damage closely under good lighting. This will help you determine the extent of the repair needed.
Tool/Material: Soap, water, soft cloth, good lighting.
2. Removing Paint Transfer
Problem: Another vehicle's paint is transferred onto your bumper.
Solution: Try using a dedicated paint cleaner or a mild rubbing compound. Apply the cleaner to a soft cloth and gently rub the affected area. Be careful not to apply too much pressure, as this could damage the underlying paint. For stubborn paint transfer, you might need to use a clay bar. Clay bars are designed to remove contaminants from the paint surface without scratching it.
Tool/Material: Paint cleaner, rubbing compound, soft cloth, clay bar (optional).
Example: Removing white paint from a red Mazda 3 bumper.
3. Repairing Minor Surface Scratches
Problem: Light scratches that haven't penetrated the paint.
Solution: A rubbing compound can often remove these scratches. Apply a small amount of rubbing compound to a polishing pad and gently rub the affected area in a circular motion. Use a dual-action polisher for best results. After using the rubbing compound, follow up with a polishing compound to restore the paint's shine. Finally, apply a wax or sealant to protect the repaired area.
Tool/Material: Rubbing compound, polishing compound, polishing pad, dual-action polisher (optional), wax/sealant, microfiber cloths.
Example: Removing fine scratches from a Tesla Model S bumper.
4. Repairing Deep Scratches and Gouges
Problem: Scratches that have penetrated the paint or removed plastic.
Solution: This requires a more involved process:
- Sanding: Use sandpaper (starting with a coarser grit, like 320, and moving to finer grits, like 600 and 800) to smooth out the edges of the scratch or gouge. Be careful not to sand too much, as this could damage the surrounding paint.
- Filler (if necessary): For deep gouges, you might need to use a plastic filler to fill in the missing material. Apply the filler according to the manufacturer's instructions and allow it to dry completely.
- Sanding (again): Once the filler is dry, sand it smooth with fine-grit sandpaper (800-1000 grit).
- Primer: Apply a primer to the repaired area to create a smooth surface for the paint to adhere to.
- Painting: Apply several thin coats of automotive paint that matches your car's color code. Allow each coat to dry completely before applying the next.
- Clear Coat: Apply a clear coat to protect the paint and give it a glossy finish.
- Polishing: Once the clear coat is dry, polish the area to blend it seamlessly with the surrounding paint.
Tool/Material: Sandpaper (various grits), plastic filler (if necessary), primer, automotive paint (matching color code), clear coat, polishing compound, polishing pad, dual-action polisher (optional), tack cloth.
Example: Repairing a deep scratch on a Chevrolet Silverado bumper.
5. Addressing Cracks
Problem: Cracks in the plastic bumper.
Solution: Cracks often require professional repair, especially if they are large or located in a critical area. However, small cracks can sometimes be repaired using a plastic welding kit. This involves using heat to melt the plastic and fuse the crack back together. After welding, you'll need to sand, fill (if necessary), prime, and paint the area as described above.
Tool/Material: Plastic welding kit, sandpaper (various grits), plastic filler (if necessary), primer, automotive paint (matching color code), clear coat, polishing compound, polishing pad, dual-action polisher (optional).
Important: Plastic welding requires skill and experience. If you're not comfortable with this technique, it's best to take your car to a professional body shop.
Example: Repairing a small crack on a Hyundai Elantra bumper.
Real-World Issues and Troubleshooting
Here are some common challenges you might encounter during bumper scuff repair:
Matching the Paint Color
Problem: Difficulty finding the correct paint color for your car.
Solution: Locate your car's paint code. This is usually found on a sticker located in the door jamb, glove compartment, or under the hood. Provide the paint code to an automotive paint supplier, and they can mix a custom batch of paint that matches your car's color perfectly. You can also purchase pre-mixed touch-up paint, but these may not always be an exact match.
Example: A Volkswagen Jetta owner struggling to match the factory paint color.
Orange Peel Texture
Problem: The paint has an uneven, textured surface after spraying (orange peel).
Solution: This is often caused by improper spraying technique, using the wrong thinner, or applying the paint in too thick of a coat. Wet sanding with fine-grit sandpaper (2000 grit or higher) can help smooth out the orange peel. Follow up with polishing to restore the paint's shine.
Paint Runs
Problem: The paint runs or drips during application.
Solution: This is usually caused by applying the paint too thickly or holding the spray gun too close to the surface. Allow the paint to dry completely, then sand down the runs with fine-grit sandpaper. Re-apply the paint in thin, even coats.
Filler Cracking
Problem: The plastic filler cracks after it dries.
Solution: This can be caused by using the wrong type of filler, applying it too thickly, or not properly preparing the surface. Remove the cracked filler and start over, using a high-quality plastic filler specifically designed for automotive repairs. Ensure the surface is clean and properly sanded before applying the filler.
Maintenance Tips for Keeping Your Bumper in Top Condition
Prevention is always better than cure. Here are some tips to minimize bumper damage:
- Park Carefully: Be mindful of your surroundings when parking and avoid getting too close to obstacles.
- Use Bumper Protectors: Consider installing bumper protectors to shield your bumper from minor impacts.
- Maintain a Safe Following Distance: This will help prevent damage from road debris.
- Regular Washing and Waxing: Washing your car regularly removes dirt and grime that can scratch the paint. Waxing provides a protective layer that helps prevent damage from the elements.
- Touch-Up Paint: Keep a bottle of touch-up paint handy to quickly repair minor scratches and chips.
By understanding the causes of bumper scuffs, knowing how to repair them, and following preventative maintenance tips, you can keep your car looking its best and protect its value. Remember that for extensive damage or complex repairs, seeking professional assistance from a qualified body shop is always the best course of action.
Disclaimer: This article provides general information and should not be considered a substitute for professional advice. Always follow safety precautions and manufacturer's instructions when performing automotive repairs.