Radiator Leaking From The Top
A leaking radiator is never a welcome sight, and when the leak originates from the top, it can point to a specific set of problems. While a puddle under your car is a universal sign of coolant loss, a leak from the radiator's upper reaches often requires a more nuanced understanding. This article will delve into the common causes of radiator leaks at the top, the underlying principles at play, and potential troubleshooting steps.
Understanding Radiator Construction and Function
Before diving into specific leak causes, let's establish a baseline understanding of radiator construction. Modern radiators are typically constructed with two tanks (top and bottom) connected by a core. The core consists of numerous small tubes with fins attached. These fins dramatically increase the surface area, enabling efficient heat dissipation. Coolant flows from the engine into the top tank, then down through the core, where air passing over the fins removes heat. The cooled coolant then exits the bottom tank and returns to the engine.
The tanks themselves are typically made of plastic or aluminum. Plastic tanks are often crimped onto the core with a rubber gasket sealing the joint. Aluminum tanks may be welded directly to the core or attached using similar crimping methods. It's the interface between the tank and the core where many leaks originate, especially at the top.
The radiator's primary function is to maintain optimal engine temperature. The cooling system circulates coolant throughout the engine block, absorbing heat generated by combustion. This hot coolant is then pumped to the radiator, where the heat is released into the atmosphere. Without a properly functioning radiator, the engine would quickly overheat, leading to severe damage.
Common Causes of Leaks at the Top of the Radiator
A leak at the top of the radiator can stem from several factors, each with its own underlying mechanism:
1. Over-Pressurization
The cooling system operates under pressure, typically around 15-20 PSI. This pressure raises the boiling point of the coolant, allowing it to absorb more heat without vaporizing. However, excessive pressure can stress the radiator's components, especially the top tank. Several factors can contribute to over-pressurization:
a) Faulty Radiator Cap: The radiator cap is more than just a lid; it's a pressure-relief valve. It's designed to release excess pressure if it exceeds the specified limit. A malfunctioning cap that doesn't release pressure when it should can lead to a buildup of pressure within the system, potentially causing the top tank to crack or the crimped joint to fail. This is often the first thing to check when dealing with a suspected over-pressurization issue.
b) Head Gasket Failure: A blown head gasket can allow combustion gases to enter the cooling system. These gases displace coolant and rapidly increase pressure, overwhelming the radiator's ability to cope. The pressure spike often manifests as a leak near the top of the radiator or a bulging top tank.
c) Clogged Radiator Core: Restrictions within the radiator core can impede coolant flow, increasing pressure in the upper regions of the system. This is more likely to cause a general overheating issue as well, but the increased pressure can contribute to a leak at the top tank.
2. Material Degradation
Over time, the materials that comprise the radiator can degrade, especially plastic components. Exposure to heat, pressure, and harsh chemicals in the coolant can weaken the plastic, making it brittle and prone to cracking. This is particularly common in older vehicles.
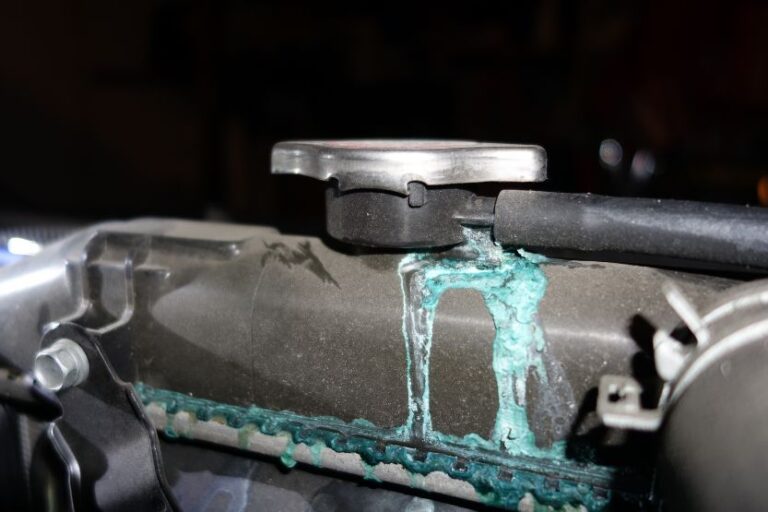
a) Plastic Tank Cracking: The top tank, being constantly exposed to hot coolant and fluctuating pressure, is a common site for cracks to develop. These cracks can be microscopic at first but gradually expand, leading to a noticeable leak.
b) Gasket Deterioration: The rubber gasket that seals the plastic tank to the core can also deteriorate over time, losing its elasticity and creating a path for coolant to escape. This is especially likely if the cooling system hasn't been properly maintained and the coolant has become acidic.
3. Corrosion
Corrosion can weaken the radiator from the inside out. This is often caused by using the wrong type of coolant or neglecting to change the coolant at the recommended intervals. Corrosion can eat away at the metal of the core and the plastic of the tanks, making them more susceptible to leaks.
a) Electrolysis: Stray electrical currents in the cooling system can accelerate corrosion through a process called electrolysis. This is more common in vehicles with grounding issues. The coolant acts as an electrolyte, facilitating the flow of electrons and causing rapid deterioration of metal components.
b) Acidic Coolant: Over time, coolant can become acidic due to the breakdown of its corrosion inhibitors. This acidic coolant can then attack the metal and plastic components of the radiator, weakening them and making them more prone to leaks.
4. Mechanical Damage
While less common for leaks specifically at the top, physical damage to the radiator can also lead to leaks. This can be caused by road debris, accidents, or even improper handling during maintenance.
a) Impact Damage: A direct impact to the radiator, even a minor one, can crack the plastic tank or damage the core, leading to a leak. The top of the radiator is often more exposed to such impacts than the bottom.
b) Stress from Mounting Points: If the radiator is not properly mounted, it can be subjected to excessive stress, especially during vehicle movement. This stress can cause the plastic tank to crack near the mounting points, resulting in a leak.
Troubleshooting and Diagnosis
Diagnosing a radiator leak at the top requires a systematic approach. Here's a step-by-step guide:
- Visual Inspection: Carefully inspect the top of the radiator for any visible cracks, leaks, or bulges. Pay close attention to the area where the plastic tank is crimped to the core. Also, check the radiator cap for any signs of damage or corrosion.
- Pressure Test: A pressure test can help identify leaks that are not immediately apparent. A cooling system pressure tester is attached in place of the radiator cap, and the system is pressurized to the specified level. Watch for any pressure drop, which indicates a leak.
- Coolant Inspection: Examine the coolant for signs of contamination, such as oil or rust. Oil in the coolant can indicate a head gasket failure, while rust indicates corrosion.
- Combustion Gas Test: If a head gasket failure is suspected, a combustion gas test can confirm the presence of exhaust gases in the cooling system. This test involves using a special fluid that changes color in the presence of combustion gases.
- Electrical System Check: Check for any stray electrical currents in the cooling system using a multimeter. If present, trace the source of the current and correct the grounding issue.
Repair Options
The repair options for a radiator leak at the top depend on the severity and cause of the leak:
- Radiator Cap Replacement: If the leak is caused by a faulty radiator cap, replacing the cap is a simple and inexpensive fix.
- Radiator Repair: Minor leaks in the core can sometimes be repaired using a radiator sealant. However, these sealants are often a temporary fix and can potentially clog the radiator core.
- Radiator Replacement: If the leak is caused by a cracked plastic tank or extensive corrosion, the best option is usually to replace the entire radiator.
- Head Gasket Repair: If the leak is caused by a head gasket failure, the head gasket must be replaced. This is a more complex repair that may require removing the cylinder head.
Preventative Maintenance: Regular maintenance is key to preventing radiator leaks. This includes:
- Flushing the cooling system at the recommended intervals.
- Using the correct type of coolant.
- Inspecting the radiator cap and hoses regularly.
- Addressing any overheating issues promptly.
By understanding the causes of radiator leaks at the top and following a systematic troubleshooting approach, you can effectively diagnose and repair these problems, ensuring the longevity and performance of your vehicle's cooling system.