Repair Scrape On Plastic Bumper
So, you’ve got a scrape on your plastic bumper. It happens to the best of us. Whether it was a close encounter with a parking bollard, a rogue shopping cart, or an unfortunate brush with a mailbox, that blemish on your bumper is staring back at you, mocking your otherwise pristine ride. Don't despair! While a severely damaged bumper might require professional attention or even replacement, many minor scrapes can be repaired at home with the right tools, materials, and a little patience. This article will guide you through the process of repairing a scrape on a plastic bumper, offering practical advice and insights suitable for car enthusiasts of all skill levels.
Understanding Plastic Bumper Construction
Before diving into the repair process, it's crucial to understand what you're actually working with. Modern car bumpers are typically made from various types of plastic, most commonly polypropylene (PP), thermoplastic olefin (TPO), or acrylonitrile butadiene styrene (ABS). These materials are chosen for their impact resistance, flexibility, and relatively low cost. Think of a late model Honda Civic, for instance; its bumper is likely made of TPO due to its excellent paint adhesion properties. On the other hand, older models or trucks like a Ford F-150 might utilize PP for its durability and cost-effectiveness.
The manufacturing process usually involves injection molding, where molten plastic is injected into a mold, creating the desired bumper shape. This molded part often has a textured surface to help paint adhere and to hide minor imperfections. Scrapes, however, can damage this texture and expose the underlying plastic, requiring repair to restore the original appearance.
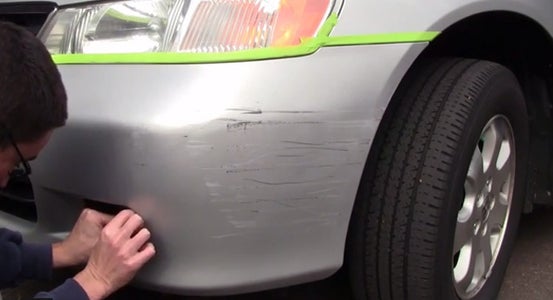
Identifying the Damage
The first step is to assess the extent of the damage. Is it a minor scratch that only affects the paint? Or is it a deeper gouge that has penetrated the plastic? Run your fingernail across the scrape. If your nail catches, it indicates a deeper gouge that requires more extensive repair. Also, check for any cracks or fractures in the surrounding plastic. These are signs of a more significant impact and might necessitate professional repair or bumper replacement.
For example, a light scratch on the bumper of a Toyota Camry might only require a touch-up paint application, while a deep gouge on a Subaru Outback's bumper, caused by an off-road adventure, might need plastic welding and refinishing.
The Repair Process: Step-by-Step
Here's a general step-by-step guide to repairing a scrape on a plastic bumper. Remember to always wear appropriate safety gear, including gloves and eye protection.
1. Cleaning and Preparation
Thoroughly clean the area around the scrape with soap and water to remove any dirt, grime, or wax. After washing, degrease the area with a wax and grease remover. This ensures that the repair materials will properly adhere to the plastic. This step is crucial for a long-lasting repair.
2. Sanding
Use sandpaper to feather the edges of the scrape and create a smooth transition between the damaged and undamaged areas. Start with a coarser grit (e.g., 180-grit) to remove any loose plastic or rough edges, and then gradually move to finer grits (e.g., 320-grit, 400-grit) to smooth the surface. Wet sanding is recommended to minimize dust and create a smoother finish. Be careful not to sand too aggressively, as you could further damage the surrounding plastic.
Imagine you’re working on the textured bumper of a Jeep Wrangler. Preserving the original texture is key to a seamless repair. Use a sanding block to maintain an even pressure and avoid creating flat spots.
3. Filling (If Necessary)
If the scrape is deep, you'll need to fill it with a plastic filler or body filler specifically designed for automotive use. These fillers are typically two-part epoxies that harden to a durable, sandable material. Follow the manufacturer's instructions carefully for mixing and application. Apply the filler in thin layers, allowing each layer to dry completely before applying the next. Overfill the area slightly, as you'll be sanding it down later.
Consider using a flexible filler for bumpers made of TPO or PP, as these plastics tend to flex more than ABS. This will help prevent the filler from cracking over time. A product like 3M Bumper Repair Material is a good example.
4. Sanding the Filler
Once the filler is completely dry, sand it down to match the contour of the surrounding bumper. Start with a medium-grit sandpaper (e.g., 320-grit) and gradually move to finer grits (e.g., 400-grit, 600-grit) to achieve a smooth, seamless finish. Use a sanding block to ensure even pressure and avoid creating dips or bumps. Again, wet sanding will help minimize dust and create a smoother finish.
5. Priming
Apply several thin coats of automotive primer to the repaired area. Primer provides a uniform surface for the paint to adhere to and helps to hide any remaining imperfections. Allow each coat of primer to dry completely before applying the next. Sand the primer lightly with fine-grit sandpaper (e.g., 600-grit) to create a smooth surface for painting.
6. Painting
The most challenging part is matching the paint color to the rest of the bumper. The best way to ensure a perfect match is to use automotive paint that is specifically formulated for your car's make, model, and year. You can find this information on a sticker located on the driver's side door jamb or in the owner's manual. Auto parts stores can often mix paint to match your car's color code.
Apply several thin coats of paint to the primed area, allowing each coat to dry completely before applying the next. Use a spray gun or aerosol can to achieve a smooth, even finish. Avoid applying too much paint in one coat, as this can lead to runs or drips.
For example, if you’re repairing a scrape on a Mazda Miata’s Soul Red Crystal Metallic paint, proper application technique is critical. This color is notorious for being difficult to match and requires precise layering.
7. Clear Coat (If Applicable)
Many modern car paints use a clear coat to protect the color coat and provide a glossy finish. If your car's paint has a clear coat, apply several thin coats of clear coat to the painted area, allowing each coat to dry completely before applying the next. Sand the clear coat lightly with very fine-grit sandpaper (e.g., 2000-grit) and then polish it with a polishing compound to achieve a smooth, glossy finish.
8. Polishing and Waxing
Once the paint and clear coat (if applicable) are completely dry, polish the repaired area with a polishing compound to remove any minor imperfections and blend the repaired area with the surrounding paint. Finally, apply a coat of wax to protect the paint and enhance its shine. This last step helps blend the repair seamlessly with the rest of the bumper.
Tools and Materials
Here's a list of tools and materials you'll likely need:
* Soap and water * Wax and grease remover * Sandpaper (various grits: 180, 320, 400, 600, 2000) * Sanding block * Plastic filler or body filler * Putty knife or applicator * Automotive primer * Automotive paint (matched to your car's color code) * Clear coat (if applicable) * Spray gun or aerosol can * Polishing compound * Wax * Microfiber cloths * Gloves * Eye protectionAdvanced Techniques: Plastic Welding
For more significant damage, such as cracks or splits in the bumper, plastic welding can be a viable repair option. This involves using a specialized tool to melt and fuse the plastic back together. It's a more advanced technique that requires practice and skill, but it can save you the cost of replacing the entire bumper.
Imagine a cracked bumper on a classic BMW E30. Finding a replacement bumper in good condition can be difficult and expensive. Plastic welding, done correctly, can restore the original bumper and preserve the car's authenticity.
Practical Takeaways
* Assess the damage carefully: Determine the extent of the scrape before starting the repair. * Preparation is key: Thoroughly clean and prepare the area to ensure proper adhesion of repair materials. * Use the right materials: Choose fillers and paints specifically designed for automotive use and compatible with the type of plastic your bumper is made of. * Apply thin coats: Avoid applying too much filler, primer, or paint in one coat, as this can lead to problems like runs or drips. * Take your time: Rushing the repair process can lead to subpar results. Be patient and allow each layer of material to dry completely before proceeding to the next step. * Practice makes perfect: If you're new to auto body repair, consider practicing on a scrap piece of plastic before tackling your car's bumper. * Know your limits: If the damage is severe or you're not comfortable performing the repair yourself, don't hesitate to seek professional help. A reputable auto body shop can provide expert repairs and ensure a flawless finish.By following these steps and tips, you can successfully repair minor scrapes on your plastic bumper and restore your car's appearance. Remember to always prioritize safety and take your time to achieve the best possible results. With a little patience and effort, you can save money and gain a sense of satisfaction from doing the job yourself.