Repair Scuff On Plastic Bumper
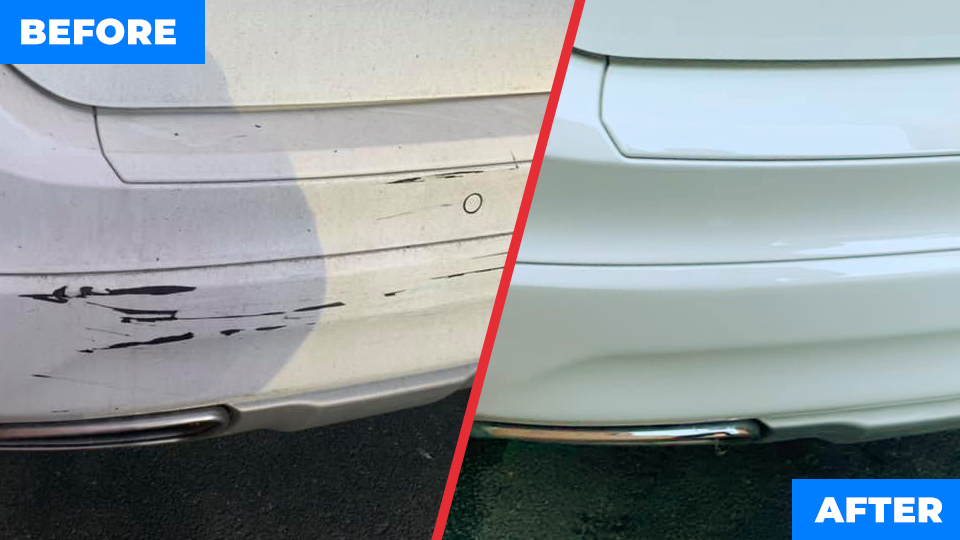
So, you've got a scuff on your plastic bumper. It's a common issue, and thankfully, usually something you can tackle in your garage. This guide will walk you through the process, assuming you've got some experience with basic auto repairs and aren't afraid to get your hands dirty. We'll cover everything from assessing the damage to applying the final coat of clear coat.
Assessment and Preparation
First things first, you need to accurately assess the damage. Is it just a surface scuff in the clear coat, or has it gone deeper, gouging into the plastic itself? Run your fingernail across the damaged area. If your nail catches, it's more than just a surface scuff. Deeper scratches require more aggressive repair techniques, like plastic welding or filler. This guide will focus primarily on surface scuffs and light scratches that haven't significantly deformed the plastic.
Next, clean the area thoroughly. Use a dedicated automotive wax and grease remover. Don't skimp on this step! Any remaining wax, silicone, or road grime will interfere with the adhesion of your repair materials, leading to a failed repair. Follow the manufacturer's instructions on the wax and grease remover. Typically, you'll spray it on, let it dwell for a short period, and then wipe it off with a clean, lint-free microfiber cloth. Repeat this process if necessary.
Now, mask off the surrounding area. Use painter's tape and newspaper or plastic sheeting to protect the undamaged paint. The key here is to create a smooth, clean line around the damaged area. Overlap the tape slightly onto the damaged area to ensure complete coverage. Don’t be stingy with the masking – overspray happens, and it’s much easier to protect than to correct.
Materials You'll Need:
- Automotive wax and grease remover
- Painter's tape
- Newspaper or plastic sheeting
- Sandpaper: 320 grit, 400 grit, 600 grit, 800 grit, 1000 grit, 1500 grit, 2000 grit
- Sanding block
- Water spray bottle
- Plastic filler (if needed for deeper scratches - we'll touch on this briefly)
- Primer (automotive grade)
- Color-matched automotive paint (spray can or spray gun system)
- Clear coat (automotive grade)
- Tack cloth
- Rubbing compound (automotive grade)
- Polishing compound (automotive grade)
- Microfiber cloths
- Optional: Heat gun (for plastic filler curing)
- Optional: Buffing machine (for final polishing)
Sanding and Surface Preparation
This is where the elbow grease comes in. Wet sanding is crucial for achieving a smooth, seamless repair. "Wet sanding" means using water as a lubricant while sanding to prevent the sandpaper from clogging and to produce a finer finish. Fill a spray bottle with clean water and keep the area wet throughout the sanding process.
Start with 320 grit sandpaper if there are deeper scratches. If it's just a light scuff, you might be able to skip this and go straight to 400 grit. The 320 grit is for leveling out imperfections. Wrap the sandpaper around a sanding block to ensure even pressure. Sand in a back-and-forth motion, keeping the sanding block flat against the bumper. Don't apply too much pressure; let the sandpaper do the work. Regularly rinse the area with water to remove sanding debris.
After the 320 grit, move on to 400 grit, then 600 grit, then 800 grit, then 1000 grit, then 1500 grit and finally 2000 grit sandpaper. Each time you switch to a finer grit, sand at a 90-degree angle to the previous grit's sanding direction. This will help you identify any remaining scratches from the coarser grit. The goal is to gradually refine the scratches until the surface is smooth and uniform. Remember to keep the area wet during sanding. You should aim to sand a slightly larger area than the original scuff; this will allow for better blending.
Pro Tip: Constantly check your work. After each grit, wipe the area dry with a clean microfiber cloth and inspect it under good lighting. Look for any remaining scratches or imperfections. If you see any, go back to the previous grit and sand them out. Patience is key!
Dealing with Deeper Scratches (Briefly)
If you have deeper scratches that the 320 grit sandpaper couldn't fully remove, you'll need to use plastic filler. Clean the sanded area with wax and grease remover again. Follow the manufacturer's instructions for mixing and applying the filler. Usually, you'll apply a thin layer of filler to the damaged area, slightly overfilling it. Let the filler cure completely. A heat gun can be used to speed up the curing process, but be careful not to overheat the plastic. Once cured, sand the filler down to match the surrounding surface, starting with 320 grit and working your way up through the finer grits as described above. Remember to feather the edges of the filler into the surrounding paint to create a smooth transition.
Priming, Painting, and Clear Coat
Once you're satisfied with the smoothness of the surface, it's time for primer. Clean the sanded area with a tack cloth to remove any remaining dust. Apply several light coats of automotive-grade primer, allowing each coat to dry according to the manufacturer's instructions. Light coats are better than one heavy coat, which can lead to runs and drips. After the primer has dried, lightly sand it with 800 grit sandpaper to smooth out any imperfections. Clean with a tack cloth again.
Next comes the color-matched automotive paint. This is where you'll want to use a spray can or a spray gun system. If using a spray can, shake it well for several minutes before spraying. Apply several light coats of paint, allowing each coat to dry according to the manufacturer's instructions. Again, light coats are key. Overlap each coat slightly to ensure even coverage. If using a spray gun, make sure your air pressure and paint flow are properly adjusted. Refer to your paint manufacturer's recommendations for optimal settings.
After the paint has dried completely, apply several coats of automotive-grade clear coat. This will protect the paint and give it a glossy finish. Follow the same procedure as with the paint: light coats, proper drying time, and overlapping each coat. The clear coat is crucial for blending the repair into the surrounding paint.
Final Polishing and Blending
Allow the clear coat to dry and cure completely, usually 24-48 hours, depending on the product and ambient temperature. Once cured, you can begin the final polishing process. This is where you'll blend the repaired area into the surrounding paint, making the repair virtually invisible.
Start with rubbing compound. Apply a small amount of rubbing compound to a clean microfiber cloth or a polishing pad if using a buffing machine. Rub the compound into the clear coat, using a circular motion. The goal is to remove any imperfections, such as orange peel or sanding scratches. If using a buffing machine, use a low speed and be careful not to overheat the paint. Overheating can damage the clear coat and cause it to peel.
After the rubbing compound, use polishing compound. This will further refine the surface and remove any swirl marks left by the rubbing compound. Apply the polishing compound in the same manner as the rubbing compound, using a clean microfiber cloth or polishing pad. If using a buffing machine, use a medium speed.
Finally, wipe the area down with a clean microfiber cloth to remove any remaining polishing compound. Apply a coat of wax or sealant to protect the paint and enhance the shine. This will also help to blend the repaired area into the surrounding paint.
Remove the masking tape carefully. Inspect your work one last time. If you’re not satisfied, you can always go back and repeat any of the steps above. Remember, the key to a successful repair is patience and attention to detail. Good luck!