Scratch Plastic Bumper Repair
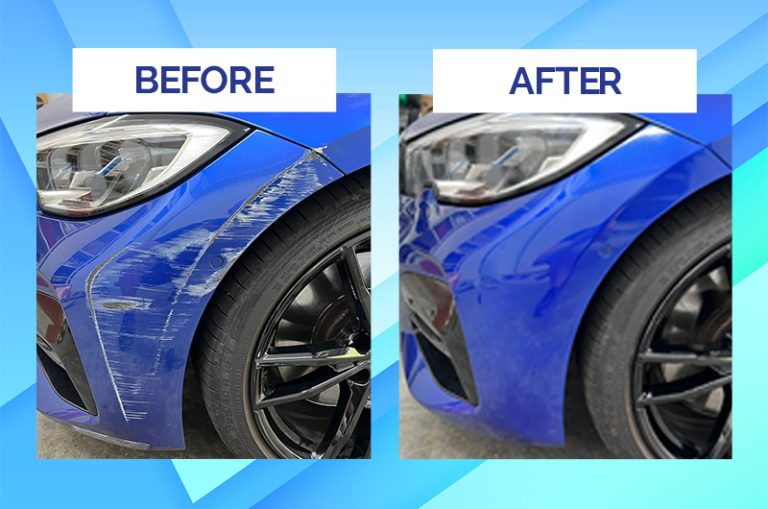
Plastic bumpers are a common feature on modern vehicles, designed to absorb low-speed impacts and protect the car's frame. However, their exposed location makes them susceptible to scratches, scuffs, and other minor damage. This article provides practical advice for car owners and mechanics on repairing scratched plastic bumpers, focusing on maintenance, troubleshooting, and real-world issues.
Understanding Plastic Bumper Damage
Before diving into repairs, it's crucial to understand the different types of scratches and the extent of the damage. This will determine the appropriate repair method and whether professional help is needed.
Types of Scratches:
- Surface Scratches: These are the most common type, affecting only the clear coat or paint layer. They often appear as light, hazy marks. A simple polish can usually remove them.
- Medium Scratches: These penetrate the paint layer and reach the plastic substrate. They are more visible and require more involved repair techniques.
- Deep Scratches: These are the most severe, gouging into the plastic itself. They may require filling and sanding before painting.
Problem: You notice a light scratch on the bumper after a minor parking incident.
Cause: Likely a surface scratch caused by contact with another object, such as a shopping cart or another car's bumper.
Solution: Try using a scratch removal compound and a microfiber cloth. Apply the compound to the scratch and gently rub in a circular motion. Buff off the excess with a clean microfiber cloth. If the scratch is still visible, you might need a slightly more abrasive compound or consider professional detailing.
DIY Scratch Repair: Step-by-Step Guide
For minor to medium scratches, a DIY repair can save you money. Here's a step-by-step guide:
- Cleaning: Thoroughly clean the affected area with soap and water to remove dirt, grime, and wax. Use a degreaser for stubborn residue. Proper cleaning is essential for optimal adhesion and a flawless finish.
- Sanding (if necessary): For medium scratches, gently sand the area with fine-grit sandpaper (e.g., 1500-grit or 2000-grit). Wet sanding is recommended to prevent clogging and create a smoother surface. Remember to feather the edges of the scratch.
- Filling (for deep scratches): If the scratch is deep, use a plastic filler designed for automotive use. Apply the filler in thin layers, allowing each layer to dry completely before applying the next. Overfill slightly to allow for sanding.
- Sanding (after filling): Once the filler is dry, sand it down to match the surrounding surface. Start with a coarser grit sandpaper (e.g., 400-grit) and gradually move to finer grits (e.g., 800-grit, 1500-grit) to achieve a smooth, seamless transition.
- Priming: Apply a thin, even coat of automotive primer to the repaired area. This will provide a smooth surface for the paint to adhere to. Allow the primer to dry completely before proceeding.
- Painting: Use automotive touch-up paint that matches your car's color code. Apply several thin coats, allowing each coat to dry completely before applying the next. Avoid applying too much paint at once, as this can lead to runs and drips.
- Clear Coating: Apply a clear coat to protect the paint and provide a glossy finish. Apply several thin coats, allowing each coat to dry completely.
- Polishing: Once the clear coat is dry, use a polishing compound to remove any imperfections and enhance the shine.
- Waxing: Apply a coat of wax to protect the repaired area and enhance its appearance.
Example: A 2018 Honda Civic has a medium scratch on its rear bumper. The process would involve cleaning, sanding with 1500-grit sandpaper, priming, applying touch-up paint matching the Civic's paint code (e.g., NH731P - Crystal Black Pearl), clear coating, polishing, and waxing.
Troubleshooting Common Issues
Even with careful preparation, problems can arise during the repair process. Here are some common issues and their solutions:
- Paint Doesn't Match: This is a common problem. Ensure you're using the correct paint code for your vehicle. Color variations can occur due to fading and environmental factors. Consider blending the new paint into the surrounding area for a more seamless match. Professional paint matching services are also available.
- Paint Runs or Drips: Avoid applying too much paint at once. Apply thin, even coats and allow each coat to dry completely before applying the next. If runs or drips occur, sand them down with fine-grit sandpaper and reapply the paint.
- Filler Cracks or Shrinks: Use a high-quality plastic filler specifically designed for automotive use. Apply the filler in thin layers and allow each layer to dry completely before applying the next. Ensure the surface is properly prepared before applying the filler.
- Primer or Paint Peels: This usually indicates poor adhesion. Ensure the surface is properly cleaned and sanded before applying primer or paint. Use a quality primer and follow the manufacturer's instructions carefully.
- Uneven Surface After Sanding: Use a sanding block to maintain a flat surface. Start with a coarser grit sandpaper and gradually move to finer grits. Feather the edges of the repaired area to blend it with the surrounding surface.
Problem: After painting, you notice the color doesn't quite match the rest of the bumper.
Cause: Paint fading, slight variations in paint formulation, or incorrect paint code.
Solution: Consider blending the new paint into the surrounding area. This involves lightly sanding the edges of the repaired area and gradually applying the new paint, fading it into the existing paint. Alternatively, have the paint professionally matched at an automotive paint supplier.
Real-World Examples and Challenges
Repairing plastic bumpers can present unique challenges depending on the vehicle and the type of damage.
Example 1: Textured Bumpers (e.g., بعض trucks and SUVs): Repairing scratches on textured bumpers can be difficult because it's hard to replicate the original texture. Special texture coatings are available, but achieving a perfect match requires skill and experience. Sometimes, replacing the entire bumper is the best option.
Example 2: Bumper Covers with Integrated Sensors (e.g., newer Tesla models): Repairing bumpers with integrated parking sensors or cameras requires extra caution. Disconnecting and reconnecting these sensors can be complex, and improper handling can damage them. It's often best to have these repairs done by a professional.
Example 3: Severe Damage from Collisions: If the bumper is cracked, torn, or significantly deformed, a DIY repair is unlikely to be successful. These types of repairs require specialized tools and techniques, such as plastic welding and heat forming. Professional body shops are equipped to handle these types of repairs.
Problem: You have a deep scratch on the textured bumper of a Ford F-150.
Cause: Impact from a rock or other debris while driving off-road.
Solution: Repairing the texture is difficult. You could attempt to fill the scratch, sand it smooth, and apply a texture coating. However, achieving a seamless match is challenging. Consider replacing the entire bumper cover for a guaranteed perfect finish.
Maintenance Tips for Preventing Scratches
Prevention is always better than cure. Here are some tips for minimizing scratches on your plastic bumpers:
- Park carefully: Avoid parking too close to other vehicles or objects. Use parking sensors and cameras if your car is equipped with them.
- Wash your car regularly: Regularly washing your car removes dirt and grime that can scratch the paint.
- Apply wax: Waxing your car creates a protective layer that helps to prevent scratches.
- Use a bumper protector: Consider installing a bumper protector, especially if you frequently park in tight spaces.
- Avoid harsh chemicals: Avoid using harsh chemicals or abrasive cleaners on your bumper, as they can damage the paint and plastic.
When to Seek Professional Help
While DIY repairs can be effective for minor scratches, there are situations where professional help is necessary:
- Deep or extensive damage: If the scratch is deep or covers a large area, a professional repair will likely yield better results.
- Structural damage: If the bumper is cracked, torn, or deformed, it may require professional repair or replacement.
- Integrated sensors or cameras: If the bumper has integrated sensors or cameras, it's best to have the repairs done by a professional to avoid damaging these components.
- You're not comfortable doing the repair yourself: If you're not comfortable with the DIY process, it's always best to seek professional help.
Keeping Your Car in Top Condition
Maintaining your car's appearance is essential for preserving its value and preventing further damage. Regular washing, waxing, and detailing can help to keep your car looking its best. Address scratches and other minor damage promptly to prevent them from worsening. By following these tips, you can keep your car in top condition for years to come. Remember, a well-maintained car not only looks good but also performs better and lasts longer.
In conclusion, repairing scratched plastic bumpers can be a manageable task with the right knowledge and tools. However, understanding the extent of the damage, choosing the appropriate repair method, and knowing when to seek professional help are crucial for achieving optimal results. Regular maintenance and preventative measures can also significantly reduce the likelihood of future scratches and damage.