Thule Roof Bars Fitting Guide
Thule Roof Bars Fitting Guide: A Comprehensive Overview for Automotive Enthusiasts
Securing extra cargo space for your vehicle often begins with a solid foundation: a reliable set of roof bars. Thule, a renowned name in cargo management solutions, offers a diverse range of roof bar systems designed to fit various vehicle makes and models. This guide provides a detailed walkthrough of the fitting process, catering to both DIY enthusiasts and seasoned professionals.
Understanding Thule Roof Bar Systems
Thule roof bar systems typically consist of three main components: the roof bars themselves (the load-bearing crossbars), the foot packs (the mechanisms that attach the bars to the vehicle's roof), and the fitting kits (vehicle-specific adapters that ensure a secure and custom fit). Before commencing installation, it is crucial to identify the correct parts for your specific vehicle. Thule's online fit guide or a reputable retailer can assist in this process.
Essential Tools and Preparation
Proper preparation is key to a successful installation. Gather the following tools before starting:
- Torque wrench: Essential for tightening fasteners to the specified torque.
- Socket set: Containing various sizes to accommodate different bolt and nut heads.
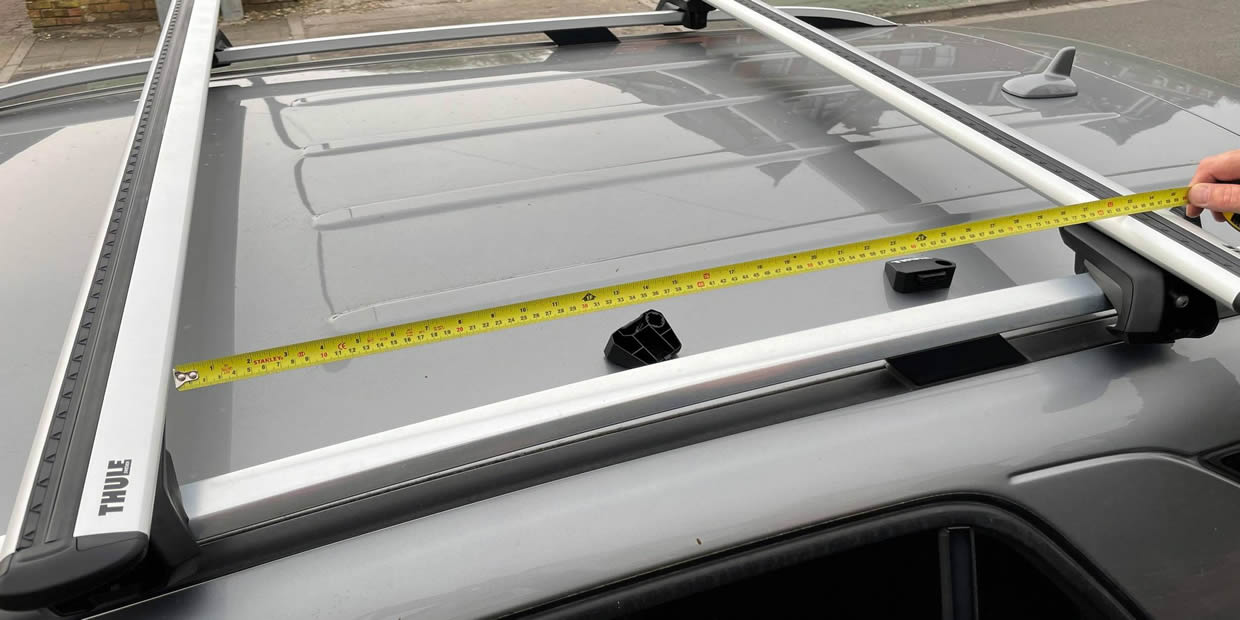
- Measuring tape: For precise positioning of the roof bars.
- Screwdrivers: Both Phillips head and flathead, depending on the fitting kit.
- Soft cloth or protective tape: To prevent scratches on the vehicle's paintwork.
- Installation manual: The most important resource for your specific kit.
Ensure the vehicle's roof is clean and free of any debris. This will prevent scratching and ensure a secure grip for the foot packs.
Step-by-Step Installation Process
While the specific steps may vary slightly depending on the vehicle and Thule system, the following provides a general overview of the installation process:
1. Assembling the Foot Packs and Fitting Kits
Begin by assembling the foot packs and fitting kits according to the instructions provided in the installation manual. This often involves attaching vehicle-specific brackets or pads to the foot packs. Pay close attention to the orientation and placement of these components, as incorrect assembly can lead to an insecure fit. For example, some fitting kits use a rubber pad that contours to the vehicle's roofline; ensuring the correct pad is used for the specific location is crucial.
2. Attaching the Foot Packs to the Roof Bars
Slide the assembled foot packs onto the roof bars. Most Thule systems utilize a T-track system, where the foot packs slide along a channel in the roof bar. Ensure the foot packs are positioned correctly according to the measurements specified in the installation manual. These measurements are critical for distributing the load evenly and preventing damage to the vehicle's roof.
3. Positioning the Roof Bars on the Vehicle
Carefully lift the assembled roof bars and position them on the vehicle's roof. Align the foot packs with the designated mounting points, which may be pre-existing mounting points, door frames, or specific locations along the roofline. Refer to the installation manual for precise positioning instructions. Use a measuring tape to ensure the bars are equidistant from the front and rear of the vehicle.
4. Securing the Foot Packs
Once the roof bars are properly positioned, begin securing the foot packs to the vehicle. This typically involves tightening bolts or clamps that attach the foot packs to the mounting points or door frames. Use a torque wrench to tighten the fasteners to the specified torque. Overtightening can damage the vehicle's roof, while undertightening can result in an insecure fit. For example, a common torque specification for Thule roof bar systems is 8-10 Nm. Always consult the installation manual for the correct torque value.
5. Final Adjustments and Tightening
After securing all the foot packs, double-check the positioning of the roof bars and make any necessary adjustments. Ensure the bars are level and aligned correctly. Once satisfied, re-tighten all the fasteners to the specified torque. It is also advisable to periodically check the tightness of the fasteners after the first few uses, as they may loosen slightly due to vibrations.
Specific Installation Scenarios
Different vehicles and roof types require slightly different installation techniques. Here are a few common scenarios:
Vehicles with Raised Side Rails
For vehicles with raised side rails, the foot packs typically clamp directly onto the rails. Ensure the clamps are securely tightened and that the foot packs are properly aligned with the rails. Some Thule systems offer adjustable clamps to accommodate different rail sizes.
Vehicles with Fixed Mounting Points
Some vehicles have fixed mounting points on the roof. These points provide a secure and predetermined location for attaching the roof bars. The fitting kits for these vehicles are designed to interface directly with the fixed mounting points. Ensure the fitting kit is compatible with the specific mounting point configuration of your vehicle.
Vehicles with Bare Roofs
Vehicles with bare roofs require a more complex fitting kit that typically attaches to the door frames. These kits often include rubber pads to protect the paintwork and clamps that grip the inner edge of the door frame. Ensure the clamps are properly positioned and tightened to prevent damage to the door frames. Pay special attention to the instructions regarding the proper clamping force, as overtightening can deform the door frame.
Troubleshooting Common Issues
Even with careful planning and execution, you may encounter some common issues during the installation process:
- Difficulty tightening fasteners: Ensure you are using the correct size socket and that the torque wrench is properly calibrated. If the fasteners are corroded, apply a penetrating oil before attempting to tighten them.
- Roof bars not sitting level: Check the positioning of the foot packs and ensure they are properly aligned with the mounting points or door frames. Adjust the foot packs as needed to achieve a level installation.
- Rattling or wind noise: This can be caused by loose fasteners or improperly installed foot packs. Double-check all the connections and ensure they are securely tightened. Some Thule systems include wind fairings to reduce wind noise.
Maintenance and Care
To ensure the longevity and reliability of your Thule roof bars, it is important to perform regular maintenance. Periodically inspect the foot packs and roof bars for any signs of damage or corrosion. Clean the roof bars with soap and water to remove any dirt or debris. Lubricate the moving parts of the foot packs with a silicone-based lubricant to prevent corrosion and ensure smooth operation. Always store the roof bars in a dry and protected location when not in use.
Safety Considerations
Safety is paramount when using roof bars. Always adhere to the following safety precautions:
- Never exceed the maximum load capacity of the roof bars. This information is typically printed on the roof bars themselves or in the installation manual.
- Distribute the load evenly across the roof bars. Avoid concentrating the load in one area.
- Secure all cargo properly. Use straps or ropes to tie down the cargo to the roof bars.
- Check the tightness of the fasteners periodically. Vibrations can cause the fasteners to loosen over time.
- Be aware of the increased height of your vehicle. This is especially important when driving under bridges or through tunnels.
By following these guidelines, you can safely and effectively install and maintain your Thule roof bars, ensuring years of reliable service. Remember to always consult the installation manual for your specific vehicle and Thule system. Consulting with a professional installer is also a viable option if you are unsure about any aspect of the installation process. Safe travels!