Torque Spec Lower Ball Joint
Hey there, fellow car enthusiasts! Having some trouble with a clunking noise in your front end, or maybe your steering feels a little loose? It could very well be your lower ball joints, and if you're replacing them yourself, or even just want to understand the repair better, torque specs are absolutely critical.
In this article, we'll dive into why the torque spec for your lower ball joint is so important, what happens if you get it wrong, and provide some practical advice to help you get the job done right. Think of me as your friendly service advisor, here to guide you through the process.
The Importance of Proper Lower Ball Joint Torque
Let's get right to the heart of the matter: Why is hitting that exact torque specification so darn important? Well, it boils down to the integrity of the connection and the overall safety and handling of your vehicle.
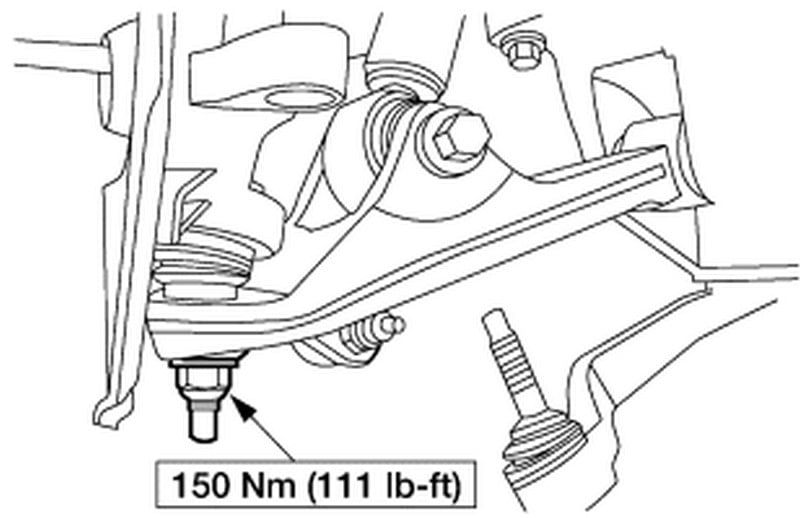
The lower ball joint connects your lower control arm to the steering knuckle or spindle. It's a critical component in your suspension, allowing the wheel to pivot for steering while also supporting the weight of the vehicle. A properly torqued ball joint ensures a secure and stable connection that can withstand the stresses of driving, including bumps, turns, and braking.
Think of it like this: overtightening or undertightening any bolt can cause issues. But it's much more serious when it involves a component that directly impacts steering and handling.
Consequences of Incorrect Torque
So, what happens if you don't get the torque just right?
Undertightening: A Recipe for Disaster
If you undertighten the ball joint, you're leaving the connection loose. This can lead to a number of problems:
- Premature Wear and Tear: A loose ball joint will experience excessive movement and vibration, causing it to wear out much faster than it should.
- Clunking Noises: That annoying clunking or rattling sound you hear when going over bumps is often a telltale sign of a loose ball joint.
- Steering Instability: A loose ball joint can cause your steering to feel vague, wander, or even exhibit play. This can make it difficult to maintain control of the vehicle, especially at higher speeds.
- Component Failure: In the worst-case scenario, an undertightened ball joint can completely separate, leading to a catastrophic suspension failure. This can result in a loss of control and a serious accident.
Overtightening: Just as Bad (or Worse!)
While it might seem like "tighter is better," overtightening a ball joint can be just as damaging:
- Stripped Threads: Overtightening can strip the threads on the bolt or in the ball joint housing, rendering the connection useless. You'll likely need to replace the ball joint *and* the component it threads into (like the control arm) if this happens.
- Deformed Components: Excessive torque can deform the ball joint housing or the surrounding components, leading to premature wear and potential failure.
- Weakened Metal: Overtightening can stretch the bolt beyond its yield strength, weakening it and making it more susceptible to failure.
As you can see, both undertightening and overtightening can have serious consequences. That's why adhering to the manufacturer's recommended torque specification is so crucial.
Finding the Right Torque Specification
Okay, so you know why torque matters. The next step is finding the correct torque specification for your specific vehicle.
Here are the most reliable sources:
- Vehicle Repair Manual: Your vehicle's repair manual (like a Haynes or Chilton manual) is the *best* source for torque specifications. These manuals are specific to your make, model, and year, and they provide detailed information on virtually every component of your car.
- Factory Service Manual: If you want the *absolute* most accurate information, go for a factory service manual. These are the same manuals used by professional mechanics at dealerships. They can be more expensive and harder to find, but they're worth it if you're serious about DIY repairs.
- Online Databases: Many reputable websites and online databases offer torque specifications for various vehicles. However, be careful when using these resources, as the information may not always be accurate or up-to-date. Always double-check the information against another reliable source. Look for sites like AlldataDIY or Mitchell1DIY.
Important Note: Never rely on generic torque specifications or "rules of thumb." Torque specifications vary depending on the size, material, and application of the fastener. Always consult a reliable source specific to your vehicle.
Tools and Materials You'll Need
Before you start wrenching, make sure you have the right tools and materials on hand:
- Torque Wrench: This is the most important tool for this job. You'll need a torque wrench that can accurately measure the required torque specification. There are two main types: click-type and beam-type. Click-type wrenches are generally more accurate and easier to use, as they "click" when you reach the set torque.
- Socket Set: You'll need a socket set with the appropriate sizes for the ball joint fasteners. Make sure you have both standard and deep sockets available.
- Wrenches: You may also need a set of wrenches for holding the ball joint in place while you tighten the nut or bolt.
- Jack and Jack Stands: You'll need a jack to lift the vehicle and jack stands to support it safely. Never work under a vehicle supported only by a jack.
- Penetrating Oil: Apply penetrating oil to the fasteners before you start to help loosen them.
- Gloves and Safety Glasses: Protect your hands and eyes from debris and chemicals.
- New Cotter Pin (if applicable): Many ball joints use a cotter pin to secure the nut. Always replace the cotter pin with a new one.
Step-by-Step Torqueing Procedure
Once you've replaced the ball joint, here's how to properly torque it:
- Clean the Threads: Before installing the new ball joint, clean the threads on both the bolt/nut and the ball joint housing. This will ensure accurate torque readings.
- Install the Ball Joint: Install the new ball joint according to the manufacturer's instructions. Make sure everything is properly aligned.
- Snug the Fasteners: Before torquing, snug the fasteners down by hand or with a wrench. This will ensure that the ball joint is properly seated.
- Set the Torque Wrench: Set your torque wrench to the manufacturer's specified torque. Double-check the units (ft-lbs or Nm).
- Torque in Stages (if required): Some manufacturers recommend torquing the ball joint in stages. For example, you might first torque it to half the specified torque, and then torque it to the full value.
- Torque Smoothly and Slowly: Apply torque smoothly and slowly. Avoid jerking or rushing the process.
- Listen for the Click (if using a click-type wrench): If you're using a click-type torque wrench, listen for the "click" that indicates you've reached the set torque.
- Verify the Torque: After torquing the ball joint, double-check the torque specification and make sure you're satisfied with the result. If in doubt, loosen the fastener and re-torque it.
- Install Cotter Pin (if applicable): If the ball joint uses a cotter pin, install a new cotter pin to secure the nut. Bend the ends of the cotter pin to prevent it from falling out.
When to Seek Professional Help
While replacing a lower ball joint can be a DIY project, it's important to know when to seek professional help. If you're not comfortable working on your vehicle's suspension, or if you encounter any problems during the repair, it's best to take it to a qualified mechanic. This is especially true if:
- You're not comfortable using a torque wrench.
- You're having trouble removing the old ball joint.
- You're unsure about the correct torque specification.
- You suspect that other suspension components may be damaged.
A professional mechanic has the experience, tools, and knowledge to properly diagnose and repair your vehicle's suspension. They can also ensure that the repair is done safely and correctly.
Approximate Repair Costs
If you decide to take your vehicle to a mechanic, the cost of replacing a lower ball joint can vary depending on the make and model of your car, as well as the labor rates in your area. Generally, you can expect to pay between $200 and $500 per ball joint, including parts and labor. Keep in mind this is a rough estimate. Some vehicles are easier to service than others. Luxury vehicles, or vehicles where accessing the ball joint is difficult, tend to cost more. Always get a written estimate from your mechanic before authorizing any repairs.
Final Thoughts
Replacing a lower ball joint can be a challenging but rewarding DIY project. By understanding the importance of proper torque specifications and following the steps outlined in this article, you can ensure that the job is done safely and correctly. Remember to always consult your vehicle's repair manual for the correct torque specification and to seek professional help if you're not comfortable with the repair. Drive safely!