Turn Signal Flashing Fast Led
So, you've swapped out your old incandescent turn signal bulbs for some snazzy new LEDs, and now your turn signals are flashing at what seems like warp speed. You're not alone! This is a very common issue, and understanding why it happens, and more importantly, how to fix it, will save you a lot of frustration. We're going to dive deep into the technical reasons behind this "hyper-flashing" problem and give you several solutions you can tackle yourself.
The Root Cause: Resistance and the Flasher Relay
The key to understanding why LEDs cause hyper-flashing lies in the concept of electrical resistance. Incandescent bulbs, the kind your car was originally designed for, draw a significant amount of current. This current draw creates a certain level of resistance in the circuit. Your car's flasher relay, or flasher unit, is designed to operate based on that specific resistance. It monitors the current flow in the turn signal circuit.
Think of the flasher relay as a gatekeeper. It's designed to open and close (turn the lights on and off) at a specific rate when it detects the correct amount of current flowing through the circuit. If a bulb burns out, the resistance increases (because the circuit is now incomplete, or has infinite resistance at the bulb location), and the relay typically responds by flashing faster, alerting you to the problem. This is a built-in safety feature.
LEDs, on the other hand, are far more efficient than incandescent bulbs. They consume significantly less power, and therefore draw significantly less current. This means they offer far less resistance to the circuit. The flasher relay, designed for the higher resistance of incandescent bulbs, now sees a much lower resistance. It interprets this low resistance as a burnt-out bulb (or a partially shorted circuit that also lowers resistance) and kicks into hyper-flashing mode.
To put it simply: the flasher relay thinks one of your bulbs is out because the LEDs aren't drawing enough power to satisfy its resistance requirements. It's a case of mistaken identity, caused by the LED's superior energy efficiency.
Understanding the Flasher Relay Types
There are two primary types of flasher relays you might encounter:
- Thermal Flashers: These are older, simpler relays that rely on a bimetallic strip that heats up due to the current flow. When heated, the strip bends and breaks the circuit, turning the lights off. As it cools, it bends back, completing the circuit and turning the lights on again. The rate of flashing is directly related to the amount of current flowing. Because LEDs draw less current, the strip doesn't heat up enough to cycle at the correct rate, leading to hyper-flashing.
- Electronic Flashers: These relays use electronic components, such as integrated circuits (ICs), to control the flashing rate. Some electronic flashers are load-dependent, meaning they are still sensitive to the amount of current flowing through the circuit. Other electronic flashers are load-independent, meaning they flash at a consistent rate regardless of the load. These are the best option when switching to LEDs, but even some electronic units might still be sensitive to the reduced load of LEDs.
Solutions to Hyper-Flashing
Now that we understand the cause of the problem, let's explore the solutions. There are two main approaches:
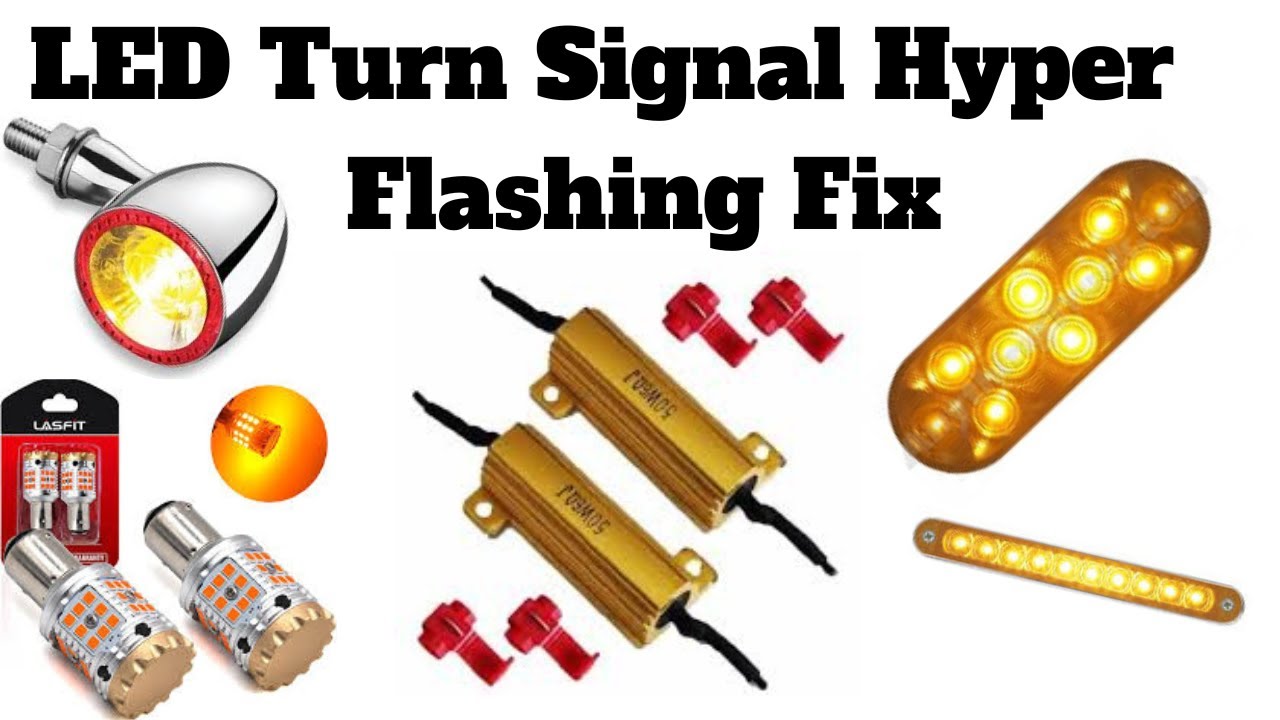
1. Load Resistors (The "Old School" Approach)
The most common and straightforward solution is to install load resistors in parallel with the LED turn signal bulbs. A load resistor is essentially a resistor that mimics the electrical load of an incandescent bulb. By adding a load resistor, you effectively increase the overall current draw of the circuit, bringing it back within the operating range of the flasher relay. This tricks the relay into thinking that incandescent bulbs are still installed.
How to Install Load Resistors:
- Choose the Correct Resistor Value: The most common resistor value used for turn signals is a 6-ohm, 50-watt resistor. However, you may need to experiment with different values depending on the specific LEDs and your car's electrical system. Some cars may require 3 or 6 ohm resistors, sometimes even less.
- Identify the Turn Signal Wires: Locate the positive and negative wires for the turn signal bulb at the bulb socket. Use a multimeter to confirm which wire is positive and which is negative when the turn signal is activated.
- Connect the Resistor in Parallel: Connect one end of the resistor to the positive wire and the other end to the negative wire. Important: Load resistors get very hot during operation. Mount them securely to a metal surface (like the car's body) to act as a heat sink and prevent them from melting any nearby plastic or wires. Failure to do this is a fire hazard!
- Test the Turn Signals: After installing the resistors, test the turn signals to ensure they are flashing at the correct rate.
Pros of Load Resistors:
- Relatively inexpensive.
- Easy to install (if you're comfortable working with basic wiring).
Cons of Load Resistors:
- Inefficient: They waste energy by converting electrical energy into heat. This defeats one of the primary benefits of switching to LEDs (energy efficiency).
- Get very hot: As mentioned earlier, this is a fire hazard if not properly mounted.
- Can be bulky and difficult to conceal.
- May require splicing into the factory wiring harness.
2. LED-Compatible Flasher Relay (The "Modern" Solution)
A more elegant and efficient solution is to replace the original flasher relay with an LED-compatible flasher relay. These relays are specifically designed to work with the low current draw of LEDs. They are typically load-independent, meaning they will flash at the correct rate regardless of whether you're using incandescent bulbs, LEDs, or a combination of both. Some are designed to simply plug and play, and others might require minor wiring changes.
How to Install an LED-Compatible Flasher Relay:
- Locate the Flasher Relay: The location of the flasher relay varies depending on the make and model of your car. It's often located in the fuse box, under the dashboard, or behind the glove compartment. Consult your car's owner's manual for the exact location.
- Remove the Old Flasher Relay: Disconnect the old flasher relay from its socket.
- Install the New Flasher Relay: Plug the new LED-compatible flasher relay into the socket. Ensure it's securely connected. Some universal flasher relays might require some wire splicing to match the car's socket if they are not direct plug and play. Make sure you understand the pinout of both the car and the relay you purchased.
- Test the Turn Signals: Test the turn signals to ensure they are flashing at the correct rate.
Pros of LED-Compatible Flasher Relays:
- More efficient than load resistors: They don't waste energy.
- Don't get hot.
- Often a cleaner and more professional-looking solution.
- No need to splice into the factory wiring harness (if you find a direct plug-and-play model).
Cons of LED-Compatible Flasher Relays:
- Can be more expensive than load resistors.
- May be more difficult to find the correct relay for your specific car model.
Troubleshooting and Advanced Considerations
Even with load resistors or an LED-compatible flasher relay, you might still encounter problems. Here are a few things to check:
- Incorrect Resistor Value: If you're using load resistors, double-check that you've selected the correct resistor value. Too high of a resistance value will not draw enough current and hyper-flashing can still occur.
- Faulty Load Resistor: Load resistors can fail over time, especially if they are not properly mounted and get too hot. Test the resistor with a multimeter to ensure it's still working correctly.
- Poor Wiring Connections: Ensure all wiring connections are clean, secure, and properly insulated. Loose or corroded connections can cause resistance and lead to hyper-flashing.
- Grounding Issues: A poor ground connection can also cause problems. Make sure the load resistors (if used) are properly grounded to a clean, unpainted metal surface.
- Can-Bus System: Some newer vehicles have a Controller Area Network (CAN bus) system that monitors the operation of various electrical components, including the turn signals. These systems may require more sophisticated solutions, such as CAN bus-compatible LED bulbs or specialized CAN bus-compatible flasher relays. These products typically have built in resistors and will communicate with the car's computer system to prevent hyper flashing or error codes.
- Incorrect LED Bulb Type: Ensure the LED bulbs you are using are compatible with your vehicle's electrical system. Some LEDs are designed for specific voltage ranges or polarity.
By understanding the underlying principles and following these troubleshooting steps, you should be able to resolve the hyper-flashing issue and enjoy the benefits of your new LED turn signals.
Disclaimer: Always consult your car's owner's manual and follow proper safety precautions when working with electrical systems. If you are not comfortable performing these modifications yourself, it is best to seek the assistance of a qualified mechanic.